Power / EV Chargers
User Manual for Easee One Home Charger
Comprehensive user and installation guide for the Easee One home EV charger. Includes safety instructions, wiring diagrams, installation steps, and troubleshooting for the 10500B model.
Table of contents
Manual images
Click an image to enlargeQuick guide from the manual
The Easee One is a 1-phase EV charger designed specifically for UK installations, including support for TN-S-C systems with missing PEN conductor detection. Important: This product must be installed, repaired, or serviced exclusively by an authorised electrician. All local, regional, and national electrical regulations must be followed. The charger is intended for charging electric vehicles with non-gassing batteries using a Type 2 charging cable.
Product overview
The system consists of three main components:
- Front cover: Protects the internal electronics.
- Chargeberry: The core unit containing the charging electronics.
- Backplate: The mounting base for attaching and connecting to the infrastructure.
The device features a touch button for configuration, a light strip for status communication, an RFID reader for access control, and a universal Type 2 socket.
Safety instructions
Observe these critical safety rules:
- Never make changes to components, software, or cables.
- Do not install near explosive atmospheres or flowing water.
- The charger must be installed on a wall or structure with sufficient load-bearing capacity that covers the entire back side of the product.
- Never clean with high-pressure water or running water.
- Do not use extension cords or adapters.
- Always pull the plug handle, not the cable, when disconnecting.
Installation
Installation must be performed by an authorised electrician. The process involves:
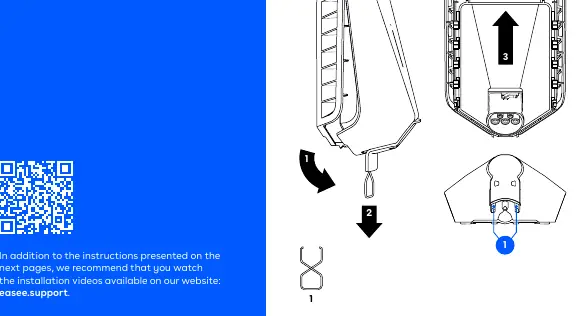
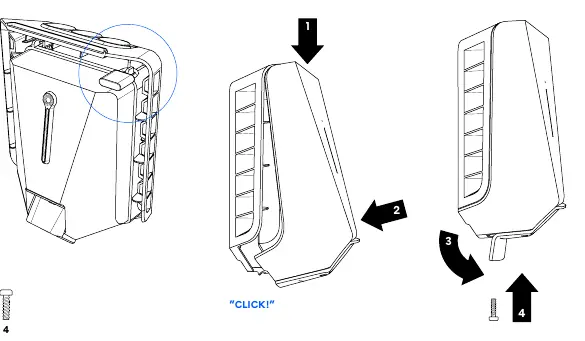
- Opening: Use the supplied tool to release the front cover and disconnect the Chargeberry.
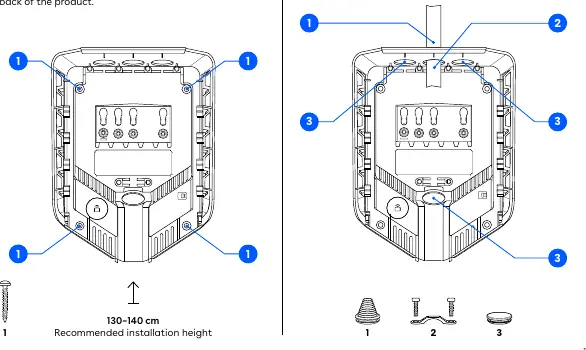
- Mounting: Fix the backplate to the wall using the 4 provided screws. Ensure the recommended installation height of 130–140 cm.
- Preparing: Insert the cable through one of the 4 entries and secure it with the strain relief. Close unused entries with blind plugs.
- Wiring: Strip wires by 12 mm. Tighten terminals to 5 Nm. Follow the specific wiring diagrams for TT/TN-S or TN-C-S (PME) networks. Never connect Earth to both PE and PEN terminals.
- Installing: Use the Easee Installer App to configure the site.
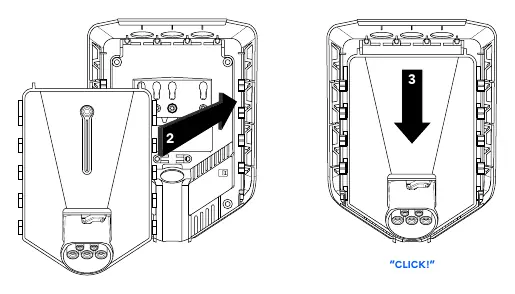
- Attaching: Position the Chargeberry in the backplate and press down until it clicks.
- Closing: Hang the front cover, press until it clicks, and secure with the locking screw.
Daily use and operation
Before charging, ensure the charger is configured and the software is up to date. To charge, connect the cable to the charger and the vehicle. If access control is enabled, unlock the charger using an RFID tag or the Easee App. The charging process starts and adapts automatically to the vehicle and available energy.
Troubleshooting
The light strip indicates the charger status:
- White (constant): Standby or car connected.
- White (pulsating): Charging in progress.
- Blue (constant/pulsating): Smart charging enabled/in progress.
- Red (constant): General error. Unplug and replug the cable.
- Red (constant + warning sounds): Broken PEN lead or incorrect wiring. Consult an electrician.
- Red (pulsating): Abnormal temperature/safe mode.
- Yellow (flashing): Waiting to be configured.
Maintenance
The product requires no regular cleaning. If cleaning is necessary for cosmetic reasons, use a damp cloth and mild household cleaner. Avoid strong chemicals, oil, or alcohol. Visually inspect the Type 2 socket for wear and tear at regular intervals.
Manufacturer information
Easee
Practical help
Common problems
Red light constant
General error. Unplug the charging cable and replug it to the Charging Robot.
Red light with warning sounds
Broken PEN lead detected or wires are connected incorrectly. Consult an authorised electrician.
Red pulsating light
The Charging Robot has measured an abnormal temperature and has entered safe mode.
Yellow flashing light
The Charging Robot is waiting to be configured. Consult an authorised electrician.
Before use
- Ensure the charger is installed by an authorised electrician.
- Check the charging cable and connector for damage or impurities.
- Ensure the charger is properly configured.
- Verify the software is up to date.
- Unlock the charger using an RFID tag or the Easee App if access control is enabled.
Specs in practice
- Charging power
- 1.4–7.4 kW (6 A – 32 A) depending on configuration.
- Connection point
- Type 2 socket (IEC 62196-2).
- Installation network
- Supports TT, TN-S, TN-C, and TN-C-S.
Images and diagrams
- Opening: Use the supplied tool to release the front cover.
- Wiring: Connect wires to the backplate terminals (PE, N, L1, PEN) according to the network type.
- Attaching: Align the Chargeberry with the backplate slots and press down until it clicks.
Model compatibility
- Specifically designed for 1-phase installations in the UK.
- Requires charging cable according to IEC 62196.
- Supports up to 3 units per circuit with load balancing.

Manual page author
Michael Turner
Technical manual editor
Reviews PDF manuals for structure, safety notes, and practical product details so readers can find the right information quickly.