Computers / Laptops
User Manual for Dell Inspiron 15 3520 Laptop
Comprehensive setup guide and technical specifications for the Dell Inspiron 15 3520 laptop. Includes hardware details, port layouts, keyboard shortcuts, and support resources.
Table of contents
Manual images
Click an image to enlargeQuick Start
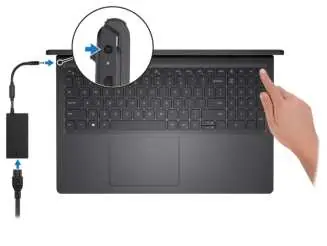
To set up your Dell Inspiron 15 3520, connect the power adapter to the laptop and a power outlet. Press the power button to turn on the computer. Follow the on-screen instructions to complete the operating system setup (Windows or Ubuntu). If connecting to a secured wireless network, have your password ready. On the Support and Protection screen, enter your contact details to finalize the configuration.
Device Views
The laptop features various ports and components for connectivity and interaction:
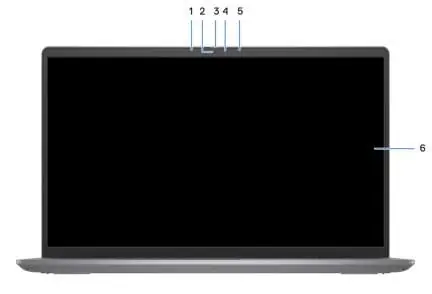
- Front: Includes the camera, privacy shutter (optional), status light, and microphones.
- Right: Features an SD-card slot, USB 2.0 port, and a headset port.
- Left: Contains the power-adapter port, power/battery status light, HDMI 1.4 port, and USB 3.2 Gen 1 ports (with optional Type-C/DisplayPort support).
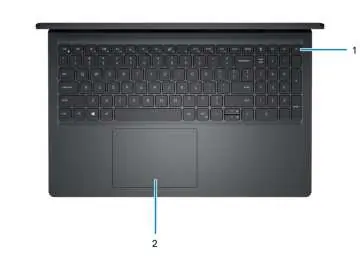
- Top: Houses the keyboard, touchpad, and power button (with optional fingerprint reader).
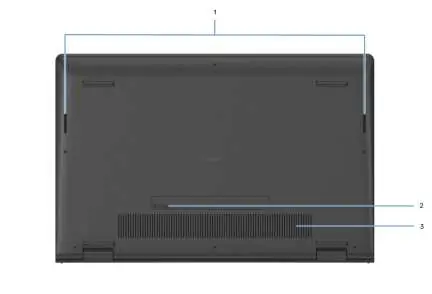
- Bottom: Contains speakers, air vents, and the Service Tag label.
Hardware Specifications
The Inspiron 15 3520 supports various configurations:
- Processor: 11th and 12th Gen Intel Core, Celeron, and Pentium processors.
- Memory: Two SODIMM slots supporting DDR4 memory (up to 16 GB).
- Storage: Supports 2.5-inch SATA HDD or M.2 2230/2280 SSD configurations.
- Display: Available in HD or FHD resolutions, with optional touch support and low blue light technology.
- Graphics: Integrated Intel UHD or Iris Xe Graphics; discrete NVIDIA GeForce MX550 available on select models.
Features
The display is designed to minimize blue light exposure. Low blue light mode is enabled by default. Additionally, Dell ComfortView software technology is available to reduce harmful blue light emissions during extended use. It is recommended to take regular breaks and maintain a comfortable viewing distance.
Keyboard Shortcuts
The keyboard supports various secondary functions using the Fn key:
- Fn + Esc: Toggle fn-key lock.
- Fn + F1-F3: Mute, decrease, or increase volume.
- Fn + F6-F7: Decrease or increase screen brightness.
- Fn + F8: Switch to external display.
- Fn + F10: Print Screen.
Support
For assistance, use the built-in Dell apps like SupportAssist, My Dell, and Dell Update. You can find your Service Tag on the bottom of the laptop to access specific support resources at www.dell.com/support.
Official resources from the manual
Manufacturer information
Dell Inc.
Practical help
Common problems
Battery not charging
Ensure the power adapter is securely connected. Check that the operating temperature is within the allowed range (0°C to 45°C for charging).
Overheating
Ensure air vents on the bottom of the laptop are clear of obstructions and dust. Clean them regularly.
Camera not working
Check if the privacy shutter is closed. Ensure the camera status light is on when in use.
Before use
- Connect the power adapter to the laptop and a power outlet.
- Press the power button to turn on the computer.
- Follow on-screen instructions to complete OS setup.
- Connect to a wireless network for Windows updates.
- Sign in with or create a Microsoft account.
Images and diagrams
- Front view: Shows microphone, camera, privacy shutter, and status light.
- Top view: Shows power button (with optional fingerprint reader) and touchpad.
- Bottom view: Shows speakers, service tag, and air vents.
Model compatibility
- 11th Gen Intel Core systems do not support Type-C ports or hard drive configurations.
- Type-C port with DisplayPort is only available on 12th Gen processor configurations.

Manual page author
David Miller
Documentation analyst
Organizes user manual content into clear summaries, with attention to model details, product context, and everyday usability.