HVAC / Air Conditioners
Della Mini-Split Air Conditioner User Manual
Comprehensive user guide for Della Mini-Split Air Conditioners. Includes installation steps, remote control operation, maintenance, troubleshooting, and error codes for models 048-IF-11K1V-17S and others.
Table of contents
Manual images
Click an image to enlargeQuick guide from the manual
This manual provides essential instructions for the installation, operation, and maintenance of the Della Mini-Split Air Conditioner. Key procedures include professional installation, proper vacuum pumping of the refrigerant system, and routine filter cleaning. Users should consult the troubleshooting section for error codes before contacting support.
Safety precautions
Installation must be performed by professional or qualified persons. Ensure the mains voltage corresponds to the rating plate. Do not install the unit near flammable substances or in unventilated areas. Always disconnect power before maintenance. Keep the air filter mounted during operation to prevent dust accumulation.
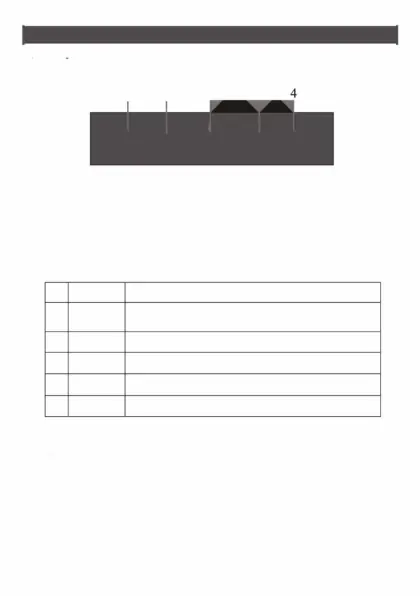
Name of parts
The system consists of an indoor unit and an outdoor unit. The indoor unit features a mounting plate, front panel, emergency button, and air deflectors. The outdoor unit includes the air inlet/outlet, wiring cover, drainage pipe, and refrigerant valves.
Remote control operation
The remote control allows for mode selection (Auto, Cool, Dry, Fan, Heat), fan speed adjustment, and temperature control. Special functions include:
- Turbo: Quick cooling or heating.
- Timer: Automatic on/off scheduling.
- Swing: Adjusts airflow direction.
- Sleep: Adjusts operation for comfort during sleep.
- I Feel: Optimizes temperature based on remote location.
- Anti-Mildew: Dries inner parts after cooling/dry mode.
Installation
Installation involves selecting a location with proper clearances, mounting the indoor plate, drilling the wall hole, connecting refrigerant pipes, drainage hoses, and wiring. The outdoor unit requires a solid base, proper drainage connection, and a vacuum pumping procedure to ensure system integrity. Always perform a test run after installation.


Maintenance
Regular maintenance is required for efficient operation. Clean the air filter frequently to avoid dust buildup. Use a soft, dry cloth or a cloth dipped in neutral detergent to clean the unit surface. Do not use volatile liquids like gasoline or thinner.
Troubleshooting
If the unit fails to operate, check for power failure, blown fuses, or active timer settings. Insufficient airflow may be caused by dirty filters or obstructed vents. The unit displays error codes (e.g., E1, E2, E3) to indicate specific faults like sensor issues or communication errors.
Manufacturer information
Della
Practical help
Common problems
Appliance does not operate
Check for power failure, loose connections, or if the TIMER-ON function is active.
Insufficient airflow
Check for dirty air filters or obstructed air conditioner intakes and outlets.
Remote control does not respond
Ensure the remote is close enough to the indoor unit, replace batteries, or remove obstacles between the remote and the signal receiver.
Strange noise during operation
Expansion or contraction of the front panel due to temperature changes is normal. If the noise is persistent, check for backflow of liquid in the refrigerant circulation.
Before use
- Ensure power supply voltage complies with the rating plate specifications.
- Verify all electrical connections are secure.
- Confirm the drainage pipe is smooth and unobstructed.
- Ensure refrigerant valves are fully open.
- Check that no foreign objects or tools are left inside the unit.
- Complete installation of the indoor unit air inlet grille and panel.
Specs in practice
- Cooling Capacity
- Measured in Btu/h, indicates the cooling power of the unit.
- Heating Capacity
- Measured in Btu/h, indicates the heating power of the unit.
- Moisture removal
- Measured in Liters/h, indicates the dehumidification capability.
Images and diagrams
- Indoor Unit Parts: Identifies the mounting plate, front panel, emergency button, and pipe connections.
- Remote Control: Details buttons for Mode, Fan, Swing, Turbo, and Timer.
- Vacuum Pumping: Shows the connection of the manifold gauge to the outdoor unit valves and vacuum pump.
Model compatibility
- For North American market: Press the ECO button 10 times within 8 seconds in heating mode to start forced defrosting.
- Installation must be performed by professional or qualified persons.
- The unit is designed for domestic environments and should not be used for drying clothes or cooling food.

Manual page author
David Miller
Documentation analyst
Organizes user manual content into clear summaries, with attention to model details, product context, and everyday usability.