HVAC / Air Conditioners
User Manual for Della 048-OPAC-5 and 048-OPAC-6 Portable Air Conditioner
Quick guide for Della 048-OPAC-5 and 048-OPAC-6 portable air conditioners. Includes installation steps, operation modes, maintenance, and troubleshooting.
Table of contents
Manual images
Click an image to enlargeQuick Guide
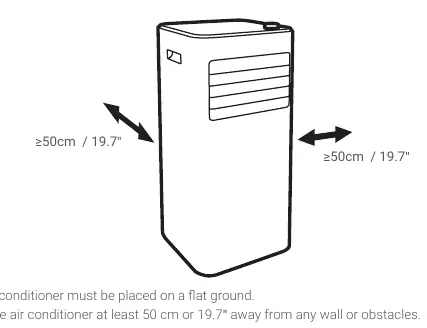
This portable air conditioner is designed for indoor cooling. Ensure the unit is placed on a flat surface with at least 50 cm (19.7 inches) of clearance from walls or obstacles. The unit requires proper grounding and must be plugged directly into a wall outlet; do not use extension cords or power strips.
Safety Information
- Refrigerant: This unit uses R32 refrigerant. If a leak is suspected, shut down the unit and disconnect power immediately.
- Electrical: Plug directly into a grounded wall socket. Do not use damaged cords or plugs.
- Environment: Use indoors only. Keep away from water, flammable substances, and heat sources.
- Supervision: Adult supervision is required when children or pets are present.
Installation
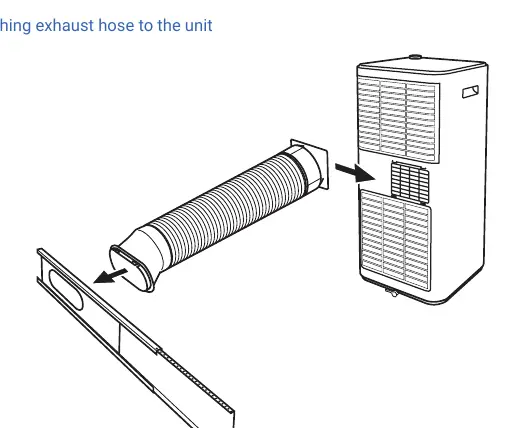
Exhaust Hose: Connect the exhaust hose to the hose connector and the window kit adapter. Attach the connector to the unit's air exhaust. Keep the hose as short and straight as possible to maintain efficiency.
Window Kit: Adjust the window slider kit to fit your window, secure it with screws, and place it between the window sash and frame. Use the provided foam seal for a tight fit.
Operation
Modes: Use the Mode button to switch between Cool, Dry, and Fan modes. The current mode is indicated on the control panel.
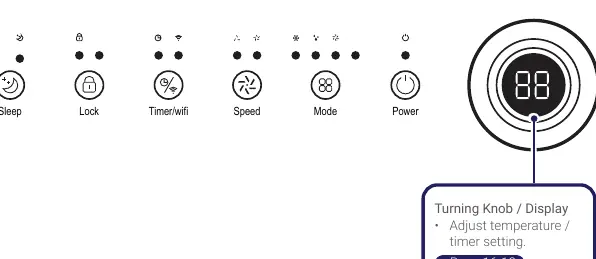
Temperature: In Cool mode, adjust the temperature between 16°C - 32°C (61°F - 90°F) using the knob or remote control.
Sleep Mode: Adjusts temperature automatically over 2 hours and maintains it for 10 hours.
Timer: Can be set to turn the unit ON or OFF. Set the time using the knob or remote and wait 5 seconds for activation.
Child Lock: Press the lock button on the control panel to disable other buttons.
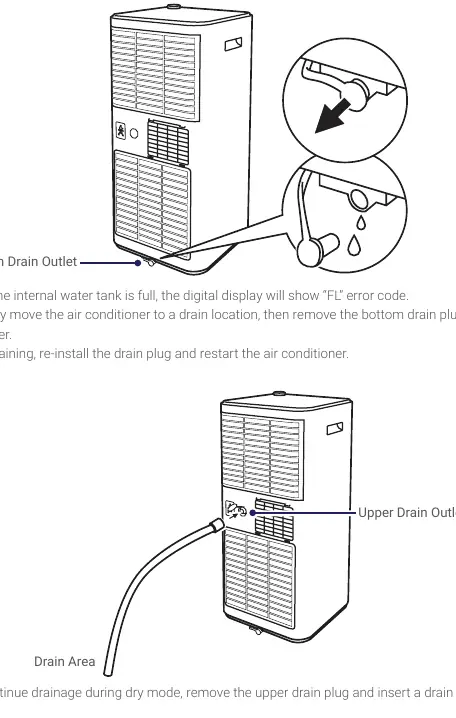
Water Drainage
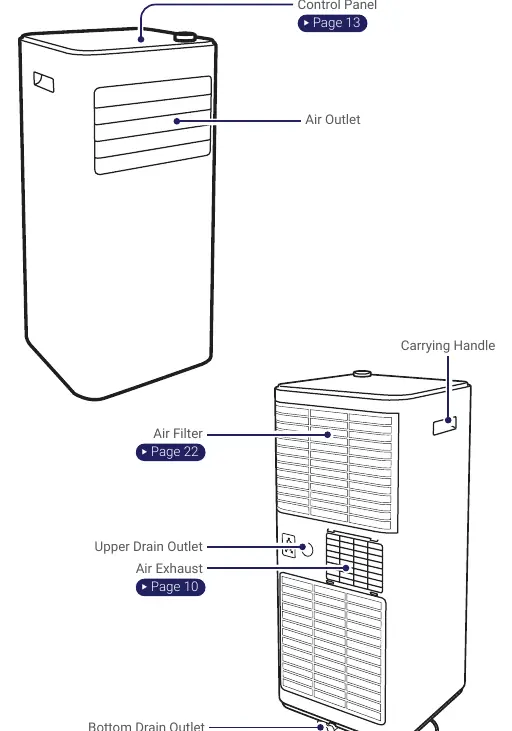
When the internal tank is full, the display shows the FL error code. Move the unit to a drain location, remove the bottom drain plug, and drain the water. For continuous drainage in Dry mode, remove the upper drain plug and attach a drain hose.
Care and Maintenance
- Unit Cleaning: Use a soft, dry, or damp cloth with neutral detergent. Never flush with water.
- Filter Cleaning: Remove the air filter, clean with a vacuum or warm water with mild detergent, and ensure it is completely dry before reinstalling.
- Storage: Drain all water, clean and dry the filter, and store the unit in an upright position in a dry indoor location.
Troubleshooting
If the unit is nonoperational, check for power failure, tripped breakers, or a full water tank. If cooling capacity is reduced, check for vent obstructions, dirty filters, open windows/doors, or improperly attached exhaust hoses.
Error Codes:
- E0: Communication fault between main PCB and display PCB.
- E1: Ambient temperature sensor failure.
- E2: Coil temperature sensor failure.
- Ft: Full water tank.
Manufacturer information
Della
Practical help
Common problems
Unit is nonoperational
Check power supply, ensure plug is connected, reset circuit breaker, or check if the water tank is full (FL error).
Reduced cooling capacity
Clear vent obstructions, clean the air filter, close windows and doors, or ensure the exhaust hose is properly attached.
Water leak
The internal water tank is likely full. Drain the unit using the bottom drain outlet.
Noise or vibration
Ensure the appliance is placed on a flat, level surface.
Before use
- Verify voltage and current rating match the product specification.
- Ensure the power outlet is properly grounded.
- Place the unit on a flat, level ground.
- Maintain at least 50 cm (19.7 inches) of clearance around the unit.
- Install the exhaust hose and window kit correctly.
- Check that the air filter is clean and installed.
Specs in practice
- Cooling Capacity
- 8000 BTU/h for 048-OPAC-5; 10000 BTU/h for 048-OPAC-6.
- Dehumidification
- 47.96 Pints per day.
Images and diagrams
- Control panel layout showing buttons for Sleep, Lock, Timer/WiFi, Speed, Mode, and Power.
- Exhaust hose assembly showing connection to the unit and window adapter.
- Window slider kit installation for vertical and horizontal windows.
- Drainage procedure using bottom and upper drain outlets.
Model compatibility
- Indoor use only.
- Do not use in laundry rooms or near open ignition sources.
- Requires 115V 60Hz power supply.

Manual page author
Michael Turner
Technical manual editor
Reviews PDF manuals for structure, safety notes, and practical product details so readers can find the right information quickly.