Power / Power Supplies
Installation Guide for Delta 52001 Series Slide Bar & Hand Shower System
A comprehensive installation and usage guide for the Delta 52001, 52002, 52003, and 52008 series slide bar and hand shower systems. Includes mounting instructions, safety warnings, and maintenance procedures.
Quick answers from the manual
Quick answer
- The Delta 52001 Series is a wall-mounted slide bar and hand shower system. It must be installed into wall studs to support up to 300 lbs. The hand shower features an adjustable mount and a 2.5 GPM flow restrictor. p. 1, 2
Key actions
- Mounting to wall studs p. 1
- Adjusting the hand shower position p. 2
First start
- Drill pilot holes into wall studs using a 5/32" bit. p. 1
Problems and fixes
Mineral buildup on hand shower
Soak in 50/50 vinegar and water solution for 30 minutes.
p. 2Maintenance and reset
- Clean with soft, damp cloth p. 2
Technical specifications
| Parameter | Value | Meaning | Pages |
|---|---|---|---|
| Max Weight Capacity | 300 lbs | Maximum weight the bar can support when properly installed. | p. 1 |
| Max Flow Rate | 2.5 GPM | Water usage limit. | p. 2 |
Where to find it in the PDF
- Installation Instructions p. 1
- Usage, Maintenance, and Warranty p. 2
Table of contents
Manual images
Click an image to enlargeQuick guide from the manual
This document provides essential installation and maintenance instructions for the Delta 52001 Series Slide Bar and Hand Shower System. Crucial safety requirement: For proper support, both ends of the slide bar must be installed into a wall stud. The slide bar is rated for a maximum weight of 300 lbs when properly installed. Always check for electrical wiring or plumbing behind the wall before drilling.
Parts and tools
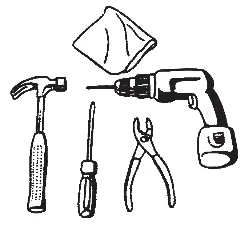
Ensure you have all parts before starting: the wall slide bar with adjustable mechanism, hand shower with hose, and mounting hardware (six #10 x 2-1/2" wood screws). Required tools include a slot-headed screwdriver, electric drill, 5/32" drill bit, soft cloth, and wrench or pliers. If installing over ceramic tile, a 1/4" carbide tip drill bit is required.
Installation
The slide bar can be installed vertically, horizontally, or at an angle. Follow these steps:
- Locate wall studs using a stud finder.
- Mark the mounting hole positions on the wall.
- Drill pilot holes at the marked positions. If drilling through tile, use a 1/4" carbide tip bit first, then the 5/32" bit for the wood stud.
- Align the slide bar with the holes and insert the provided wood screws.
- Hand tighten the screws into the wall stud.
- Securely tighten all mounting screws with a screwdriver.
- If using a concealed mount, move the cover plates over the mounting holes and press firmly against the wall.
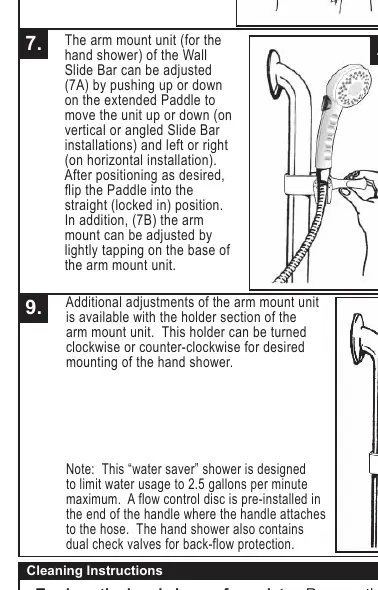
Usage and adjustments
The hand shower arm mount can be adjusted by pushing the paddle up or down (for vertical/angled installations) or left/right (for horizontal installations). Once positioned, flip the paddle into the straight, locked position. The holder section can also be twisted clockwise or counter-clockwise for desired hand shower orientation.
Cleaning and maintenance
To clean the hand shower face plate, remove the handle from the hose and soak it in a 50/50 solution of white vinegar and water for 30 minutes to dissolve mineral buildup. Wipe the slide bar and arm mount unit with a soft, damp cloth. Do not use detergents or cleansers that may harm the finish. Periodically inspect the slide bar for damage or looseness.
Practical help
Common problems
Slide bar feels loose or unstable
Ensure both ends of the slide bar are mounted directly into wall studs. Tighten all mounting screws securely.
Hand shower flow is weak
Check for mineral buildup on the face plate. Soak the hand shower in a 50/50 solution of white vinegar and water for 30 minutes.
Before use
- Locate wall studs using a stud finder.
- Verify you have a 5/32" drill bit and a 1/4" carbide tip bit (if drilling through tile).
- Check for electrical wiring or plumbing behind the wall before drilling.
- Ensure the slide bar is level before marking holes.
- Confirm the hand shower is properly attached to the hose.
Specs in practice
- Weight Limit
- 300 lbs maximum when properly installed into wall studs.
Images and diagrams
- The slide bar can be mounted vertically, horizontally, or at an angle.
- The arm mount unit features a paddle that must be flipped to lock the position.
- Concealed mounts use cover plates to hide the mounting screws.
Model compatibility
- If the existing shower arm has an integral ball connector, replace it with a standard 1/2" threaded shower arm.

Manual page author
David Miller
Documentation analyst
Organizes user manual content into clear summaries, with attention to model details, product context, and everyday usability.