Tools / Saws
Denali 20V 13-Inch Brushless String Trimmer User Guide
A comprehensive user guide for the Denali 20V 13-Inch Brushless String Trimmer (ALT4823B-00). Includes detailed instructions for assembly, operation, maintenance, and troubleshooting.
Quick answers from the manual
Quick answer
- The Denali 20V 13-Inch String Trimmer is a battery-powered tool for trimming grass and weeds. It features a bump-feed head, adjustable speed, and a foldable shaft. To start, press the lock-off button and trigger switch simultaneously. p. 7, 14
Key actions
- Assemble the shaft, guard, and front handle before first use. p. 9, 10, 11
- To start the trimmer, press the lock-off button and trigger switch simultaneously. p. 14
First start
- Unfold the shaft, lock it with the provided bolts, mount the guard, and attach the front-assist handle. p. 9, 10, 11
Problems and fixes
Trimmer fails to start
Check battery attachment, charge the battery, or ensure both the lock-off button and trigger switch are pressed simultaneously.
p. 23Maintenance and reset
- Periodically inspect for loose parts, clean air vents, and sharpen or replace the line-cutting blade. p. 20, 21, 22
Technical specifications
| Parameter | Value | Meaning | Pages |
|---|---|---|---|
| Voltage | 20V | Rated voltage | p. 6 |
| Cutting Width | 13 inches | Cutting capacity | p. 6 |
Where to find it in the PDF
- Assembly p. 9, 10, 11
- Operation p. 12, 13, 14, 15
- Maintenance p. 20, 21, 22
Table of contents
Manual images
Click an image to enlargeQuick guide from the manual
The Denali 20V 13-Inch Brushless String Trimmer is designed for trimming grass, light weeds, and similar vegetation in private settings. This guide covers the essential steps for assembly, safe operation, and maintenance to ensure optimal performance.
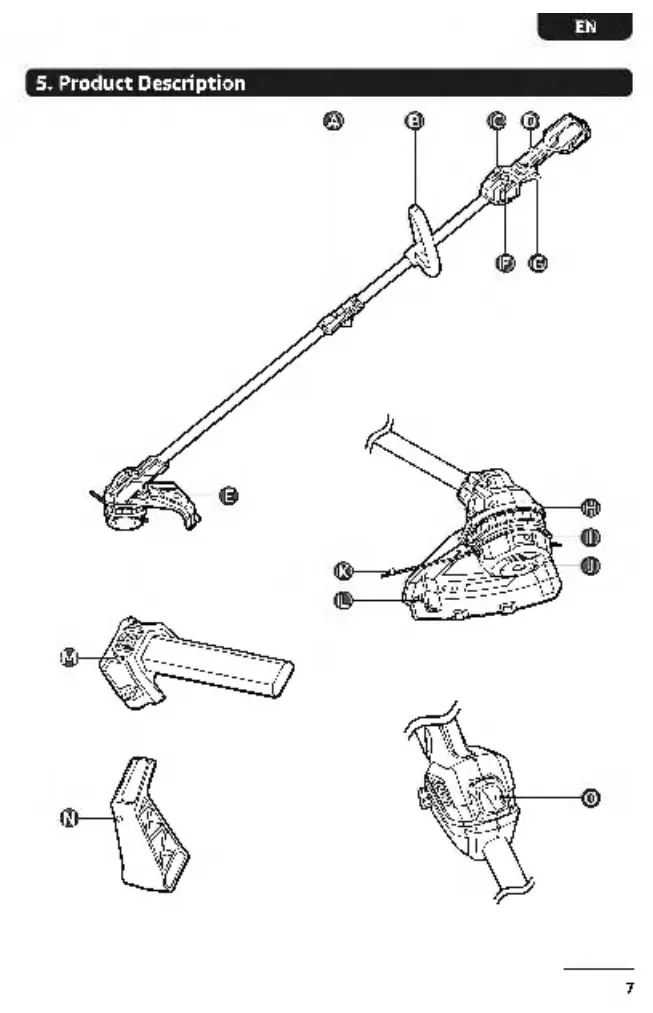
Product Description
The trimmer features a foldable shaft for storage, an adjustable front-assist handle, a speed selector (HI/LO), and a bump-feed trimmer head. Key components include the lock-off button and trigger switch, which must be pressed simultaneously to start the motor.
Assembly
Required tools: PH2 screwdriver and an impact driver with a 14 mm socket (not included).
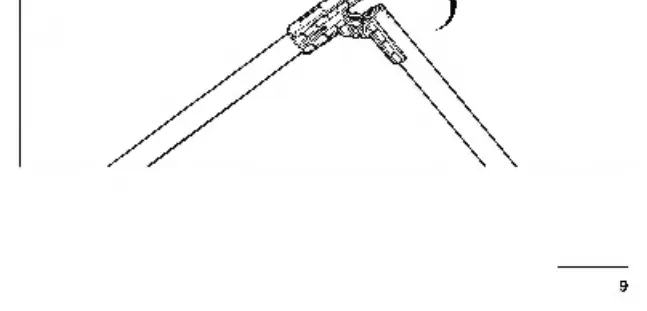
- Unfold the shaft: Remove the battery, unfold the shaft, and lock it using the two supplied bolts.
- Mount the guard: Remove the battery, insert the guard into the groove of the trimmer head, and secure it with the two supplied bolts.
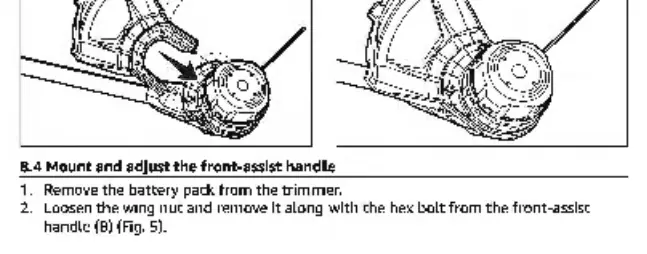
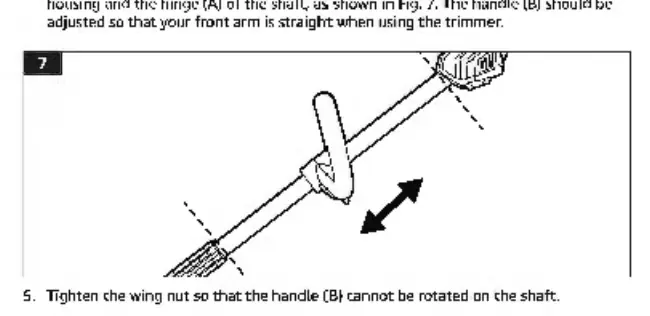
- Mount the front-assist handle: Remove the wing nut and bolt from the handle, position it on the shaft between the rear handle and the hinge, and tighten the wing nut.
Operation
Battery usage: Align the raised rib on the battery pack with the grooves on the machine and slide it on until it clicks. Always remove the battery before making adjustments or cleaning.
Starting and stopping: Ensure you have a secure footing. Press and hold the lock-off button, then depress the trigger switch to start. Release the trigger to stop.
Speed selector: Use the switch to choose between HI (high speed for performance) or LO (low speed for efficiency).
Trimming tips: Keep the cutting attachment parallel to the ground. Do not force the trimmer; let the tip of the line do the cutting. Work progressively from top to bottom when cutting tall grass.
Maintenance
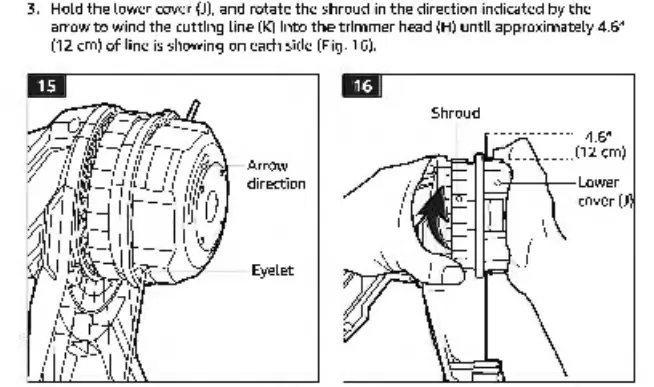
Line replacement: Use only 0.080" (2.0 mm) nylon twist line. Remove the battery, insert the line through the eyelet, and wind it into the head by rotating the lower cover.
Trimmer head replacement: If the head is damaged, remove the battery, stabilize the spool assembly, and use a 14 mm socket to loosen the nut. Replace with a new head and tighten securely.
Cleaning: Clean air vents with a small brush or vacuum. Do not use water or harsh solvents on plastic parts.
Storage
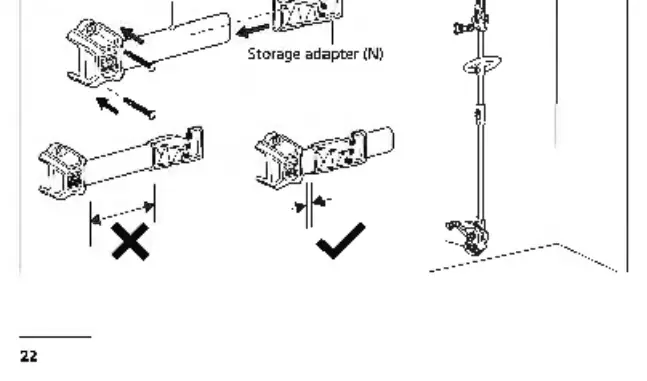
Store the unit in a dry, well-ventilated area, out of reach of children. Use the provided storage rail and adapter to hang the trimmer horizontally on a wall.
Practical help
Common problems
Trimmer fails to start
Check if the battery is attached, charge the battery, or ensure both the lock-off button and trigger switch are pressed simultaneously.
Trimmer stops suddenly while cutting
Check if the guard is mounted, ensure the correct line diameter (0.080") is used, or allow the motor to cool down if overheated.
Trimmer head will not advance line
Clean the motor shaft and trimmer head, replace the cutting line, or untangle the line inside the head.
Before use
- Check for damaged, missing, or loose parts
- Wear eye and ear protection
- Clear the area of rocks, glass, and debris
- Ensure the battery is fully charged
- Verify the guard is properly installed
Specs in practice
- Rated voltage
- 20V DC
- Cutting width
- 13 inches (33 cm)
- Cutting line type
- 0.080 inch (2.0 mm) nylon twist line
Images and diagrams
- B: Adjustable front-assist handle
- C: Speed selector
- D: Rear handle
- F: Lock-off button
- G: Trigger switch
Model compatibility
- Use only with specified battery packs (2 Ah or 4 Ah) and chargers (ASC5358B-00, ASC5358B-02, ASC5358B-00).
- Do not use metal-reinforced line or wire.

Manual page author
Emily Carter
User documentation editor
Prepares concise manual descriptions and highlights the most useful setup, operation, and maintenance information for readers.