Garden / Leaf Blowers
Denali Universal 12-14mm Bar Clamp Phone Mount
Quick guide for installing the Denali 12-14mm Bar Clamp Phone Mount. Includes hardware list, torque specifications, and step-by-step mounting instructions.
Table of contents
Manual images
Click an image to enlargeQuick guide from the manual
This guide covers the installation of the Denali Universal 12-14mm Bar Clamp Phone Mount. The mount is designed for pipes ranging from 12mm to 14mm in diameter. Always ensure that wires are routed correctly and have enough slack to allow for full handlebar movement and suspension compression before finalizing the installation.
What is in the box
- Clamp Part for 12-14mm Tube (LAH.00.017) - Qty 1
- 8mm Spacer Plate (LAH.00.018) - Qty 1
- 8-32 x 1-1/8 in Socket Head Screw DIN 9112 - Qty 2
- 8-32 x 3/4 in Socket Head Screw DIN 9112 - Qty 2
Tools Required: 5/32 Hex wrench.

Installation
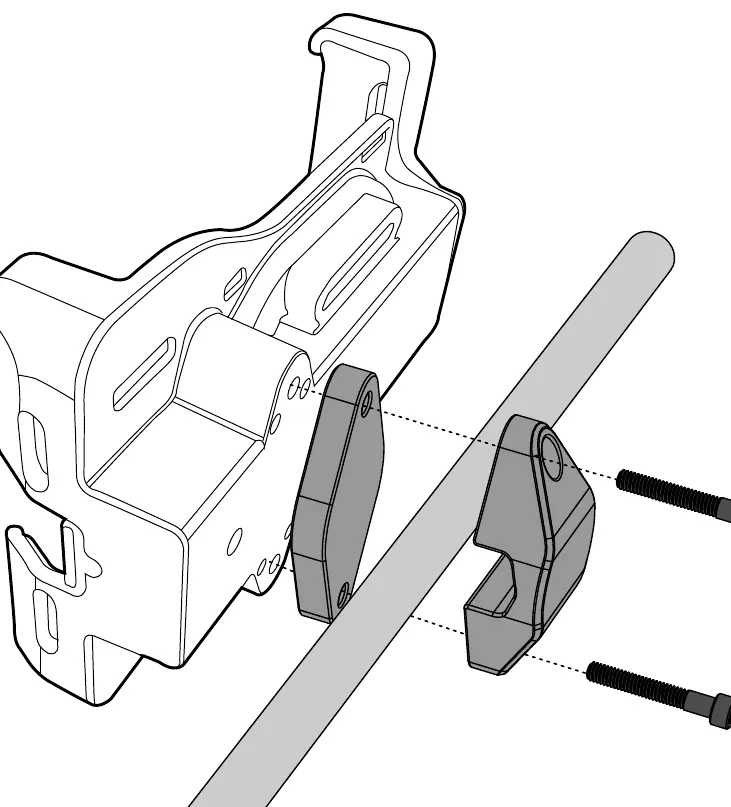
- Determine fitment: Based on your specific bike clearances, determine if you need to use the optional 8mm spacer (b) and the longer screws (c) to mount your clamp and RAM Charger.
- Position the bracket: Place the Clamp Bracket (a) over your bar in the desired location. Ensure the flat face is aimed towards you and the sloped faces point towards the windshield.
- Secure the assembly: Align the mounting holes on the back side of the RAM Charger with your bracket and secure it using the appropriate Socket Head Screws (c or d). Note that the whole assembly may need to be rotated downwards to access the mounting holes on the bracket.
Installation tips and torque specifications
Denali recommends using medium strength liquid thread locker on all screws, nuts, and bolts. Inspect all hardware after the first 30 miles to ensure proper torque is maintained. Refer to your motorcycle owner's manual for specific torque requirements, or use the following default specifications for the included accessory hardware:
- M3: 10.0 in-lbs (1.0 Nm)
- M4: 23.0 in-lbs (2.5 Nm)
- M5: 44.5 in-lbs (3.5 ft-lbs / 5.0 Nm)
- M6: 78.0 in-lbs (6.5 ft-lbs / 9.0 Nm)
- M8: 13.5 ft-lbs (18.0 Nm)
- M10: 30.0 ft-lbs (41.0 Nm)
- M12: 52.0 ft-lbs (71.0 Nm)
Practical help
Common problems
Wires binding during operation
Ensure wires are routed with enough slack to allow for full handlebar movement (left and right) and full suspension compression.
Hardware loosening over time
Use medium strength liquid thread locker on all screws and bolts. Inspect all hardware after the first 30 miles of riding.
Before use
- Verify the pipe diameter is between 12mm and 14mm.
- Check for necessary clearances on your motorcycle handlebars.
- Ensure you have a 5/32 Hex wrench available.
- Determine if the 8mm spacer is required for your specific setup.
Specs in practice
- Clamp Diameter
- Compatible with pipes ranging from 12mm to 14mm.
- Torque Specifications
- Guidelines for tightening hardware to prevent loosening; refer to your motorcycle owner's manual for primary torque settings.
Images and diagrams
- The exploded view shows the orientation of the clamp bracket, spacer plate, and the two types of socket head screws.
- The installation diagram illustrates how the bracket sits on the bar and how the RAM Charger aligns with the mounting holes.
Model compatibility
- Designed for 12-14mm diameter bars.
- Installation should be performed by a qualified motorcycle technician if you are unsure of your ability.

Manual page author
Michael Turner
Technical manual editor
Reviews PDF manuals for structure, safety notes, and practical product details so readers can find the right information quickly.