Garden / Brushcutters & Trimmers
User Manual for Weed Eater 20V 12" String Trimmer WE20VT
Quick guide for the Weed Eater 20V 12" String Trimmer (WE20VT). Includes assembly instructions, operation, maintenance, troubleshooting, and safety guidelines.
Quick answers from the manual
Quick answer
- The Weed Eater WE20VT is a 20V cordless string trimmer. It features automatic line advancement, a telescoping shaft, and an edging function. Always charge the battery fully before first use. p. 1, 8, 10
Key actions
- Assemble the guard, shaft, and auxiliary handle. p. 8, 9
- Charge the battery using the provided charger. p. 12
- Replace the cutting line. p. 14
First start
- Charge the battery fully, assemble the guard, shaft, and handle, then insert the battery. p. 8, 12
Problems and fixes
Motor fails to start
Secure battery or charge battery.
p. 15
Line does not advance
Unwind spool to remove tangles or replace spool.
p. 15Maintenance and reset
- Clean air vents, wipe exterior with dry cloth, and ensure battery is stored charged. p. 12
Technical specifications
| Parameter | Value | Meaning | Pages |
|---|---|---|---|
| Motor | 20V | Voltage rating | p. 4 |
| Cutting Path | 12" | Cutting width | p. 4 |
| Line Diameter | 0.065" | Required line thickness | p. 4 |
Where to find it in the PDF
- Assembly p. 8, 9
- Operation p. 10, 11
- Maintenance p. 12, 13
Table of contents
Quick guide from the manual
The Weed Eater 20V 12" String Trimmer (WE20VT) is a cordless tool designed for cutting grass and soft vegetation. Before first use, ensure the battery is fully charged. The unit features an automatic line advancement system, a telescoping shaft for height adjustment, and an edging function for sidewalks and walkways. Always wear eye protection and keep bystanders at least 50 feet away during operation.
Assembly
The trimmer requires assembly before use:
- Guard Assembly: Invert the trimmer, place the guard onto the motor housing, and secure it with the 3 provided screws.
- Shaft Assembly: Align the lower tube groove with the upper locking sleeve assembly. Push the tubes together until they snap into place, then slide the locking sleeve over and tighten clockwise.
- Auxiliary Handle: Position the handle on the upper shaft and tighten the adjustment knob until secure.
Operation
To operate the trimmer:
- Battery Installation: Align the battery tongue with the handle cavity and push until it clicks.
- Turning On/Off: Place one hand on the trigger handle and the other on the auxiliary handle. Slide the lock-out button toward the rear and hold, then squeeze the trigger switch. Release the trigger to stop.
- Edging: Pull up the edging coupler, turn the handle end 180 degrees counter-clockwise, and flip the edging guide down until it locks.
- Telescoping Shaft: Unscrew the shaft coupler, slide to the desired length, and retighten.
Maintenance
Regular maintenance ensures optimal performance:
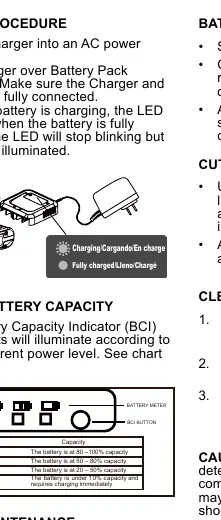
- Charging: Plug the charger into an AC outlet and slide the battery onto the charger terminals. The LED will blink while charging and remain illuminated when fully charged.
- Cleaning: Wipe the exterior with a dry cloth. Do not use water or solvents. Clear debris from air vents.
- Spool Replacement: Remove the battery, invert the trimmer, and remove the spool cover. Replace the spool and ensure the line is threaded through the housing opening.
- Line Replacement: Cut 20 feet of 0.065" line. Bend one end 1/4 inch, insert into the spool hole, and wind clockwise evenly.
Troubleshooting
If the motor fails to start, ensure the battery is secure and charged. If the trimmer smokes, stop use immediately and contact customer support. If the line does not advance, check for tangles on the spool or replace the spool if empty.
Practical help
Common problems
Motor fails to start when trigger is depressed
Ensure the battery is fully inserted and latched, or charge the battery pack.
String trimmer smokes during operation
Stop using the tool immediately and call technical service at 1-855-378-6903.
Cutting line does not advance
Check if the line is tangled on the spool or if the line has run out. Rewind or replace the spool.
Before use
- Charge the battery fully before initial use.
- Ensure the guard is properly installed.
- Check for damaged parts or loose fasteners.
- Wear ANSI Z87.1 compliant eye protection.
- Ensure the work area is clear of bystanders and pets (at least 50 ft away).
Specs in practice
- Cutting Path
- 12 inches (30.5 cm) width of cut.
- Line Diameter
- Uses 0.065 inch (1.65 mm) diameter line.
Images and diagrams
- Exploded view shows the correct order of assembly for the guard, spool, and handle.
- Shaft assembly diagram illustrates the alignment of the locking sleeve.
- Spool replacement diagram shows the correct winding direction for the cutting line.
Model compatibility
- Use only with WE20VRB battery.
- Use only with WE20VCH charger.

Manual page author
Emily Carter
User documentation editor
Prepares concise manual descriptions and highlights the most useful setup, operation, and maintenance information for readers.