Tools / Impact Wrenches
User Manual for Princess Auto 20V Cordless Grass Trimmer 9283508
Quick guide for the Princess Auto 20V Cordless Grass Trimmer (9283508). Includes assembly, operation, maintenance, and troubleshooting instructions.
Quick answers from the manual
Quick answer
- The Princess Auto 20V Cordless Grass Trimmer (9283508) is a 12-inch trimmer designed for lawn edges and grass around shrubs. It requires a 20V battery and charger (sold separately). p. 3, 11
Key actions
- Replacing Trimming Line p. 10
- Installing Battery p. 8
First start
- Charge the battery, install it, adjust the handle and tube length, and press the trigger lock and trigger to operate. p. 8
Problems and fixes
Tool does not function or parts missing
Visit a Princess Auto Ltd. location for a solution or have a qualified technician service the tool.
p. 11Technical specifications
| Parameter | Value | Meaning | Pages |
|---|---|---|---|
| Voltage Rating | 20V | Operating voltage | p. 11 |
| No Load Speed | 7,500 RPM | Speed without load | p. 11 |
| Cutting Size | 12 in. | Cutting path width | p. 11 |
Where to find it in the PDF
- Identification Key p. 7
- Assembly & Installation p. 7, 8
- Specifications p. 11
Table of contents
Manual images
Click an image to enlargeQuick guide from the manual
The Princess Auto 20V Cordless Grass Trimmer is designed for trimming lawn edges and cutting grass around shrubs and trees. Note: The battery and charger are sold separately. Always read the safety instructions before use, wear appropriate personal protective equipment (impact safety goggles, gloves, non-skid footwear), and ensure the work area is clear of bystanders.


Assembly & Installation
Follow these steps to assemble the trimmer:
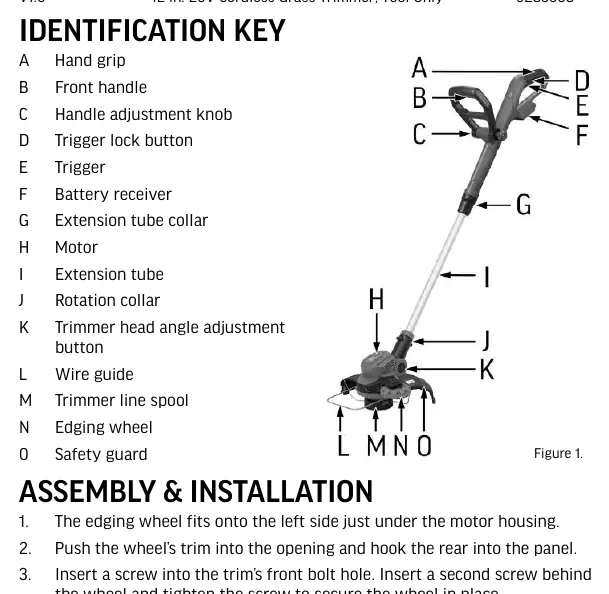
- Edging Wheel: Fit the edging wheel onto the left side under the motor housing. Secure it with two screws.
- Safety Guard: Flip the trimmer head upside down. Slide the safety guard's slot under the trimmer line spool until seated. Secure with a screw.
- Wire Guide: Spread the wire guide ends and slip them into the side openings of the safety guard until they snap into place.
- Front Handle: Push the handle ends onto the frame's mount. Insert a bolt through the handle and mount, then secure with the adjustment knob and nut.
Operation
Before operating, ensure the battery is charged and installed by aligning the rib on the battery with the groove on the port until it clicks.
Trimming
- Adjust the trimmer head angle and extension tube length for a comfortable, straight-backed posture.
- Hold the trimmer head off the ground.
- Push the trigger lock button, then squeeze the trigger to start the motor.
- Move the trimmer slowly side to side while walking forward.
Edge Trimming
- Adjust the trimmer head angle to be in-line with the extension tube.
- Twist the head until the edging wheel is at a 90-degree angle to the handle.
- Place the wheel on the ground and align the trimmer line with the lawn's edge.
Line Feed
The trimmer features automatic line feed. If the line breaks, you can manually pull additional line by removing the battery, flipping the head, and pressing the small button on the spool head while pulling the line out.
Care & Maintenance
- Cleaning: Keep the tool clean, dry, and free of oil/grease. Remove grass and debris from ventilation slots.
- Replacing Trimming Line: Use 1.3, 1.4, or 1.5 mm nylon line. Remove the spool cover, discard old line, and wind 5 meters (16 feet) of new line onto the spool in the direction of the arrow. Ensure lines do not overlap.
- Storage: Remove the battery. Clean the exterior. If storing for an extended period, apply a thin coat of lubricant to steel parts to prevent rust.
Specifications
- Voltage: 20V
- No Load Speed: 7,500 RPM
- Cutting Size: 12 inches
- Line Diameter: 0.065 inches
- Shaft Type: Aluminum
Practical help
Common problems
Trimmer line breaks
Manually pull additional line from the spool by pressing the button on the spool head.
Tool does not function
Check battery charge, ensure battery is properly installed, or contact Princess Auto for service.
Before use
- Charge the battery fully before first use.
- Inspect the tool for damaged or missing parts.
- Ensure all guards are properly installed.
- Wear impact safety goggles and gloves.
- Check that the work area is clear of people and animals.
Specs in practice
- Voltage Rating
- 20V DC power requirement.
- No Load Speed
- 7,500 RPM maximum rotational speed.
- Cutting Size
- 12-inch cutting path width.
- Line Diameter
- 0.065 inches (compatible with 1.3-1.5mm line).
Images and diagrams
- A-F: Handle, trigger, and battery controls.
- G-K: Tube, motor, and head angle adjustments.
- L-O: Cutting head components including wire guide, spool, and edging wheel.
Model compatibility
- Battery and charger are sold separately.
- Use only manufacturer-recommended replacement parts.

Manual page author
David Miller
Documentation analyst
Organizes user manual content into clear summaries, with attention to model details, product context, and everyday usability.