Tools / Polishing Tools
User Manual for Draper 98104 20V Brushless Angle Grinder
Comprehensive user guide for the Draper 98104 20V Brushless Angle Grinder. Includes setup, disc installation, battery charging, safety instructions, and troubleshooting.
Quick answers from the manual
Quick answer
- The Draper 98104 is a 20V cordless angle grinder. It requires a Draper D20 battery pack and is designed for grinding and cutting metal or masonry. Always use the appropriate guard for the task (grinding vs. cutting). p. 2, 9
Key actions
- Fitting the guard p. 9
- Fitting/Replacing discs p. 10
- Charging the battery p. 11
First start
- Charge the battery before initial use. p. 11
Problems and fixes
Machine vibrates
Check for damaged/loose wheel, refit accessory.
p. 12Maintenance and reset
- If the machine stops due to excessive start/stopping, leave it for a few minutes to reset. p. 8
Technical specifications
| Parameter | Value | Meaning | Pages |
|---|---|---|---|
| Rated voltage | 20V | Operating voltage | p. 2 |
| No-load speed | 8,500 r/min | Maximum rotational speed | p. 2 |
| Spindle thread | M14 | Mounting thread size | p. 2 |
Where to find it in the PDF
- Identification of parts p. 8
- Fitting the guard p. 9
- Fitting grinding discs p. 10
- Battery charging p. 11
Table of contents
Manual images
Click an image to enlargeQuick guide from the manual
The Draper 98104 is a 20V cordless angle grinder designed for grinding and cutting metal or masonry. This manual covers the safe operation, maintenance, and assembly of the tool. Always wear appropriate personal protective equipment (PPE), including safety glasses, ear defenders, and gloves. Ensure the battery is charged before initial use and that the correct guard is fitted for the specific task (grinding vs. cutting).
Product Identification
Key components of the tool include:
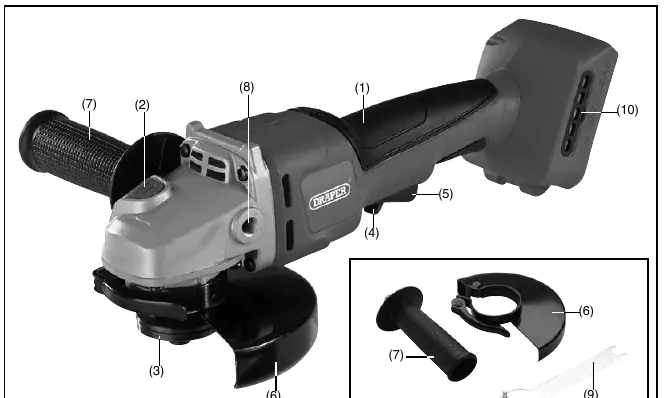
- Soft grip
- Spindle lock (used when changing discs)
- Locking flange
- Safety trigger and Trigger
- Adjustable disc guard
- Auxiliary handle
- Dust screen
Assembly and Setup
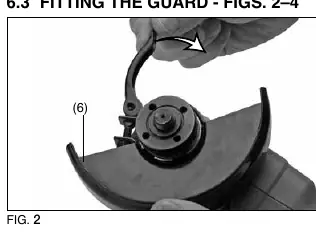
Fitting the Guard
The guard must be fitted for safety. Position the guard onto the grinder collar with the quick-release lever open. Rotate the guard until the spigot lines up with the cutout, then rotate to the desired working position and tighten the lever.
Fitting/Replacing Accessories
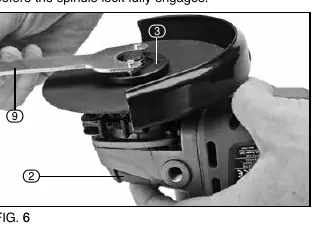
To fit a disc:
- Press and hold the spindle lock button.
- Loosen the locking flange anti-clockwise using the supplied pin spanner.
- Remove the locking flange, clean the flanges and spindle.
- Place the accessory on the spindle, then replace the locking flange.
- Securely tighten the locking flange clockwise using the pin spanner while holding the spindle lock.
Note: For cutting applications, you must replace the "grinding" guard with a "cutting" guard.
Operation
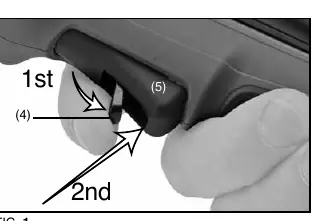
Switching On/Off
The tool features a safety trigger and a main trigger. Excessive start/stopping may cause the machine to temporarily stop functioning; if this happens, leave the grinder for a few minutes to reset.
Battery Charging
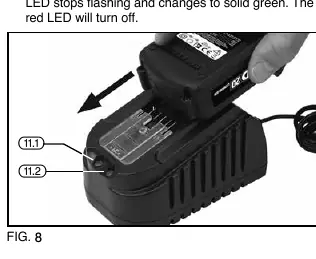
The tool is supplied "bare" (no battery/charger). Use only Draper D20 battery packs and chargers. Plug the charger into a mains socket; the red LED indicates power. Slide the battery onto the charger. A flashing red LED indicates charging has begun. A solid green LED indicates the battery is fully charged.
Maintenance and Troubleshooting
Regularly clean the air vents to prevent dust accumulation. Do not use solvents or fuels for cleaning. If the tool vibrates, check if the wheel is damaged, out of balance, or loose. If the tool does not operate, check the battery charge or replace the battery pack.
Manufacturer information
Draper Tools
Practical help
Common problems
Tool does not operate
Check battery charge or replace faulty battery pack.
Motor runs slowly or loses power
Re-charge battery pack or replace if faulty.
Machine vibrates
Check if the wheel is damaged, out of balance, or loose. Stop immediately and refit the accessory.
Battery does not charge
Check for a blown fuse in the charger plug or replace the charger.
Before use
- Ensure the battery is fully charged.
- Inspect the abrasive wheel for cracks, chips, or wear.
- Verify the guard is securely fitted and positioned correctly.
- Wear safety goggles, ear defenders, and protective gloves.
- Ensure the switch is in the off position before inserting the battery.
Specs in practice
- Rated voltage
- 20V DC power supply.
- No-load speed
- 8,500 r/min (maximum rotational speed).
- Disc Diameter
- 125mm/115mm capacity.
- Spindle thread
- M14 standard thread for accessories.
Images and diagrams
- Fig A: Identification of parts including spindle lock, trigger, and guard.
- Fig 1: Operation of the safety trigger and main trigger.
- Fig 6-7: Correct procedure for using the pin spanner to lock/unlock the flange.
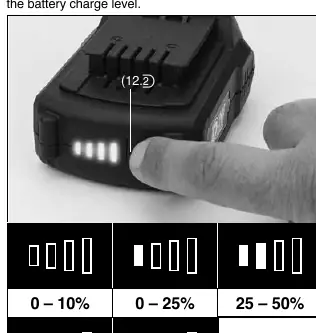
- Fig 10: Battery charge level indicator button and LED status.
Model compatibility
- Use only Draper D20 battery packs.
- Use only abrasive discs designed for this task.
- Cutting operations require a specific 'cutting' guard (not included).
- Do not use accessories requiring liquid coolants.

Manual page author
Emily Carter
User documentation editor
Prepares concise manual descriptions and highlights the most useful setup, operation, and maintenance information for readers.