Home Appliances / Fans
User Manual for DREO 2-in-1 Whole-room Heater & Circulator DR-HSH015
Quick guide for the DREO 2-in-1 Whole-room Heater & Circulator (DR-HSH015). Includes setup, operating modes, safety instructions, maintenance, and troubleshooting.
Quick answers from the manual
Quick answer
- The DREO DR-HSH015 is a 2-in-1 heater and circulator. It features multiple heating levels (H1-H3), ECO mode, fan-only mode, oscillation, and safety protections like tip-over and overheat sensors. p. 1, 9
Key actions
- Turn on/off p. 9
- Switch modes p. 9
First start
- Plug into a wall outlet directly (no extension cords). Ensure the base is installed and the unit is on a flat surface. p. 5
Problems and fixes
FF code
Overheat protection. Unplug and wait for it to cool down.
p. 11, 16
P4 code
Tip-over protection. Place on flat surface.
p. 11, 16Technical specifications
| Parameter | Value | Meaning | Pages |
|---|---|---|---|
| Rated Power | 1500W | Maximum power consumption | p. 7 |
Where to find it in the PDF
- Safety Instructions p. 4, 5, 6, 7
- Operating Instructions p. 9, 10
- Troubleshooting p. 16
Table of contents
Manual images
Click an image to enlargeQuick guide from the manual
The DREO 2-in-1 Whole-room Heater & Circulator (DR-HSH015) is designed to provide both heating and air circulation. Before using, ensure the base is installed, place the unit on a flat, dry surface, and plug it directly into a wall outlet. Keep the unit at least 3 feet (0.9 m) away from furniture, curtains, and other flammable materials. Do not use extension cords or power strips.
Knowing your appliance
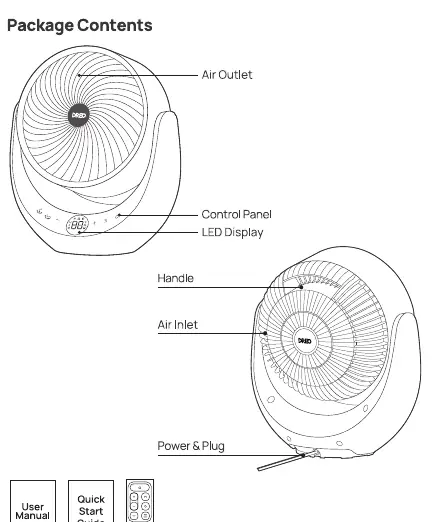
The appliance features a control panel and LED display for operation. The package includes the heater, remote control (battery included), and user documentation.
Using your appliance
The heater offers several modes and settings:
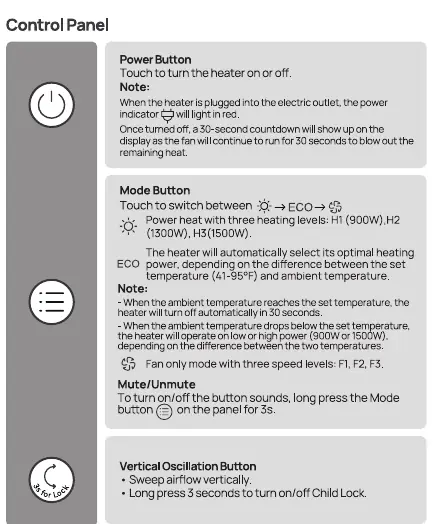
- Power Button: Turns the heater on or off.
- Mode Button: Switches between modes:
- Power Heat: Three levels (H1: 900W, H2: 1300W, H3: 1500W).
- ECO Mode: Automatically adjusts heating based on ambient temperature.
- Fan Only: Three speed levels (F1, F2, F3).
- Oscillation: Buttons for vertical and horizontal sweep.
- Timer: Set a timer from 0-12 hours.
- Child Lock: Long press the vertical oscillation button for 3 seconds to activate/deactivate.
- Mute/Unmute: Long press the Mode button for 3 seconds.
Safety instructions
General Safety:
- Do not cover the heater to avoid overheating.
- Keep away from water; do not use in bathrooms or laundry areas.
- Do not insert foreign objects into grilles.
- The heater is hot during use; do not touch.
- If the unit is tipped over, it will shut off automatically (Tip-over protection).
- If the unit overheats, it will shut off automatically (Overheat protection).
Cleaning and maintenance
Always turn off and unplug the heater before cleaning.
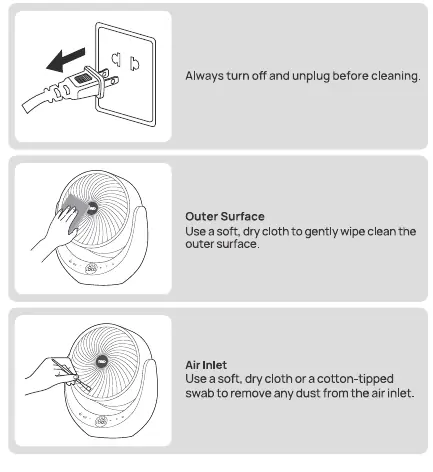
- Outer Surface: Use a soft, dry cloth to wipe the exterior.
- Air Inlet: Use a soft, dry cloth or cotton-tipped swab to remove dust.
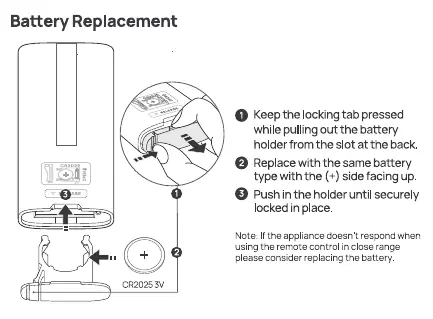
- Remote Control Battery: Replace with a CR2025 battery if the remote stops responding.
Troubleshooting
If the heater malfunctions, check the LED display for error codes:
- E1/E2: Temperature sensor issue. Unplug and contact customer support.
- FF: Overheat protection. Unplug and let it cool down.
- P4: Tip-over protection. Place on a flat, stable surface.
If the heater does not start, ensure it is plugged in, the circuit breaker is working, and it is placed on a flat surface.
Practical help
Common problems
Heater does not start
Ensure the plug is connected to a powered outlet, the circuit breaker is working, and the unit is on a flat, stable surface.
Heater stops during heating
Check if the unit has tipped over, if it has overheated, or if ECO mode has reached the set temperature.
Remote control not working
Replace the CR2025 battery in the remote control.
Before use
- Ensure the base is installed.
- Place on a flat, dry surface.
- Keep 3 feet (0.9 m) away from flammable materials.
- Plug directly into a wall outlet (no extension cords).
- Verify voltage matches the appliance.
Images and diagrams
- Control panel and LED display layout
- Remote control button functions
- Battery replacement procedure
- Cleaning the air inlet
Model compatibility
- Use only with standard wall outlets.
- Do not use with extension cords or power strips.

Manual page author
Emily Carter
User documentation editor
Prepares concise manual descriptions and highlights the most useful setup, operation, and maintenance information for readers.