Home Appliances / Range Hoods
User Manual for Drija Rectangle 76/90 Black Range Hood
Quick guide for the Drija Rectangle 76/90 Black range hood. Includes installation steps, touch control operation, maintenance, filter replacement, and troubleshooting.
Table of contents
Manual images
Click an image to enlargeQuick guide from the manual
This range hood is designed for domestic use. For optimal performance, ensure the unit is installed at a distance of 65-75cm above the cooking surface (minimum 76cm for gas appliances). Always disconnect the power supply before performing any maintenance or cleaning tasks.
Safety instructions
Never do the following:
- Use the hood without grease filters or if filters are excessively greasy.
- Install above a cooker with a high-level grill.
- Leave frying pans unattended during use.
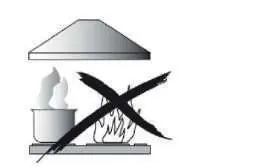
- Leave naked flames under the hood.
- Flambé under the hood.
Always do the following:
- Switch off electricity at the mains during installation and maintenance.
- Ensure the ducting has no bends sharper than 90 degrees.
- Use only recommended screws for installation.
- Ensure adequate ventilation if using the hood simultaneously with gas appliances.
Installation
The hood requires an extraction duct with an interior diameter of 150mm. Ensure the ducting is short and straight to maintain performance. Follow these steps for mounting:
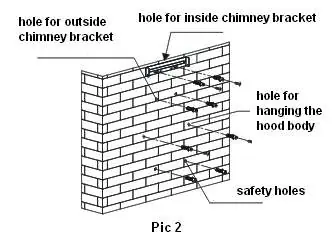

- Measure the position for hanging the hood, chimney brackets, and safety holes.
- Drill 8mm holes and insert wall plugs.
- Fix the inside chimney bracket to the wall.
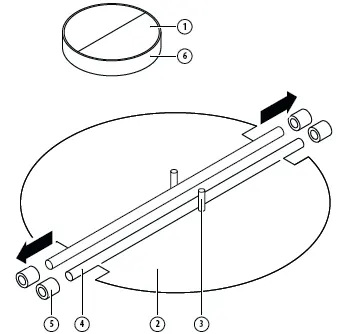
- Install the V-flap and expansion pipe onto the hood.
- Hang the hood on the wall and secure it with safety screws.
- Adjust the chimney height and fix it to the brackets.
Operation
The hood features a touch control panel with an LED display. Buttons include Power, Speed, Timer, and Lamp.
- Power: Press to turn the motor on/off. The display shows speed levels (1, 2, 3).
- Speed: Cycles through low, medium, and high speeds.
- Lamp: Toggles the LED light.
- Timer: Sets a one-hour timer when the motor is running.
Maintenance and cleaning
Regular cleaning is essential for longevity. Disconnect power before cleaning. Use neutral detergents and avoid harsh chemicals or abrasives. Clean stainless steel surfaces along the grain to prevent scratches.

- Grease Mesh Filters: Soak in water with mild detergent for 3 minutes, then brush gently. Wash separately from other kitchen utensils.
- Carbon Filters: Replace when necessary. Turn anti-clockwise to remove. Note that suction power is reduced when carbon filters are installed.
- Bulb Replacement: Must be performed by a qualified person. Ensure the bulb has cooled before handling.
Troubleshooting
If the hood fails to operate, check the following:
- Motor not working: Check if the fan switch is on, or contact service if the switch or motor has failed.
- Light not working: Check for blown house fuses or loose power cables.
- Oil leakage: Ensure the one-way valve and chimney connections are properly sealed.
- Insufficient suction: Verify the installation distance from the cooktop.
- Hood inclines: Tighten the hanging screws.
Practical help
Common problems
Motor does not work
Check if the fan switch is in an active position. If the switch or motor has failed, contact the service center.
Oil leakage
Ensure the one-way valve and chimney connections are tightly sealed.
Insufficient suction
Ensure the hood is installed at the correct distance (65-75cm) from the cooktop.
Hood inclines
Tighten the hanging screws to level the unit.
Before use
- Ensure the power supply is disconnected before installation.
- Verify the installation height is 65-75cm above the cooktop.
- Check that the ducting is short, straight, and 150mm in diameter.
- Ensure the wall can support the weight of the hood.
- Verify the V-flap is correctly installed.
Specs in practice
- Duct Diameter
- 150mm
- Installation Distance
- 65-75cm (minimum 76cm for gas appliances)
Images and diagrams
- Control panel icons: Timer, Lamp, Speed, and Power.
- Installation diagrams illustrate wall mounting points and chimney bracket placement.
- Filter removal diagram shows pressing the handle to release the mesh filter.
Model compatibility
- Not for use above cookers with high-level grills.
- Requires 150mm diameter ducting.
- Must be installed by a qualified electrician or competent person.

Manual page author
David Miller
Documentation analyst
Organizes user manual content into clear summaries, with attention to model details, product context, and everyday usability.