Plumbing / Showers & Tubs
Installation Manual for Eastbrook Vantage Easy Clean Sliding Door
Installation guide for the Eastbrook Vantage Easy Clean Sliding Door. Includes step-by-step assembly instructions, parts list, adjustment ranges, and maintenance tips.
Table of contents
Manual images
Click an image to enlargeQuick Guide
This manual provides installation instructions for the Eastbrook Vantage Easy Clean Sliding Door. Installation should only be performed by a fully qualified installer. Ensure you have identified the correct model code (69.0069 to 69.0073) to verify the correct adjustment range for your opening. Do not use the shower for 24 hours after installation to allow the silicone to set.
Parts List and Components
The product consists of various profiles, glass panels, and hardware (S01-S18). Refer to the exploded view on page 2 to identify all parts before beginning assembly. Ensure all components are present and undamaged.

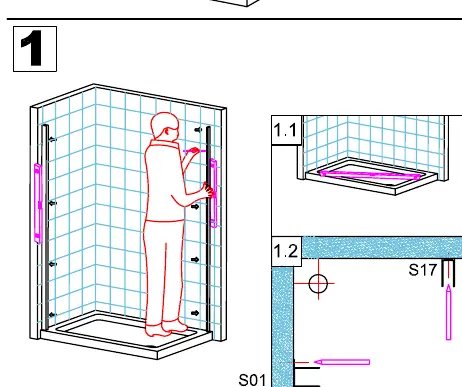
Installation Steps
The installation process is divided into 16 steps:
- Preparation: Gather necessary tools including a drill, spirit level, silicone gun, tape measure, and mallet.
- Frame Assembly: Assemble the frame components (S01-S04) and attach them to the wall according to the specific model adjustment range.
- Glass Installation: Carefully insert the glass panels (S16, S17) into the frame.
- Securing: Use the provided screws (S14, S18) and wall plugs (S13) to secure the frame to the wall.
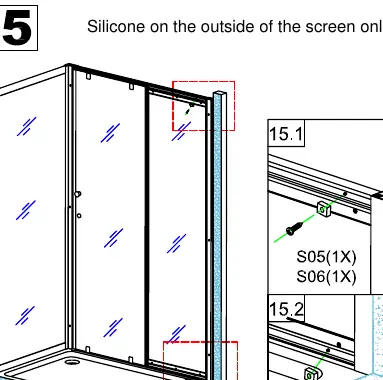
- Sealing: Apply silicone sealant to the outside of the screen only.
Cleaning and Maintenance
To maintain the appearance and functionality of your shower enclosure:
- Clean only with warm soapy water.
- Do not use irritant detergents such as alcohol, bleach, or other chemical cleaners.
- If the glass door becomes noisy during movement, apply a small quantity of lubricant to the roller wheel, slipping hook, and track.
Practical help
Common problems
Noisy door movement
Apply a small quantity of lubricant onto the roller wheel, slipping hook, and track.
Before use
- Ensure the installer is fully qualified.
- Verify the adjustment range for your specific model code (e.g., 970-1000mm for 69.0069).
- Prepare tools: drill, level, silicone gun, tape measure, mallet.
- Apply silicone on the outside of the screen only.
- Allow 24 hours for the silicone to set before using the shower.
Specs in practice
- Adjustment Range
- The width range the door can be adjusted to fit, specific to the model code (e.g., 69.0069: 970-1000mm).
Images and diagrams
- Page 2: Exploded view of all components (S01-S18) and hardware quantities.
- Page 3: Tools required and initial frame positioning steps.
- Page 5: Silicone application instructions (Step 15).
Model compatibility
- Ensure the wall surface is suitable for drilling and mounting the frame.

Manual page author
Michael Turner
Technical manual editor
Reviews PDF manuals for structure, safety notes, and practical product details so readers can find the right information quickly.