Furniture / Storage Cabinets
Ebern Designs 2-Doors Bar Cabinet Assembly Instruction
Assembly guide for the Ebern Designs 2-Doors Bar Cabinet. Includes a complete hardware list, step-by-step assembly instructions, hinge adjustment guide, and wall mounting safety procedures.
Quick answers from the manual
Quick answer
- This document is an assembly manual for the Ebern Designs 2-Doors Bar Cabinet, detailing the hardware list, step-by-step assembly, hinge adjustments, and wall mounting instructions. p. 1, 15
Key actions
- Assemble the frame using the provided hardware and steps 1-13. p. 6, 12
- Adjust hinges for door alignment. p. 5
- Secure the cabinet to the wall. p. 15
Problems and fixes
Doors are misaligned
Use the hinge adjustment screws to move the door vertically, horizontally, or adjust the gap.
p. 5Show 1 more answers Show less
Where to find it in the PDF
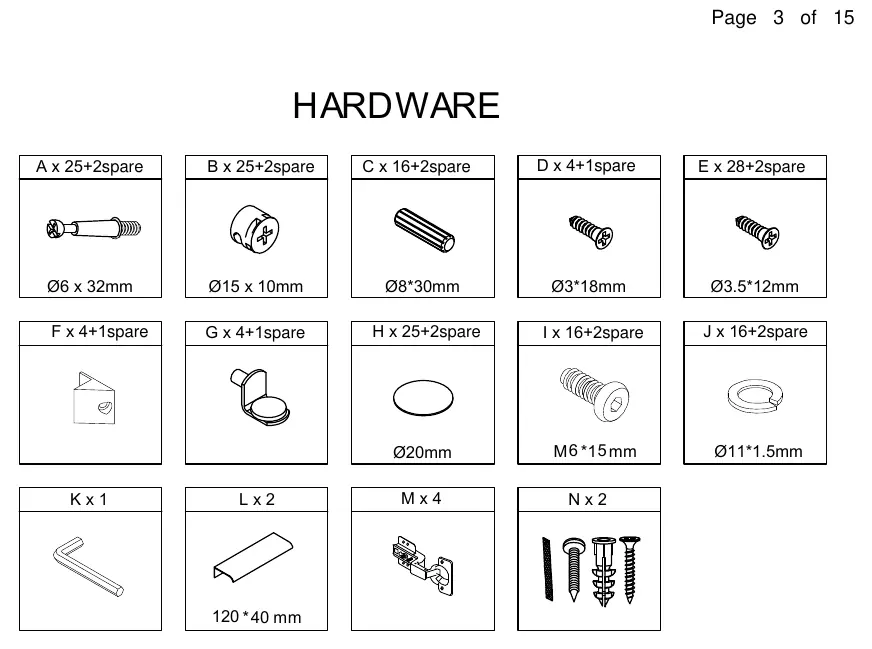
- Hardware List p. 3
- Assembly Steps p. 6, 14
- Hinge Adjustment p. 5
- Wall Mounting p. 15
Table of contents
Manual images
Click an image to enlargeQuick guide from the manual
This manual provides instructions for assembling the Ebern Designs 2-Doors Bar Cabinet. Please read all steps carefully before starting. Important: Do not use an electric screwdriver to assemble the unit to avoid damaging the panels.
Hardware list
Before beginning assembly, ensure you have all the necessary hardware components listed on page 3, including cams, pins, screws, hinges, and handles. Verify quantities against the list provided in the manual.
Installation of cams and pins
Proper installation of cams and pins is critical for structural integrity:
- Screw the pin into the designated hole.
- Ensure the arrow on the cam is pointing toward the hole of the pin it is locking.
- Lock the cam by turning the cam head with a screwdriver until tightened.
- Ensure there is no gap between the panels when the cam is locked.
Assembly instructions
The assembly process is divided into 18 steps:
- Steps 1-13: Assemble the main frame, including side panels, shelves, and internal dividers.
- Step 14: Install shelf supports.
- Step 15-16: Attach hinges to the doors and mount the doors to the main frame.
- Step 17: Finalize structural assembly.
- Step 18: Secure the cabinet to the wall for safety.
Hinge adjustment guide
If the doors are not aligned, use the hinge adjustment screws:
- Up and Down Adjustment: Loosen the screw to move the door vertically.
- Front and Back Adjustment: Turn the screw clockwise or anti-clockwise to adjust the gap between the door and the frame.
- Left and Right Adjustment: Turn the screw to adjust the door laterally.
Wall mounting
For safety, the cabinet must be secured to the wall:
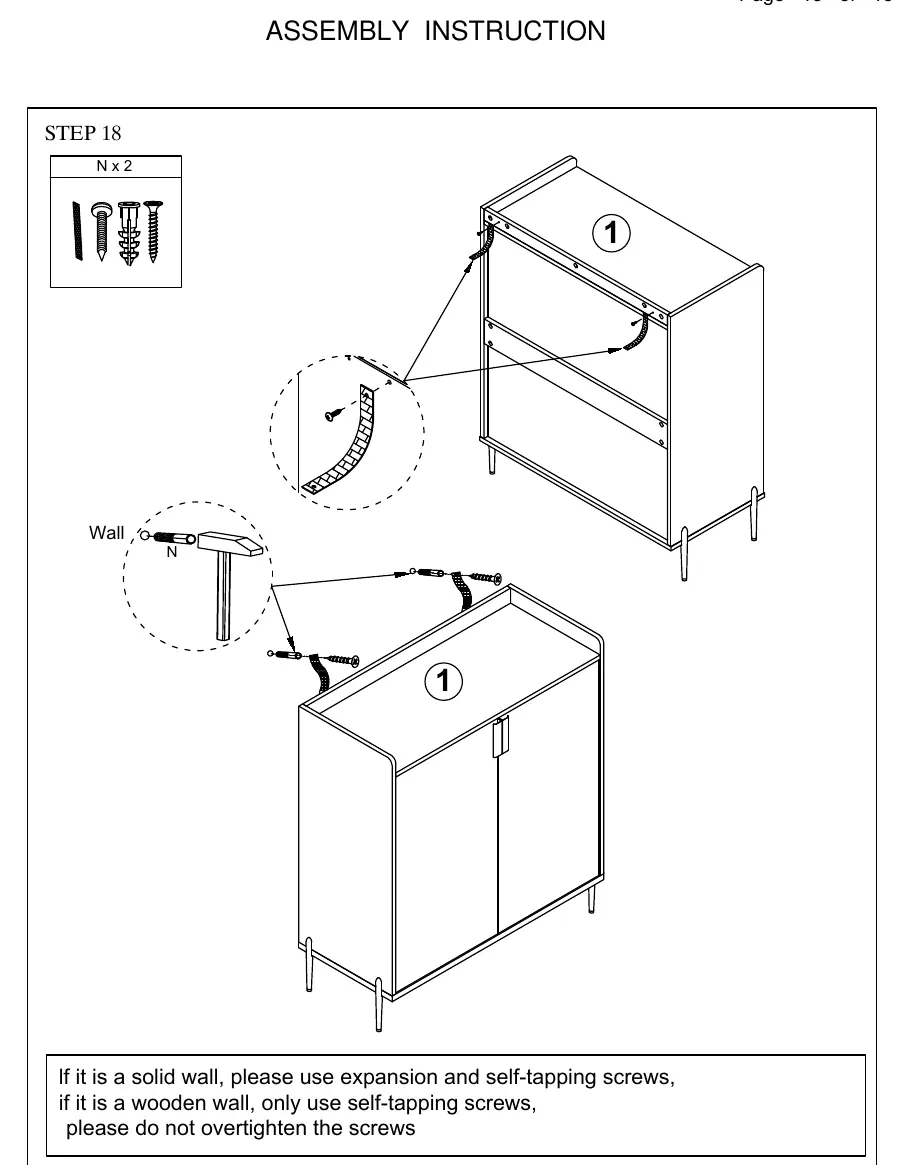
- If mounting to a solid wall, use expansion and self-tapping screws.
- If mounting to a wooden wall, use only self-tapping screws.
- Do not overtighten the screws.
Practical help
Common problems
Doors are misaligned
Use the hinge adjustment guide on page 5 to adjust the doors vertically, horizontally, or for depth.
Difficulty assembling panels
Ensure cams and pins are installed correctly with no gaps. Do not use an electric screwdriver.
Before use
- Verify all hardware components against the list on page 3.
- Ensure you have a manual screwdriver (do not use electric).
- Clear a large, flat area for assembly.
- Identify all panels (1-15) before starting.
- Check wall type (solid vs. wooden) for mounting.
Show more Show less
Images and diagrams
- Page 4: Correct installation of cams and pins.
- Page 5: Hinge adjustment directions.
- Page 15: Wall mounting procedure.
Model compatibility
- Wall mounting hardware varies based on wall type (solid vs. wooden).

Manual page author
David Miller
Documentation analyst