Power / Solar Systems
User Manual for Eco Worthy 12A Solar Charge Boost Controller
Quick guide for the Eco Worthy 12A Solar Charge Boost Controller. Learn how to install, configure voltage settings for lead-acid or lithium batteries, and troubleshoot common issues.
Table of contents
Manual images
Click an image to enlargeQuick Guide
This controller is designed to boost solar charge voltage for 24V, 36V, 48V, 60V, and 72V battery systems. It is compatible with Lead-acid, Lithium, GEL, and Flooded batteries. Important: The default setting is for lead-acid batteries. If you are using a lithium battery, you must manually adjust the charging voltage settings. Always connect the solar panel to the controller before connecting the battery.
Product Overview
The Eco Worthy Solar Charge Boost Controller features a high-functioning MCU for system stabilization, visualized charge voltage and current display, and switchable output voltage. It includes protection against overcharge, reverse current, overheat, and reverse wiring.
Technical Data
- Input Voltage: DC 13-50V
- Input Power: 450W
- Working Current: 12A
- Charge Efficiency: >93%
- Output Voltage: 24V/36V/48V/60V/72V
- Ingress Protection: IP30
- Operating Temperature: -20°C to 60°C (-4°F to 140°F)
Installation
- Connect the controller to the solar panel: Connect the positive pole of the red line to the positive pole of the solar panel and the negative pole of the black line to the negative pole of the solar panel.
- Once the solar panel is connected, the controller will turn on. Adjust the gear switch to match the voltage of your battery.
- Connect the controller to the battery pack: Connect the positive pole of the red wire to the positive pole of the battery and the negative pole of the black wire to the negative pole of the battery.
Settings
The 'Set' button has two functions: checking PV input voltage/temperature and setting charging voltage for lithium batteries.
Checking Voltage and Temperature
When the work light is on, press the 'Set' button once to display the PV input voltage on the upper screen and the controller temperature on the lower screen.
Setting Lithium Charging Voltage
- Adjust the voltage gear to fit your battery (e.g., 60V gear for a 60V battery).
- Hold the 'Set' button for 5 seconds until the voltage on the display starts flashing.
- Press the 'Set' button once to adjust the charge voltage (0.1V steps) or hold the button for quick adjustment.
Troubleshooting
- Work light is off and screens are blank: Check if the solar panels and the controller are correctly connected.
- Voltage screen shows readings but Current screen does not: Check the 10A fuse to see if it is blown, or verify battery connections.
Safety Notes
- Do not use the controller without a solar panel connected.
- The voltage gear must be consistent with the battery voltage; charging with a higher voltage gear is dangerous.
- Keep wires as short as possible to reduce electrical losses.
- The controller is not waterproof; it is recommended to install it inside a Golf Cart.
- Do not replace fuses with larger ones or copper wires. The fuse rating is 10A.
Manufacturer information
ECO-WORTHY
Practical help
Common problems
Work light is off and screens are blank
Check if the solar panels and the controller are correctly connected.
Voltage screen shows readings but Current screen does not
Check the 10A fuse to see if it is blown or check if the battery and the controller are correctly connected.
Before use
- Identify your battery type (Lead-acid, Lithium, GEL, or Flooded).
- Ensure solar panel voltage is within the 13-50V range.
- Verify the battery system voltage (24V/36V/48V/60V/72V).
- Ensure the installation location is protected from water.
- Confirm you have a 10A fuse installed.
Specs in practice
- Input Voltage
- The range of voltage the controller can accept from solar panels (13-50V).
- Working Current
- The maximum current the controller can handle (12A).
- Ingress Protection (IP30)
- The device is not waterproof and must be protected from moisture.
Images and diagrams
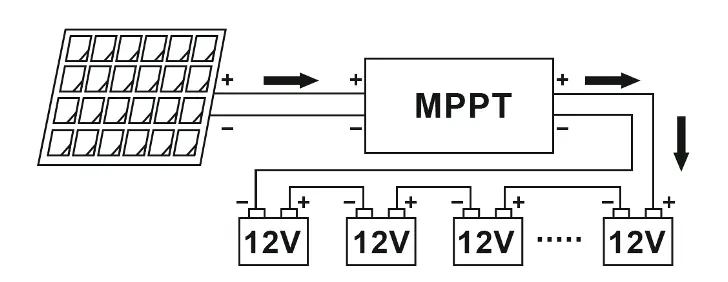
- The wiring diagram illustrates the connection sequence: Solar Panel -> MPPT Controller -> Battery Bank.
- Red lines indicate positive connections, while black/blue lines indicate negative connections.
Model compatibility
- Compatible with 24V, 36V, 48V, 60V, and 72V battery systems.
- Default settings are optimized for lead-acid batteries; lithium batteries require manual voltage adjustment.

Manual page author
David Miller
Documentation analyst
Organizes user manual content into clear summaries, with attention to model details, product context, and everyday usability.