Lighting / Controllers & Dimmers
User Manual for EcoDim Eco-Dim.07 Z-Wave Smart LED Dimmer
Quick guide for the EcoDim Eco-Dim.07 Z-Wave smart LED dimmer. Includes installation steps, wiring diagrams, MIN/MAX light level adjustment, and Z-Wave network pairing instructions.
Table of contents
Manual images
Click an image to enlargeQuick guide from the manual
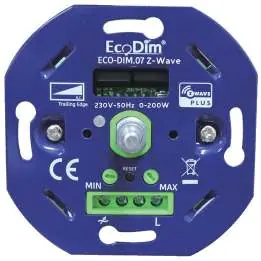
This document provides instructions for the EcoDim Eco-Dim.07 Z-Wave smart LED dimmer. It is designed for 0-200W LED loads and supports Z-Wave and Z-Wave Plus controllers. Important: Always switch off the mains voltage before working on the electrical installation. Incorrect installation can damage the dimmer beyond repair.
Specifications
The dimmer operates on 220-240 Vac, 50Hz. It is suitable for 0-200W LED loads and 10-300W halogen bulbs. The dimmer type is R,C Phase cut. It is compatible with various cover frame brands including Berker by Hager, Busch-Jaeger, Gira, JUNG, Kopp, Merten by Schneider, Niko, and PEHA.

Installation
- Remove the knob and the cover plate.
- Ensure electricity is switched off. Connect the wires as indicated in the connection diagram.
- Install the dimmer in the mounting box using screws or mounting clamps.
- Switch the electricity back on. Switch on the connected lights by pressing the dimmer shaft.
- Adjust the MIN/MAX settings as described in the adjustment section.
- Optionally, connect the dimmer to your smart home system.
- Place back the cover plate and dimmer knob.
Wiring diagrams
The dimmer supports two main wiring configurations:
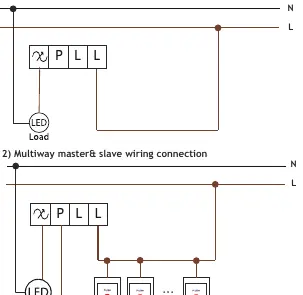
- One Way Connection: Standard connection with L and N lines.
- Multiway master & slave wiring connection: Allows for control using multiple push buttons. Note that multiway switching is only possible with push buttons, not with multiple dimmers.
MIN/MAX adjustment
To ensure optimal performance, adjust the light range:
- MIN adjustment: Switch on the lights. Insert a screwdriver into the MIN slot and turn left. If the light becomes unsteady, turn slightly back to the right until steady.
- MAX adjustment: Switch on the lights. Insert a screwdriver into the MAX slot and turn right. If the light becomes unsteady, turn slightly back to the left until steady.
Z-Wave operation
The device supports SmartStart and standard Z-Wave inclusion:
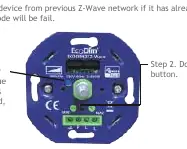
- SmartStart: Scan the Z-Wave QR code on the product with your controller. The device will be added automatically within 10 minutes of being switched on.
- Standard Inclusion: Remove the device from any previous network first. Double-press the reset button. The indicator will blink blue and stay solid for 10 seconds upon success.
- Removing from network: Press the reset button 3 times. The indicator will blink purple.
- Factory Reset: Press and hold the reset button for 5 seconds. The indicator will stay red for 10 seconds when finished. Only use this if the primary controller is inoperable.
Advanced configuration
The dimmer offers advanced settings accessible via your controller's interface, including:
- Parameter 1: State after power restored (0=Off, 1=On, 2=Return to previous level).
- Parameter 3: Default dimming speed (0-100 seconds).
- Parameter 6: Dimming way (0=Linear, 1=Logarithmic).
- Parameter 7: Default brightness when turning on.
- Parameter 8: Delay time when turning off (0-60 seconds).
Manufacturer information
EcoDim B.V.
Practical help
Common problems
Light is unsteady
Adjust the MIN or MAX settings using a screwdriver to find the stable light range.
Pairing mode fails
Ensure the device is removed from any previous Z-Wave network first.
Controller is inoperable
Perform a manual factory reset by holding the reset button for 5 seconds.
Before use
- Ensure mains power is switched off.
- Verify load is between 0-200W LED.
- Check compatibility of your cover frame.
- Have a screwdriver ready for MIN/MAX adjustment.
Specs in practice
- Input voltage
- 220-240 Vac, 50Hz
- Working temperature
- 35 °C
Images and diagrams
- One Way Connection: Direct wiring for single-point control.
- Multiway connection: Wiring diagram for using multiple push buttons with one dimmer.
Model compatibility
- Compatible with any Z-Wave or Z-Wave plus controller.
- Suitable for 90% of all LEDs.
- No neutral wire required for installation.

Manual page author
Emily Carter
User documentation editor
Prepares concise manual descriptions and highlights the most useful setup, operation, and maintenance information for readers.