Lighting / Fixtures
User Manual for Hinkley 0150WLC Smart Landscape Control
Quick guide for the Hinkley 0150WLC Smart Landscape Control. Includes installation steps, wiring diagrams, and app setup instructions for smart lighting management.
Table of contents
Quick guide from the manual
This document provides essential installation and configuration instructions for the Hinkley 0150WLC Smart Landscape Control. It covers the physical wiring of the dimmer box to the transformer and the setup process for the Hinkley mobile application to enable smart features.
Installation and Wiring
Before beginning, ensure you have a clear workspace. Follow these steps to install the controller:
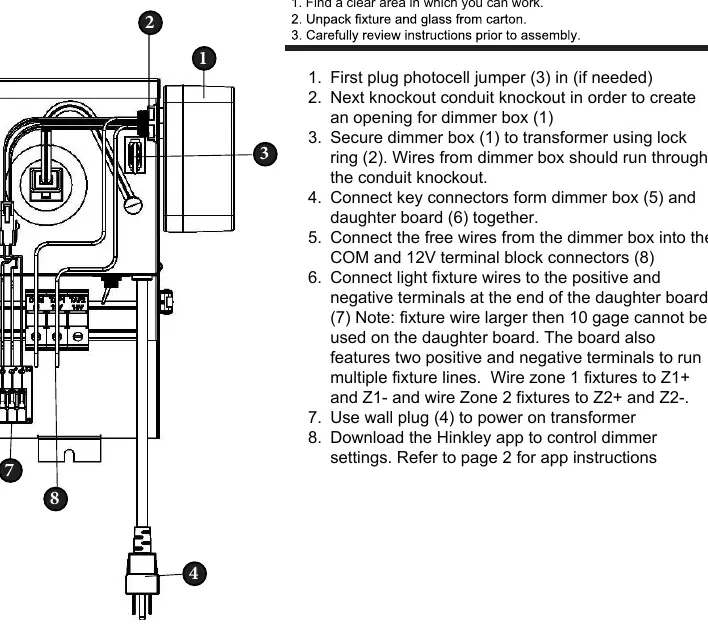
- Photocell Jumper: Plug in the photocell jumper (3) if your installation requires it.
- Conduit Preparation: Create an opening for the dimmer box (1) by knocking out the conduit knockout.
- Mounting: Secure the dimmer box (1) to the transformer using the lock ring (2). Ensure wires from the dimmer box run through the conduit knockout.
- Internal Connections: Connect the key connectors from the dimmer box (5) and the daughter board (6) together.
- Terminal Connections: Connect the free wires from the dimmer box into the COM and 12V terminal block connectors (8).
- Fixture Wiring: Connect light fixture wires to the positive and negative terminals at the end of the daughter board (7). Use Z1+ and Z1- for Zone 1 fixtures, and Z2+ and Z2- for Zone 2 fixtures.
- Power On: Use the wall plug (4) to power on the transformer.
Important Note: Fixture wires larger than 10 gauge cannot be used on the daughter board.
App Setup and Configuration
The Hinkley app allows for remote control, scheduling, and timer settings.
- Download: Install the Hinkley app from the App Store or Google Play.
- Account Creation: Open the app, create an account, and enter the required information. You will receive a verification code via email; check your spam folder if it does not arrive.
- Bluetooth: Ensure Bluetooth is enabled on your mobile device to allow the app to discover the fan/controller.
- Device Pairing: On the app home screen, select 'Add a device' and choose your controller.
- Network Setup: Enter your Wi-Fi network name and password when prompted to complete the connection.
- Management: Once connected, the main screen provides options for full device functions and automated timers or schedules.
Manufacturer information
Hinkley Lighting
Practical help
Common problems
Verification email not received during account setup
Check your email spam or junk folder.
Fixture wire connection failure
Ensure the fixture wire is not larger than 10 gauge, as larger wires are not compatible with the daughter board.
Before use
- Ensure you have a clear workspace for installation.
- Verify if the photocell jumper (3) is required for your setup.
- Ensure Bluetooth is enabled on your smartphone.
- Have your Wi-Fi network name and password ready for app configuration.
Images and diagrams
- The diagram illustrates the dimmer box (1) secured to the transformer with a lock ring (2).
- Connectors (5) and (6) link the dimmer box to the daughter board.
- Terminals (7) are clearly marked for positive and negative fixture wire connections.
Model compatibility
- Fixture wires larger than 10 gauge are not compatible with the daughter board.

Manual page author
Michael Turner
Technical manual editor
Reviews PDF manuals for structure, safety notes, and practical product details so readers can find the right information quickly.