Computers / Printers
User Manual for ELEGOO Saturn 4 Ultra 16K 3D Printer
Comprehensive user guide for the ELEGOO Saturn 4 Ultra 16K 3D printer. Includes setup, software installation, printing procedures, maintenance, and troubleshooting.
Quick answers from the manual
Quick answer
- The ELEGOO Saturn 4 Ultra 16K is a resin 3D printer. To start, perform the device self-check, install CHITUBOX, and ensure the build plate and resin tank are properly secured. Use the touch screen for leveling and calibration. p. 1, 10, 11, 12
Key actions
- Perform device self-check p. 11
- Manual leveling p. 20
- Firmware upgrade p. 21
First start
- Remove fixed screws from the resin tank and replace with screw knobs. p. 12
- Insert build plate and secure with handle. p. 12
Show 4 more answers Show less
Problems and fixes
Model doesn't stick to the build plate
Increase bottom layer exposure time or add more bottom layers.
p. 22
Model layer breakage
Check for printer vibration, loose release film, or unfastened build plate/tank.
p. 22Maintenance and reset
- Reset release film counter p. 11
Technical specifications
| Parameter | Value | Meaning | Pages |
|---|---|---|---|
| XY Resolution | 14*19um | Print detail resolution | p. 10 |
| Printing Speed | MAX 150mm/h | Maximum vertical print speed | p. 10 |
Where to find it in the PDF
- Printer Introduction p. 8, 9
- Tech Specs p. 10
- Maintenance p. 24
Table of contents
Manual images
Click an image to enlargeQuick Guide
After receiving your printer, ensure all accessories are present and the equipment is intact. Before your first print, perform the device self-check, install the CHITUBOX software, and prepare the resin tank and build plate. If you encounter any issues, contact support at [email protected].
Printer Introduction
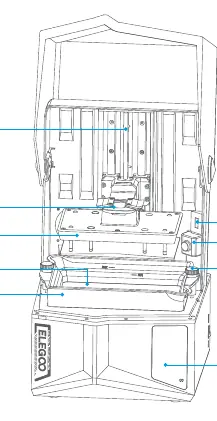
The printer features a Z-axis, build plate, resin tank, LCD display screen, AI camera, and a touch screen interface. The rear of the unit contains the USB interface, power switch, DC socket, and an extension port for accessories like a mini heater.
Technical Specifications
The Saturn 4 Ultra 16K uses MSLA stereolithography technology with a COB light source and Fresnel collimating lens. It features an XY resolution of 14x19um (15120x6230) and a printing speed of up to 150mm/h. Power requirements are 100-240V 50/60 Hz 24V 6A.
Device Self-Check
Upon startup, the printer automatically conducts a self-check on key hardware components. Do not touch the printer during this process. If the release film usage approaches 60,000 times, the device will prompt for a replacement. You can reset the counter manually in the self-check menu.
Test Printing
Preparation: Remove fixed screws from the resin tank and replace them with the provided screw knobs. Insert the build plate into the connecting block and press the handle down to secure it. The build plate is self-leveling.
Printing: Pour resin into the tank, keeping the level between the MIN and MAX lines. Cover the printer and select a pre-sliced test model.
Post-Processing: After printing, install the drip tray to prevent resin drips. Remove the build plate, use a scraper to remove the model, and use an ELEGOO cleaning and curing machine for post-processing.
Software Installation and Setup
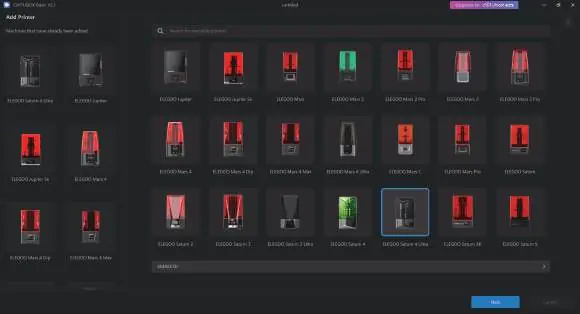
Install CHITUBOX from the provided USB drive or the official website. Select "ELEGOO Saturn 4 Ultra 16K" as your default printer. Default machine parameters are pre-configured and generally do not need adjustment.
Network Management Center
Access the Network Management Center in the slicing software to associate your printer. Ensure both the computer and printer are on the same LAN to enable remote control.
AI Camera
The built-in AI camera allows for real-time monitoring and time-lapse photography. Time-lapse recording starts at a model height of 30mm and is available for models exceeding 50mm. Anomaly detection (e.g., empty build plate, warping) is active for models over 100mm.
Resin Calibration
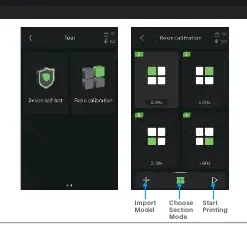
Use the calibration tool to divide the screen into 4, 6, or 8 sections. Import your model, set exposure times for each section (decreasing or equal), and print to determine optimal exposure parameters.
Accessibility Features
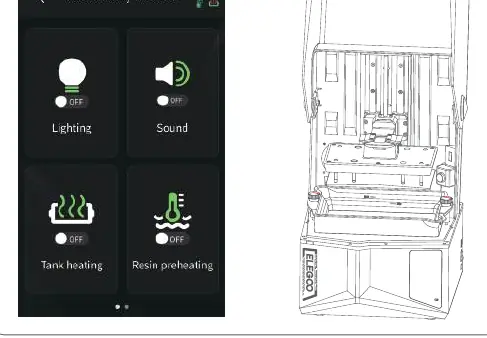
The accessibility menu allows you to toggle lighting, adjust sound, and enable tank heating or resin preheating. If the build plate fails to level automatically, use the "Manual leveling" option and follow the on-screen instructions with an A4 paper.
Firmware Upgrade
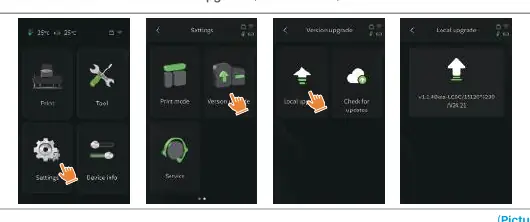
Upgrades can be performed locally via USB or online if the printer is connected to a network. Check for updates in the settings menu.
Troubleshooting
If the model does not stick to the build plate, increase bottom layer exposure time. For layer breakage, check if the printer is shaking, the release film is loose, or the build plate is not fastened. For residue detection errors, ensure the tank and plate are secure and the resin is free of foreign objects.
Machine Maintenance
Regularly clean the resin tank and build plate. Do not use sharp tools on the resin tank. If the Z-axis makes noise, apply lubricant to the lead screw every 2-3 months. The LCD screen has a service life of approximately 2000+ hours; clean it daily and replace it if exposure issues occur.
Practical help
Common problems
Model does not stick to the build plate
Increase bottom layer exposure time or add more bottom layers.
Model layer breakage
Check if the printer is shaking, the release film is loose, or the build plate/tank is not fastened.
Residue detection error at start
Ensure resin tank and build plate are secure. Clean the tank or filter the resin for foreign objects.
Resin insufficient or exceeding volume error
Ensure resin level is above 1/3 of tank volume and below the MAX line. Recalibrate via self-check.
Before use
- Confirm equipment is intact and accessories are complete.
- Remove fixed screws from the resin tank.
- Install the build plate and secure it with the handle.
- Ensure resin level is between MIN and MAX lines.
- Perform the device self-check upon startup.
Show more Show less
Specs in practice
- XY Resolution
- 14x19um (15120x6230) - determines the detail level of prints.
- Layer Thickness
- 0.01-0.2mm - adjustable thickness for each printed layer.
- Printing Speed
- MAX 150mm/h - maximum vertical printing speed.
Images and diagrams
- Printer parts diagram identifies the Z-axis, build plate, resin tank, and touch screen.
- Rear view diagram shows the USB interface, power switch, DC socket, and extension port.
Model compatibility
- Compatible with CHITUBOX slicing software.
- Supports USB and WiFi connectivity.
- Extension port supports compatible accessories like mini heaters.

Manual page author
Emily Carter
User documentation editor