Lighting / Fixtures
Installation Guide for Elk Home 20-Light Chandelier 18324/20
Comprehensive installation guide for the Elk Home 20-Light Chandelier (18324/20). Includes step-by-step instructions for mounting, wiring, chain assembly, and rod placement.
Quick answers from the manual
Quick answer
- To install the Elk Home 20-Light Chandelier, mount the bracket to the junction box, connect the ground, lead, and neutral wires, assemble the chain and canopy, install E12 bulbs, and attach the decorative rods, leaves, and flowers according to the section diagrams. p. 1, 2, 3, 4
Key actions
- Disconnect power at the main fuse box. p. 1
- Connect fixture wires to house wires using wire nuts. p. 2
Problems and fixes
Wiring identification
Use the provided chart: Lead wire is round/smooth (parallel cord), Neutral wire is square/ridged (parallel cord).
p. 2Show 2 more answers Show less
Technical specifications
| Parameter | Value | Meaning | Pages |
|---|---|---|---|
| Bulb Type | E12 Candelabra | Recommended bulb type. | p. 3 |
Where to find it in the PDF
- Installation Steps p. 1, 2, 3
- Rod Placement Diagrams p. 4
Table of contents
Manual images
Click an image to enlargeImportant Information
This guide provides instructions for installing the Elk Home 20-Light Chandelier (18324/20). Warning: Disconnect power at the main fuse box before installation. This fixture is intended for installation in accordance with the National Electrical Code (NEC) and local code specifications. If you are not familiar with these requirements, installation by a certified electrician is recommended.
Preparation and Mounting
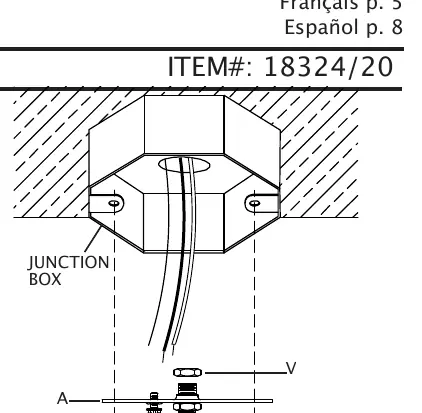
- Remove all parts and packages from the box.
- Ensure the junction box is secure.
- Attach the mounting bracket (A) to the junction box using the provided screws (B).
- Ensure the screw collar loop (W) is properly attached to the mounting bracket (A) before proceeding.
Wiring Instructions
Proper wiring is critical for safety. Follow these steps carefully:
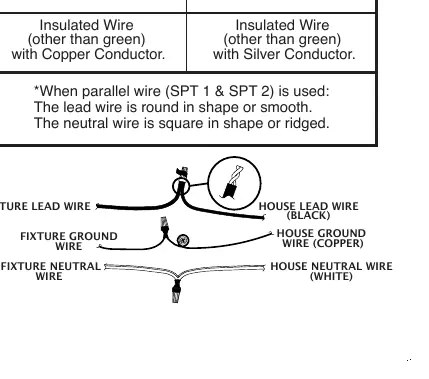
- Strip 3/4" of insulation from the ends of the fixture wires.
- Connect the fixture ground wire to the house ground wire (bare copper, bare silver, or green insulated wire) using the ground screw on the mounting bracket.
- Connect the fixture lead wire (black) to the house lead wire (black) using a wire nut (C).
- Connect the fixture neutral wire (white) to the house neutral wire (white) using a wire nut (C).
- Secure all wire nuts with electrical tape (not included).
- Carefully push all wires and wire nuts into the junction box.
Fixture Assembly
- Chain and Canopy: Attach the canopy (D) to the ceiling using the threaded ring (F) and screw collar loop (W). Use the locking links (G) to attach the chain (H) to the fixture and the mounting bracket.
- Bulb Installation: Screw recommended E12 candelabra bulbs (not included) into the sockets. Do not exceed the maximum bulb wattage marked on the socket.
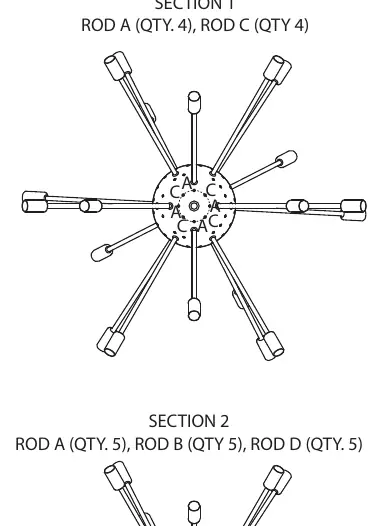
- Rod and Decoration Assembly: The fixture requires specific placement of rods (A, B, C, D), leaves (K), and flowers (L). Refer to the rod placement diagrams in the manual for the correct configuration of Section 1, Section 2, and Section 3.
- Final Touches: Insert leaves (K) into the ends of the stems on the rods and thread the flowers (L) onto the ends of the rods. Do not over-tighten.
Practical help
Common problems
Fixture wires are not long enough to reach house wires.
Ensure you have pulled the house wires down sufficiently from the junction box before starting the installation.
Unsure about wire connections.
Refer to the wiring chart in the manual. If using parallel cord (SPT 1 & SPT 2), the lead wire is round/smooth, and the neutral wire is square/ridged.
Before use
- Disconnect power at the main fuse box.
- Verify all parts are present.
- Ensure junction box is secure.
- Have E12 candelabra bulbs ready.
- Have electrical tape ready.
Show more Show less
Images and diagrams
- Wiring diagram shows proper connection of ground, lead, and neutral wires.
- Rod assembly diagrams (Sections 1-3) show placement of rods A, B, C, and D.
Model compatibility
- Intended for installation in accordance with National Electrical Code (NEC).

Manual page author
Michael Turner
Technical manual editor