Lighting / Fixtures
Installation Guide for Elk Home 81467/10 and 81477/10 Chandelier
A comprehensive installation guide for the Elk Home 81467/10 and 81477/10 10-light chandelier. This manual provides step-by-step instructions for mounting, wiring, and bulb installation to ensure a safe and correct setup.
Quick answers from the manual
Quick answer
- This manual provides instructions for the installation of the Elk Home 81467/10 and 81477/10 10-light chandeliers, covering mounting, wiring, and bulb installation. p. 1, 4
Key actions
- Install the mounting bracket to the junction box. p. 1
- Connect fixture wires to house supply wires. p. 2, 3
- Assemble the fixture body and chain. p. 2
First start
- Install E12 candelabra bulbs into the sockets. p. 4
Show 2 more answers Show less
Technical specifications
| Parameter | Value | Meaning | Pages |
|---|---|---|---|
| Bulb Type | E12 candelabra | Recommended bulb type for the fixture. | p. 4 |
Where to find it in the PDF
- English Installation Instructions p. 1, 2, 3, 4
- French Installation Instructions p. 5, 6, 7, 8
- Spanish Installation Instructions p. 9, 10, 11, 12
Table of contents
Manual images
Click an image to enlargeQuick Guide from the Manual
Before beginning the installation, ensure you have disconnected the power at the main fuse box. This fixture must be installed in accordance with the National Electrical Code (NEC) and local code specifications. If you are unfamiliar with these requirements, it is recommended to hire a certified electrician. Ensure all parts are present before starting assembly.
Mounting Bracket Installation
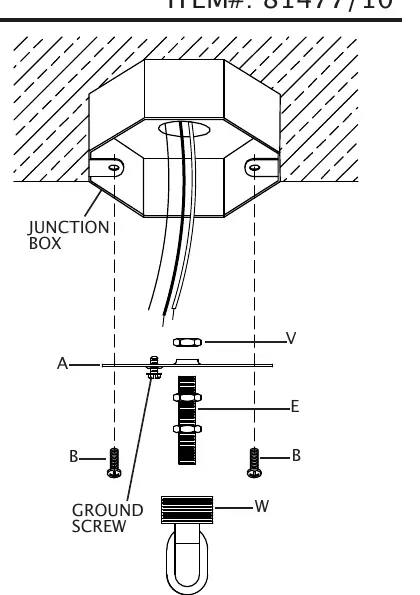
- Carefully pull house wires out of the junction box.
- Assemble the screw collar loop (W) to the mounting bracket (A) by threading the pipe (E) and securing it with the hexnut (V).
- Place the mounting bracket (A) against the junction box, ensuring the screw collar loop points downward.
- Secure the mounting bracket to the junction box using the junction box screws (B). Ensure house wires remain accessible and are not pinched.
Fixture Assembly
- Rotate the fixture arms until they are evenly spaced.
- Feed the fixture wires through the center stem (M) and thread the stem onto the fixture body (O).
- Push wires through the loop (S) and thread the loop onto the top of the center stem.
- Determine the desired hanging height and cut the chain (H) accordingly.
- Attach the chain to the loop (S) and weave the fixture wires through the chain links.
- Slide the threaded ring (F) and canopy (D) over the chain and wires.
Wiring Connections
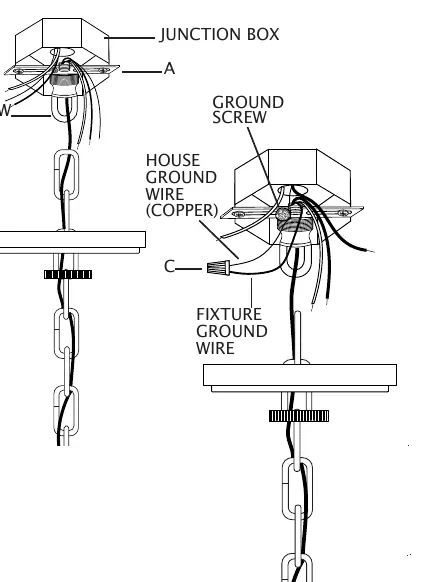
- Strip 3/4 inch of insulation from the ends of the fixture wires.
- Push the fixture wires through the screw collar loop (W) and into the junction box.
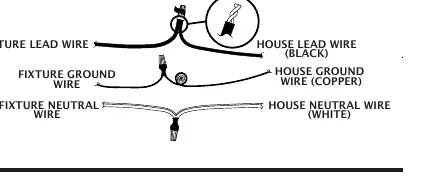
- Connect the house ground wire to the fixture ground wire using the ground screw on the mounting bracket and a wire nut (C).
- Connect the house lead wire (black) to the fixture lead wire using a wire nut (C).
- Connect the house neutral wire (white) to the fixture neutral wire using a wire nut (C).
- Secure all wire nuts with electrical tape (not included) and carefully push all wires into the junction box.
Final Installation and Bulbs
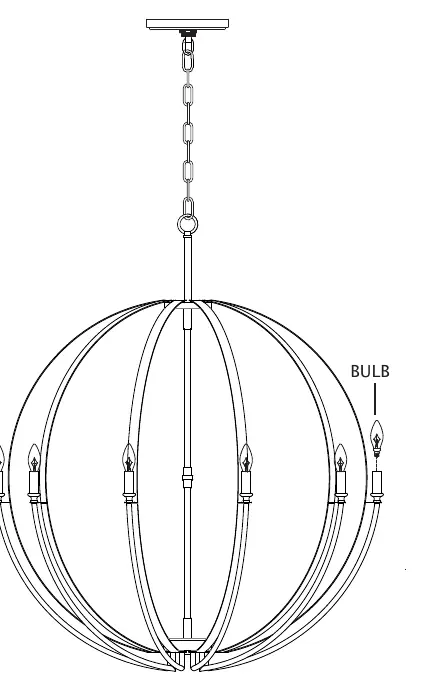
- Raise the canopy (D) to the ceiling and secure it by screwing the threaded ring (F) onto the screw collar loop (W).
- Attach the end of the chain (H) to the screw collar loop (W).
- Install the recommended E12 candelabra bulbs into the sockets. Do not exceed the maximum bulb wattage marked on the fixture.
Practical help
Common problems
Wires pinched during installation
Ensure house wires are easily accessible and not trapped between the mounting bracket and the ceiling.
Missing parts
Contact the retailer from which the product was purchased if any parts are missing from the box.
Unsure of wire connections
Refer to the wire connection chart in the manual. Use the provided wire nuts (C) and secure with electrical tape.
Before use
- Disconnect power at the main fuse box.
- Verify all parts are present.
- Ensure the junction box is secure.
- Have E12 candelabra bulbs ready (not included).
- Ensure you have electrical tape for securing wire nuts.
Show more Show less
Specs in practice
- Junction Box
- The electrical box in the ceiling where the fixture connects to house wiring.
Images and diagrams
- Mounting bracket assembly: Shows the correct orientation of the threaded pipe and hexnuts on the mounting bracket.
- Wiring diagram: Illustrates the connection of fixture wires to house supply wires using wire nuts.
Model compatibility
- Requires E12 candelabra bulbs.
- Must be installed in accordance with National Electrical Code (NEC).

Manual page author
Michael Turner
Technical manual editor