Home / Electrical Outlets & Switches
Installation Guide for Enerlites 17017-F3 3-Speed Fan Control and Light Switch
Learn how to install and operate the Enerlites 17017-F3 3-Speed Fan Control and Light Switch. This guide covers wiring instructions, safety warnings, technical specifications, and operational settings for your ceiling fan and light control.
Quick answers from the manual
Quick answer
- The Enerlites 17017-F3 is a single-pole 3-speed fan control and light switch. It requires the ceiling fan to be set to 'High' speed via its pull string before the wall switch can control the speed. p. 1
Key actions
- Turn off power at the circuit breaker before installation. p. 1
- Wire the device: Hot to Hot, Fan to Load, Light to Light Load, Ground to Ground. p. 1
First start
- Set the ceiling fan pull string to 'High' before using the wall control. p. 1
Problems and fixes
Switch not controlling fan speed
Check if the ceiling fan pull string is set to 'High'.
p. 1Technical specifications
| Parameter | Value | Meaning | Pages |
|---|---|---|---|
| Voltage | 120VAC, 60Hz | Standard residential power | p. 1 |
| Fan Load | 2.5A | Maximum fan motor current | p. 1 |
| Light Load | 720W or 6A | Maximum lighting capacity | p. 1 |
Where to find it in the PDF
- Installation and Wiring p. 1
Table of contents
Manual images
Click an image to enlargeQuick Guide
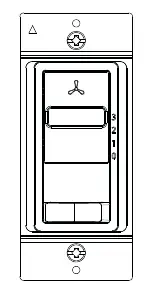
The Enerlites 17017-F3 is a 3-speed fan control and light switch. Before installation, ensure the power is turned off at the circuit breaker. Crucial: Before using this wall control, you must set your ceiling fan's physical pull string to the "High" speed setting. The wall switch then controls the speed via the slider (0-3) and the light via the bottom switch.
Safety Warnings
- Turn off power at the circuit breaker before installation.
- Use copper wire only.
- Do not use this switch to control receptacles, motor-operated appliances, fluorescent lighting fixtures, or transformer-supplied appliances.
- More than one disconnect switch may be required to de-energize the device before servicing.
Specifications
- Voltage: 120VAC, 60Hz
- Fan Load: 2.5A
- Light Load: 720W or 6A
- Operating Temperature: 32°F-104°F
Wiring Directions
Ensure power is disconnected before wiring. Connect the wires as follows:
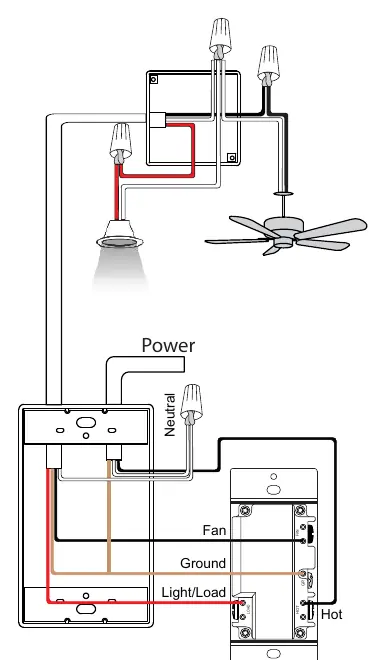
- HOT wire: Connect to the fan's HOT terminal.
- FAN wire: Connect to the fan's LOAD terminal.
- LIGHT wire: Connect to the fan's LIGHT LOAD terminal.
- GROUND wire: Connect to the fan's GROUND terminal.
Operation
The fan control is off when the slider is at the zero position. Sliding it up through positions 1-3 increases the fan speed from low to high. The light switch at the bottom controls the connected light/load.
Practical help
Common problems
Fan speed not changing
Ensure the ceiling fan's physical pull string is set to the 'High' speed setting before using the wall control.
Overheating or damage
Do not use this switch to control receptacles, motor-operated appliances, fluorescent lighting fixtures, or transformer-supplied appliances.
Before use
- Turn off power at the circuit breaker.
- Verify you are using copper wire only.
- Set the ceiling fan's pull string to 'High' speed.
- Ensure the switch is not being used for prohibited devices like motors or fluorescent fixtures.
Images and diagrams
- The wiring diagram shows the connection from the power source to the switch and then to the fan and light.
- The switch has four terminals: Hot, Fan, Light Load, and Ground.
Model compatibility
- Designed for single-pole light and fan control.
- No neutral wire required.

Manual page author
Emily Carter
User documentation editor
Prepares concise manual descriptions and highlights the most useful setup, operation, and maintenance information for readers.