Lighting / Controllers & Dimmers
Enerlites HMOS-J Occupancy/Vacancy Sensor Switch User Manual
Comprehensive user guide for the Enerlites HMOS-J sensor switch. Includes installation wiring instructions, configuration for occupancy and vacancy modes, time delay settings, and troubleshooting steps.
Quick answers from the manual
Quick answer
- The HMOS-J is a 2-in-1 occupancy/vacancy sensor switch. It detects motion to turn on loads and automatically turns them off after a set time delay. It supports manual override via the front button. p. 1, 2
Key actions
- Adjusting Time Delay p. 1
- Changing Face Cover p. 1
First start
- Warm-up period p. 1
Problems and fixes
Load does not turn off
Check ground wire, heat sources within 6 feet, and wiring polarity.
p. 2Technical specifications
| Parameter | Value | Meaning | Pages |
|---|---|---|---|
| Voltage | 120/277VAC, 60Hz | Operating voltage | p. 1 |
| Resistive Load | 5A | Maximum resistive load capacity | p. 1 |
Where to find it in the PDF
- Installation and Specifications p. 1
- Operation and Troubleshooting p. 2
Table of contents
Quick guide from the manual
The Enerlites HMOS-J is a 2-in-1 occupancy/vacancy sensor switch designed to automate lighting or load control based on motion detection. Before installation, ensure the power is turned off at the circuit breaker. Note that the device requires a 2-minute warm-up period upon initial power-up, during which the load may cycle on and off.
Installation and Wiring
Installation should be performed by a qualified electrician in accordance with the National Electric Code. Use copper wires only.
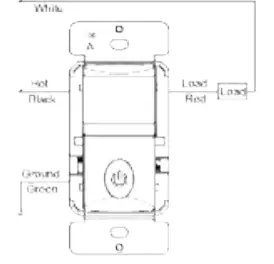
- Step 1: Connect the RED wire from the sensor to the LOAD wire.
- Step 2: Connect the BLACK wire from the sensor to the HOT wire.
- Step 3: Connect the GREEN wire from the sensor to the GROUND wire.
For optimal performance, install the sensor at a height of 4 to 5 feet, away from obstructions like walls, furniture, or transparent barriers such as Low-E glass.
Operation and Modes
The sensor features two primary modes, selectable via the mode switch:
- OCC (Occupancy Mode): Automatic On, automatic Off after the set time delay.
- VAC (Vacancy Mode): Manual On only, automatic Off after the set time delay. This mode also includes an LED night light feature.
The push button on the front allows for manual toggling of the load in either mode. The time delay can be adjusted using the time switch on the left side to 15 seconds (Test mode), 10 minutes, or 20 minutes.
Troubleshooting
If the load does not turn off as expected, check the following:
- Ensure the ground wire is properly secured.
- Check for significant heat sources (e.g., high-wattage light bulbs, portable heaters, or HVAC vents) within 6 feet (2 meters) of the sensor.
- Verify that the HOT and LOAD wires are not reversed.
Practical help
Common problems
Load does not turn off
Ensure the ground wire is secured, check for nearby heat sources (heaters/vents) within 6 feet, and verify that HOT and LOAD wires are not reversed.
Before use
- Turn off power at the circuit breaker before starting installation.
- Ensure you are using copper wires only.
- Verify the installation height is between 4 and 5 feet.
- Ensure the area is free from obstructions like Low-E glass or large furniture.
- Confirm the load type is compatible (Incandescent, Electronic Ballast, or Motor).
Specs in practice
- Detection Range
- 180-degree field of view, up to 30 feet in front and 12 feet on each side.
- Operation Temperature
- Designed to operate between 32°F and 131°F.
Images and diagrams
- Wiring diagram shows the connection of Red (Load), Black (Hot), and Green (Ground) wires.
- Face cover change instructions show how to slide the cover down to release and up to attach.
Model compatibility
- Not suitable for installation near Low-E glass.
- Requires a secured grounding wire for proper operation.

Manual page author
Michael Turner
Technical manual editor
Reviews PDF manuals for structure, safety notes, and practical product details so readers can find the right information quickly.