Electronics / Projectors
User Manual for Epson PowerLite 107/108/109W/970/980W/990U Projector
Comprehensive user guide for the Epson PowerLite 107, 108, 109W, 970, 980W, and 990U projectors. Includes setup instructions, network configuration, basic operation, maintenance, and troubleshooting.
Table of contents
Quick guide from the manual
This guide provides essential information for setting up and operating your Epson PowerLite projector. For detailed technical specifications, safety instructions, and advanced network configurations, please refer to the full manual.
Introduction to Your Projector
The PowerLite series offers high-resolution projection with flexible connectivity options, including USB plug-and-play, HDMI, and optional wireless networking. Ensure you have all components from the box, including the projector, remote control, batteries, power cord, and VGA cable.
Setting Up the Projector
Place the projector on a sturdy, level surface or use a compatible ceiling mount. Ensure there is adequate ventilation around the vents. Connect your video source using the appropriate cable (HDMI, VGA, or USB). If using the projector at altitudes above 4921 feet (1500 m), enable High Altitude Mode in the settings.
Using the Projector on a Network
You can connect the projector to a network via a wired LAN cable or an optional wireless LAN module. Use the Network menu to configure IP settings, email alerts, and SNMP monitoring. You can also control the projector remotely using a web browser by entering the projector's IP address.
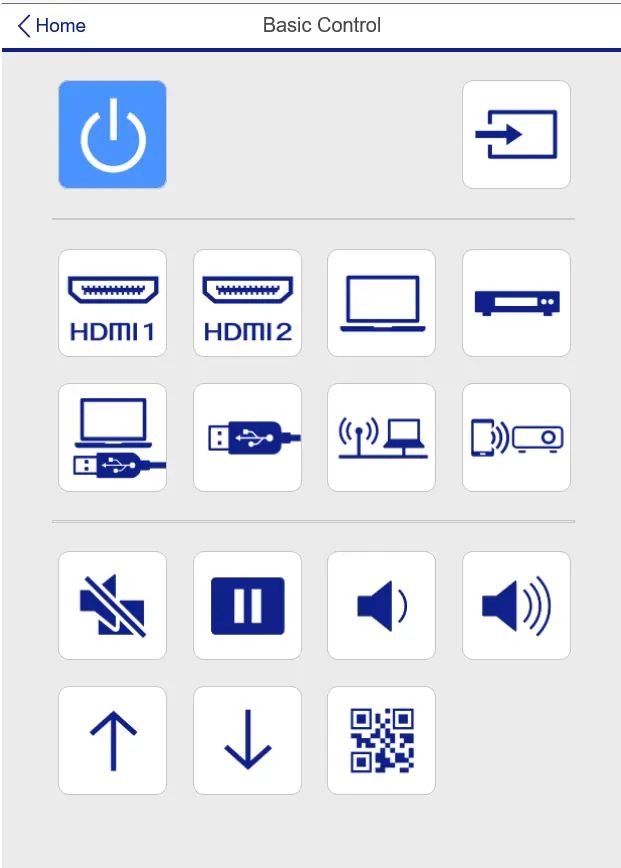
Using Basic Projector Features
Use the remote control or control panel to turn the projector on and off. Adjust the image height using the front adjustable foot and rear feet. Correct image distortion using the horizontal keystone slider, keystone buttons, or the Quick Corner feature. Use the zoom and focus rings to adjust image size and clarity.
Adjusting Projector Features
You can temporarily mute the picture and sound using the A/V Mute button. Security features include password protection and button locking to prevent unauthorized use. You can also save and transfer menu settings between projectors of the same model using a USB flash drive or computer.
Maintaining and Transporting the Projector
Regularly clean the lens with lens-cleaning paper and the air filter/vents with a vacuum or soft brush. Replace the lamp when the projected image deteriorates or the lamp light flashes. Always allow the projector to cool for at least one hour before replacing the lamp or transporting the unit.
Troubleshooting
If you encounter issues, check the status lights on the projector. Use the built-in Help system on the Home screen for quick solutions. Common problems like "No Signal" or incorrect image shape can often be resolved by checking cable connections, input source settings, or performing a reset.
Manufacturer information
Epson
Practical help
Common problems
No image appears
Ensure the lens cover is open, the projector is powered on, and all cables are securely connected. Check that the correct input source is selected.
Image is not rectangular
Use the horizontal keystone slider, keystone buttons, or the Quick Corner feature to adjust the image shape.
Cannot access projector via web
Ensure you are using the correct user ID and password (case sensitive). Default user ID is EPSONWEB and password is admin.
Wireless authentication fails
Verify that Wireless Mode is set to 'Wireless LAN On' and check the Security settings and passphrase in the Network Configuration menu.
Before use
- Ensure the lens cover is fully open.
- Verify that the projector is placed on a sturdy, level surface.
- Check that all cables are securely connected to the projector and source device.
- Turn on the connected computer or video device before the projector.
- Ensure the projector has adequate ventilation space.
Specs in practice
- Keystone Correction
- Allows adjustment of image shape by ±30° vertically and horizontally.
Images and diagrams
- Front/Top: Identifies the lens, zoom/focus rings, and control panel.
- Rear: Shows all input/output ports including HDMI, USB, and Computer ports.
- Control Panel: Illustrates buttons for power, menu, and navigation.
Model compatibility
- Wireless networking requires an optional wireless LAN module.
- MHL support is available on the HDMI2/MHL port.
- USB Display software is compatible with Windows and macOS.

Manual page author
Emily Carter
User documentation editor
Prepares concise manual descriptions and highlights the most useful setup, operation, and maintenance information for readers.