Home Appliances / Space Heaters
User Manual for Eurom Wall Designheat 2000R Ceramic Wall Heater
Quick user guide for the Eurom Wall Designheat 2000R ceramic wall heater. Includes installation instructions, operation modes, timer settings, and maintenance tips.
Quick answers from the manual
Quick answer
- The Eurom Wall Designheat 2000R is a wall-mounted ceramic heater. It features manual and remote control operation, a weekly timer, and open window detection. It must be installed at least 180 cm above the floor. p. 13, 14, 39, 40
Key actions
- Wall mounting p. 13, 39
- Setting the weekly timer p. 16, 41
First start
- Unroll the cable, plug into a 220/240V socket, and set the main switch to ON (I). p. 14, 39
Problems and fixes
Overheating
The unit switches off if it gets too hot. Ensure intake/outlet grills are not blocked and the unit is not covered.
p. 17, 43Technical specifications
| Parameter | Value | Meaning | Pages |
|---|---|---|---|
| Supply voltage | 220-240V~50Hz | Standard electrical supply | p. 7, 33 |
| Max. power | 2000 W | Maximum heat output | p. 7, 33 |
Where to find it in the PDF
- Installation p. 13, 39
- Operation p. 14, 40
Table of contents
Manual images
Click an image to enlargeQuick guide from the manual
The Eurom Wall Designheat 2000R is a wall-mounted ceramic heater designed for indoor use. It features multiple heating modes, a weekly timer, and open window detection. For safety, it must be installed at least 180 cm above the floor and kept away from flammable materials.
Installation
The heater must be mounted on a solid, non-flammable, and vertical wall. Ensure the following minimum distances are maintained:
- Ceiling: 20-40 cm
- Side walls: 20-40 cm
- Floor: 180 cm
Drill two holes 39.4 cm apart, insert plugs and screws, and hang the heater using the hanging eyes. Secure the heater using the provided bracket at the top.
Operation
The heater can be operated using the main switch and F-button on the unit, or via the included remote control.
Manual Operation
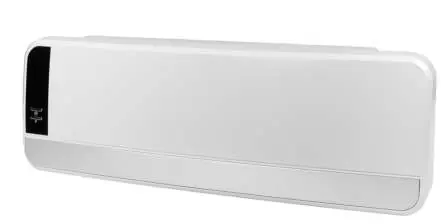
Press the F-button to cycle through modes:
- 1st press: Fan only
- 2nd press: Half power
- 3rd press: Full power
- 4th press: Swing function enabled
- 5th press: Standby mode
Remote Control
The remote control allows for setting the day, time, temperature, and weekly programs. Ensure the remote sensor has a clear line of sight to the receiver on the unit.
Weekly Timer
To set the weekly timer, first set the current date and time. You can program up to 6 time periods per day. The timer operates in a continuous loop from day 1 to day 7.
Open Window Detection
When enabled, the heater will automatically switch to standby if the room temperature drops by 5-10°C within 10 minutes.
Safety and Maintenance
The heater includes an overheating protection system. If the unit gets too hot, it will switch to ventilation mode to cool down. Always ensure the air intake and outlet grills are free from dust and obstructions. Clean the exterior with a dry or slightly damp cloth and vacuum the grills regularly. Do not use aggressive chemicals.
Practical help
Common problems
Heater switches off automatically
Check for overheating (blocked air intake/outlet) or if the 12-hour continuous run time has been reached.
Remote control not working
Ensure the remote sensor has a clear line of sight to the receiver on the unit.
Settings lost
Settings are lost if the main switch is turned off, power is cut, or the plug is removed.
Before use
- Check for visible damage to the device, cable, and plug.
- Ensure the wall is solid, non-flammable, and vertical.
- Maintain minimum distances: 20-40 cm from ceiling/sides, 180 cm from floor.
- Ensure the electrical installation has a 30 mA earth leakage circuit breaker.
Images and diagrams
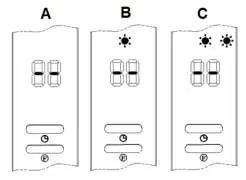
- The manual includes diagrams for wall mounting, remote control button functions, and display indicators for different modes (A, B, C, D, E, F, G, H).
Model compatibility
- Suitable for indoor use only.
- Not for use in rooms smaller than 15 m³.

Manual page author
David Miller
Documentation analyst
Organizes user manual content into clear summaries, with attention to model details, product context, and everyday usability.