Lighting / Fixtures
Everly Quinn 10-Light 2-Tier Alabaster Chandelier Installation Guide
Quick installation guide for the Everly Quinn 10-Light 2-Tier Alabaster Chandelier. Includes wiring instructions, bulb requirements, and maintenance tips.
Quick answers from the manual
Quick answer
- This manual provides installation instructions, safety warnings, and maintenance guidelines for the Everly Quinn 10-Light 2-Tier Alabaster Chandelier. p. 1, 2, 5, 7
Key actions
- Turn off electricity before installation, changing bulbs, or cleaning. p. 2
- Use a qualified electrician for installation. p. 2
- Adjust hanging cable height by pressing the small pin into the canopy. p. 7
First start
- Verify all accessories are included according to the package contents list. p. 2, 3
- Adjust the length of the hanging cable and wire. p. 5
- Install the mounting bracket on the ceiling. p. 5
- Connect the lamp wires to the house wires. p. 5
- Install the lamp frame on the ceiling. p. 5
Show 3 more answers Show less
Maintenance and reset
- Clean the lamp regularly (once a month) with a soft cloth dipped in water and wrung dry. p. 7
Technical specifications
| Parameter | Value | Meaning | Pages |
|---|---|---|---|
| Bulb Type | G9 | Required bulb base type | p. 2 |
| Maximum Wattage | 40W | Maximum wattage per bulb | p. 2 |
| Bulb Quantity | 12 | Number of bulbs required | p. 2 |
Where to find it in the PDF
- Safety and Preparation p. 2
- Package Contents p. 3
- Installation Instructions p. 4, 5, 6, 7
- Maintenance p. 7
- Warranty p. 8
Table of contents
Manual images
Click an image to enlargeQuick guide from the manual
This document provides installation and maintenance instructions for the Everly Quinn 10-Light 2-Tier Alabaster Chandelier. Before beginning, ensure the electricity is turned off at the main breaker. A qualified electrician is recommended for installation. The fixture requires 12 G9 bulbs, with a maximum wattage of 40W per bulb.
Package contents
Before starting, verify that all parts are included in the package. If any parts are missing, contact customer support via the order page. The package includes the lamp body and necessary mounting hardware.
Installation instructions
Follow these steps to install your light fixture:
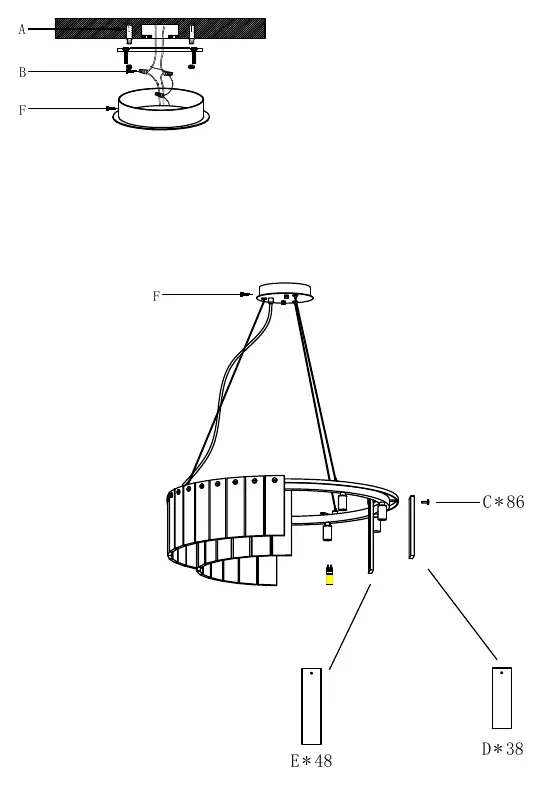
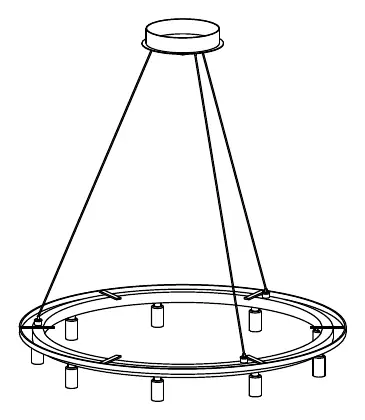
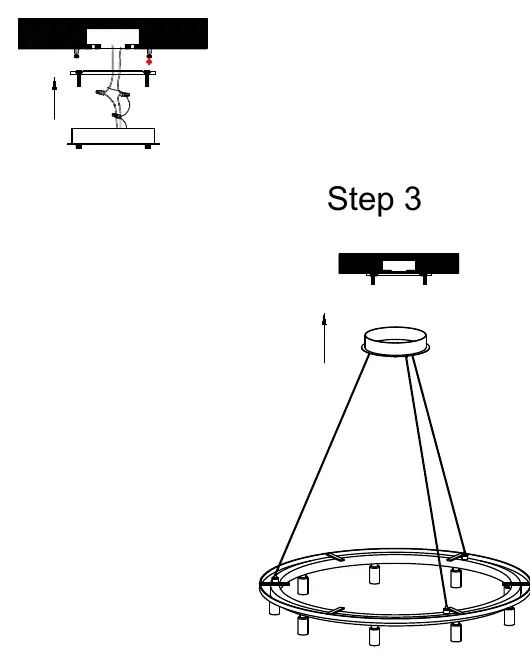
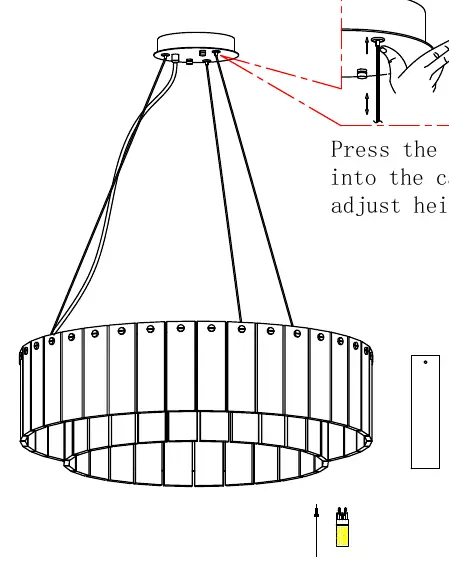
- Adjust cable length: Adjust the length of the hanging cable and wire according to your requirements.
- Mounting: Take off the mounting bracket from the ceiling canopy and install it on the ceiling.
- Wiring: Connect the lamp wires to your house wires.
- Final assembly: Install the lamp frame on the ceiling.
- Height adjustment: If further adjustment is needed, press the small pin into the canopy to adjust the height.
Maintenance
To ensure safe and efficient operation, clean the lamp regularly. Before cleaning, turn off the power and allow the lamp to cool to room temperature. Use a soft cloth dipped in water and wrung dry to wipe the fixture clean. Do not use corrosive substances such as gasoline or alcohol disinfectants, as these will damage the lamps.
Warranty
The manufacturer provides customer support 24 hours a day. If you encounter problems, contact support via the order page with your order ID and detailed information. The warranty does not cover failures caused by third-party products or natural disasters. Do not retrofit or remodel the light fixture.
Practical help
Common problems
Missing parts
Check the parts list and contact customer support via the order page for replacements.
Bulb wattage exceeded
Do not exceed 40W per bulb to prevent damage.
Cleaning damage
Do not use corrosive substances like alcohol or gasoline; use a soft, damp cloth.
Before use
- Turn off electricity at the main breaker.
- Verify all parts are present according to the package contents list.
- Ensure you have 12 G9 bulbs (max 40W each).
- Hire a qualified electrician for installation.
- Allow the lamp to cool completely before cleaning.
Show more Show less
Images and diagrams
- Wiring: Connect house wires to fixture wires.
- Height Adjustment: Press the small pin into the canopy to adjust the hanging cable length.
Model compatibility
- Intended for indoor use only.
- Not suitable for retrofitting or remodeling.

Manual page author
David Miller
Documentation analyst