Lighting / Fixtures
Installation Manual for Everly Quinn 20-Light Tiered Chandelier
A comprehensive installation and assembly guide for the Everly Quinn 20-Light Tiered Chandelier. Includes detailed wiring instructions, bulb requirements, assembly steps for crystals and supports, and safety precautions.
Quick answers from the manual
Quick answer
- This is an installation manual for the Everly Quinn 20-Light Tiered Chandelier. It requires 20 E12 bulbs (max 60W each) and should be installed by a licensed electrician. p. 1, 2
Key actions
- Shut off main electrical supply before installation or cleaning. p. 2, 7
- Wear gloves during installation to handle crystals. p. 1
Problems and fixes
Missing parts
Do not attempt to assemble; contact customer service.
p. 2Show 3 more answers Show less
Maintenance and reset
- Turn off power before changing bulbs or cleaning. p. 2, 7
Technical specifications
| Parameter | Value | Meaning | Pages |
|---|---|---|---|
| Bulb Base | E12 | Required bulb base type | p. 1, 2 |
| Max Wattage | 60W | Maximum wattage per bulb | p. 1, 2 |
| Bulb Quantity | 20 | Number of bulbs required | p. 1, 2 |
Where to find it in the PDF
- Installation Manual Cover p. 1
- Safety Instructions p. 2
- Packing Contents p. 3
- Installation Steps p. 4, 5, 6
- Wiring Diagram p. 7
- Warranty p. 8
Table of contents
Manual images
Click an image to enlargeQuick guide from the manual
This chandelier requires professional installation. Before beginning, ensure the main electrical supply is shut off. Wear gloves during installation, especially when handling crystals, to prevent damage and fingerprints. The fixture requires 20 pieces of E12 bulbs (Max 60W each, not included). If you wish to use dimmable bulbs, ensure you have a compatible dimmer switch.
Preparation
Before starting, verify that all parts listed in the packing contents are present. If any parts are missing or damaged, do not attempt to assemble or install the product. Keep the product away from children under 3 years old.
Packing contents
The package includes the following main components:
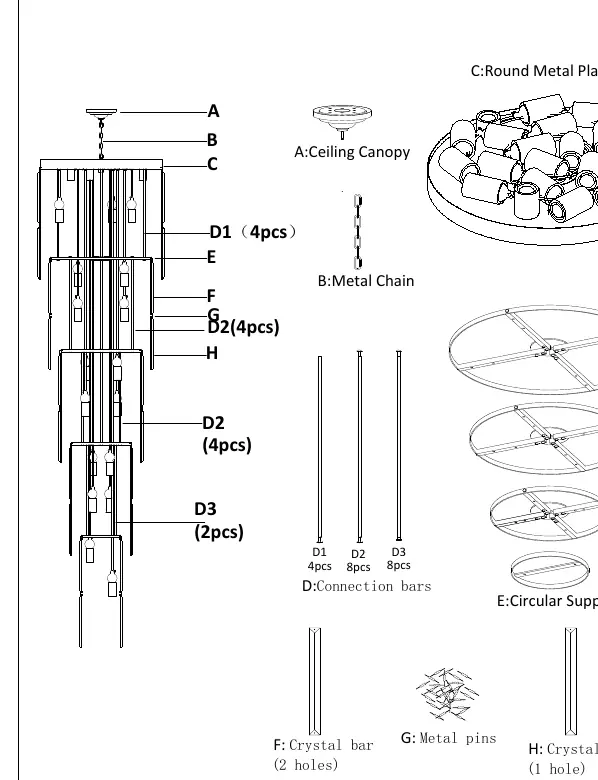
- Ceiling Canopy
- Metal Chain
- Round Metal Plate
- Connection bars (D1, D2, D3)
- Circular Supports
- Crystal bars (F and H)
- Metal pins (G)
Installation steps
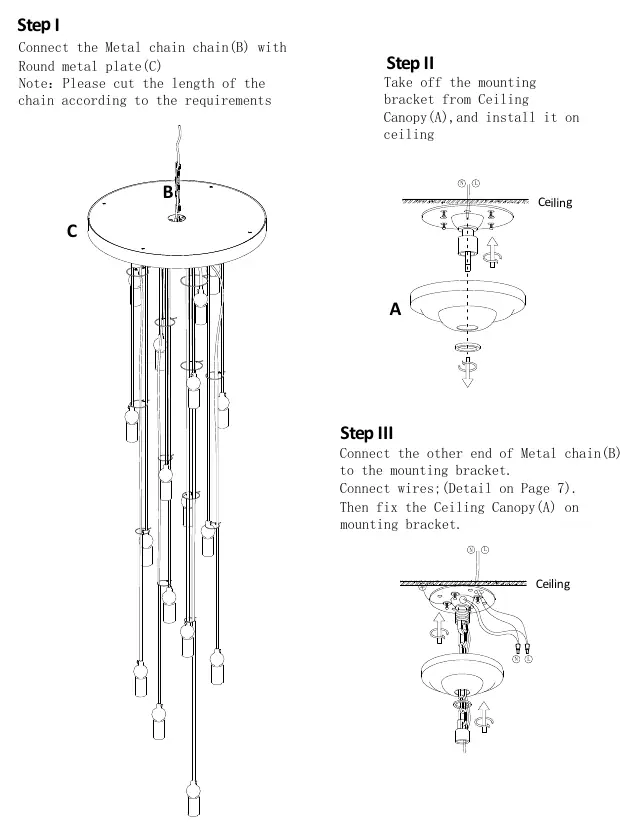
- Step I: Connect the Metal chain (B) to the Round metal plate (C). Cut the chain to your desired length if necessary.
- Step II: Remove the mounting bracket from the Ceiling Canopy (A) and install the bracket onto the ceiling.
- Step III: Connect the other end of the Metal chain (B) to the mounting bracket. Perform the electrical wiring (see Wiring instructions below) and fix the Ceiling Canopy (A) to the mounting bracket.
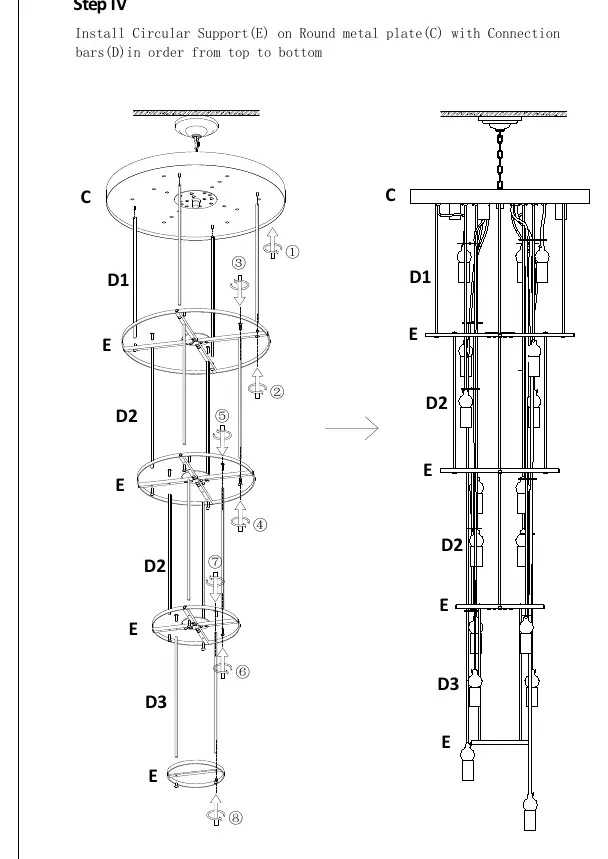
- Step IV: Install the Circular Supports (E) onto the Round metal plate (C) using the Connection bars (D) in order from top to bottom.
- Step V: Loosen the lamp wires and arrange them to hang naturally. They will straighten out over time.
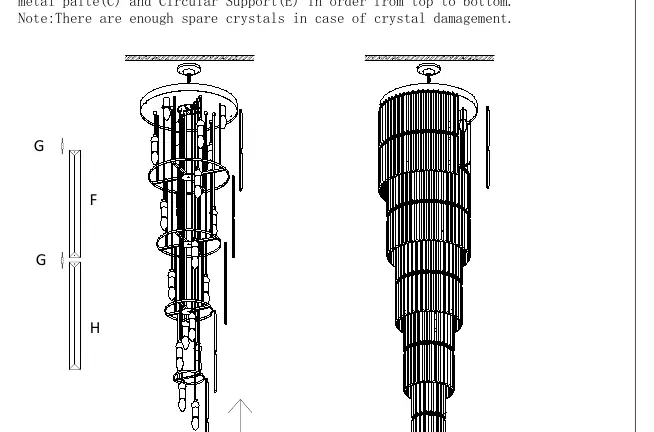
- Step VI: Connect the Crystal bars (F and H) using the Metal pins (G) and hang them on the Round metal plate (C) and Circular Supports (E), working from top to bottom.
Wiring instructions
The fixture must be wired to your house supply. Ensure the main power is off before proceeding.
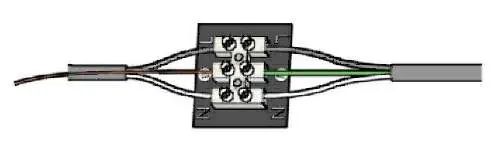
- House Wires: Black (Live), White (Neutral), Green (Ground).
- Lamp Wires: Two transparent wires (Live and Neutral, polarity does not need to be distinguished) and one Brass wire (Ground).
Warning: Never connect the ground wire to black or white power supply wires.
Maintenance and care
Always shut off the main electrical supply before changing bulbs or cleaning the fixture. The product comes with a 1-year warranty. Do not retrofit or remodel the fixture. If you encounter issues, contact customer service with your order ID.
Practical help
Common problems
Missing or damaged parts
Do not attempt to install; contact customer service with your order ID.
Wires are bent after installation
This is normal; they will naturally become vertical after hanging for some time.
Crystal damage
Spare crystals are included in the package.
Before use
- Shut off main electrical supply
- Verify all parts are present according to the packing contents diagram
- Wear gloves during installation
- Ensure you have 20 pieces of E12 bulbs (Max 60W)
- Check if a dimmer is required for your bulbs
Show more Show less
Images and diagrams
- The wiring diagram shows the connection between house wires (Black/White/Green) and lamp wires (Transparent/Brass).
- The assembly diagram illustrates the order of installing circular supports and connection bars from top to bottom.
- The crystal hanging diagram shows the use of metal pins to connect crystal bars.
Model compatibility
- Requires E12 bulbs.
- If using dimmable bulbs, a matched dimmer switch is required.
- Installation by a licensed electrician is recommended.

Manual page author
David Miller
Documentation analyst