Lighting / Fixtures
Installation Guide for Unbranded 2278-25-BN-L LED Wall Sconce
Step-by-step installation instructions for the Unbranded 2278-25-BN-L LED Wall Sconce. This guide covers mounting, wiring, dimming compatibility, and color temperature selection.
Quick answers from the manual
Quick answer
- This document provides installation instructions for the LED Wall Sconce, including wiring, mounting, and color temperature adjustment. p. 1
Key actions
- Install the mounting ring to the outlet box. p. 1
- Select color temperature. p. 1
First start
- Ensure power is off at the circuit breaker before installation. p. 1
Show 2 more answers Show less
Technical specifications
| Parameter | Value | Meaning | Pages |
|---|---|---|---|
| Color Temperature | 3000K, 4000K, 5000K | Selectable via switch | p. 1 |
| Dimming | Electronic Traic | Dimming capability | p. 1 |
Where to find it in the PDF
- Installation Instructions p. 1
Table of contents
Quick Guide
This document provides installation instructions for the LED Wall Sconce. Before beginning, ensure the main power is turned off at the circuit breaker. The fixture features selectable color temperatures (3000K, 4000K, 5000K) and is compatible with Electronic Traic dimmers.
Installation Steps
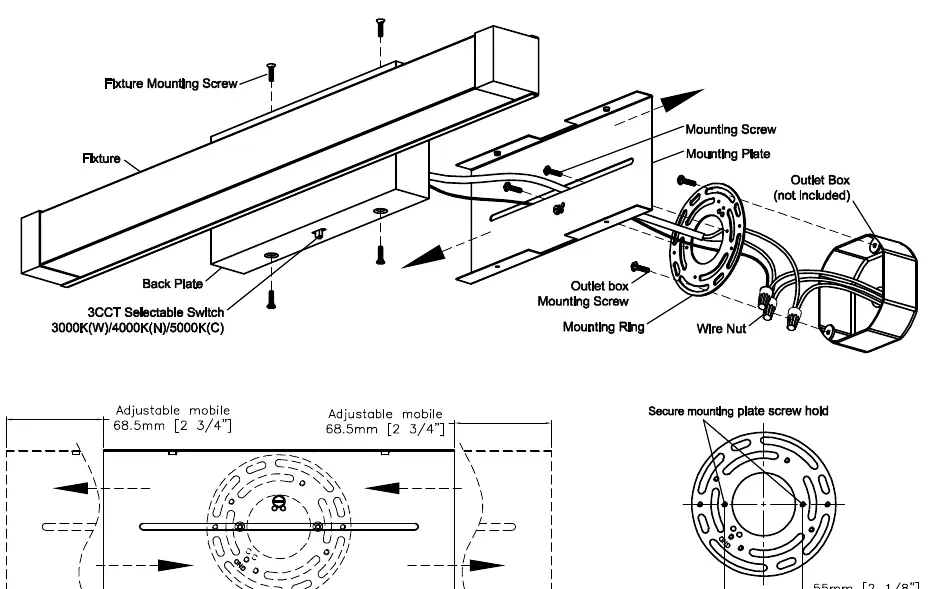
- Power Off: Turn off the main power at the circuit breaker before installing the fixture to prevent electric shock.
- Prepare Mounting: Remove the existing fixture and mounting hardware.
- Mounting Ring: Secure the mounting ring to the outlet box using the provided screws. Ensure the mounting screw holes are horizontal (spacing 2-1/8").
- Wiring: Connect the fixture wires to the supply wires. Connect the fixture's ground wire directly to the back plate using the provided green screw. Ensure all wire connectors are secure and tuck them inside the outlet box.
- Mounting Plate: Secure the mounting plate to the mounting ring. The plate is adjustable (mobile) to allow for proper positioning.
- Final Assembly: Place the fixture over the mounting plate and secure it with the fixture mounting screw.
Dimming and Color Temperature
Dimming: This fixture is compatible with Electronic Traic dimming. To utilize this feature, ensure the hot (black) and neutral (white) wires are connected correctly, along with the bare copper ground wire.
Color Temperature: The lamp allows you to switch between three color temperatures: 3000K, 4000K, and 5000K. This can be adjusted using the switch located on the back plate.
Safety Information
- All electrical connections must be in accordance with local and National Electrical Code (N.E.C.) standards.
- If you are unfamiliar with electrical wiring, consult a qualified electrician.
- Ensure supply conductors are rated for 90°C.
Practical help
Common problems
Mounting holes do not align with the outlet box
The mounting plate is adjustable. Slide the mobile mounting plate left or right to the appropriate position to align with the outlet box.
Light does not dim correctly
Ensure the dimmer switch being used is compatible with Electronic Traic dimming.
Before use
- Turn off power at the circuit breaker
- Verify supply conductors are rated for 90°C
- Ensure mounting ring is horizontal
- Check that all wire connectors are secure
- Verify the color temperature switch is set to your preference before final mounting
Show more Show less
Specs in practice
- Color Temperature
- Selectable between 3000K (Warm), 4000K (Neutral), and 5000K (Cool) via a switch on the back plate.
- Mounting Ring Spacing
- The mounting ring requires a 55mm (2 1/8") spacing for the outlet box screws.
Images and diagrams
- The diagram illustrates the mounting ring installation with 55mm (2 1/8") spacing.
- The back plate features a switch to toggle between 3000K, 4000K, and 5000K color temperatures.
- The mounting plate is shown as adjustable, allowing for horizontal alignment.
Model compatibility
- Requires Electronic Traic compatible dimmer for dimming functionality.
- Requires standard outlet box for installation.

Manual page author
Michael Turner
Technical manual editor