Tools / Saws
Service Parts List for Evolution R185CMS-Li Compound Mitre Saw
Official service parts list and exploded view diagrams for the Evolution R185CMS-Li 18V Cordless 185mm Compound Mitre Saw. Use this guide to identify replacement parts, assembly groups, and component codes for maintenance and repair.
Table of contents
Service Parts Guide for Evolution R185CMS-Li
This document provides a comprehensive breakdown of the Evolution R185CMS-Li 18V Cordless 185mm Compound Mitre Saw. It is designed to assist users and technicians in identifying specific components, assembly groups, and part codes required for maintenance, repair, or replacement.
Understanding the Assembly Groups
The saw is divided into several distinct assembly groups, each illustrated in the exploded view diagrams. Refer to these groups to locate specific parts:
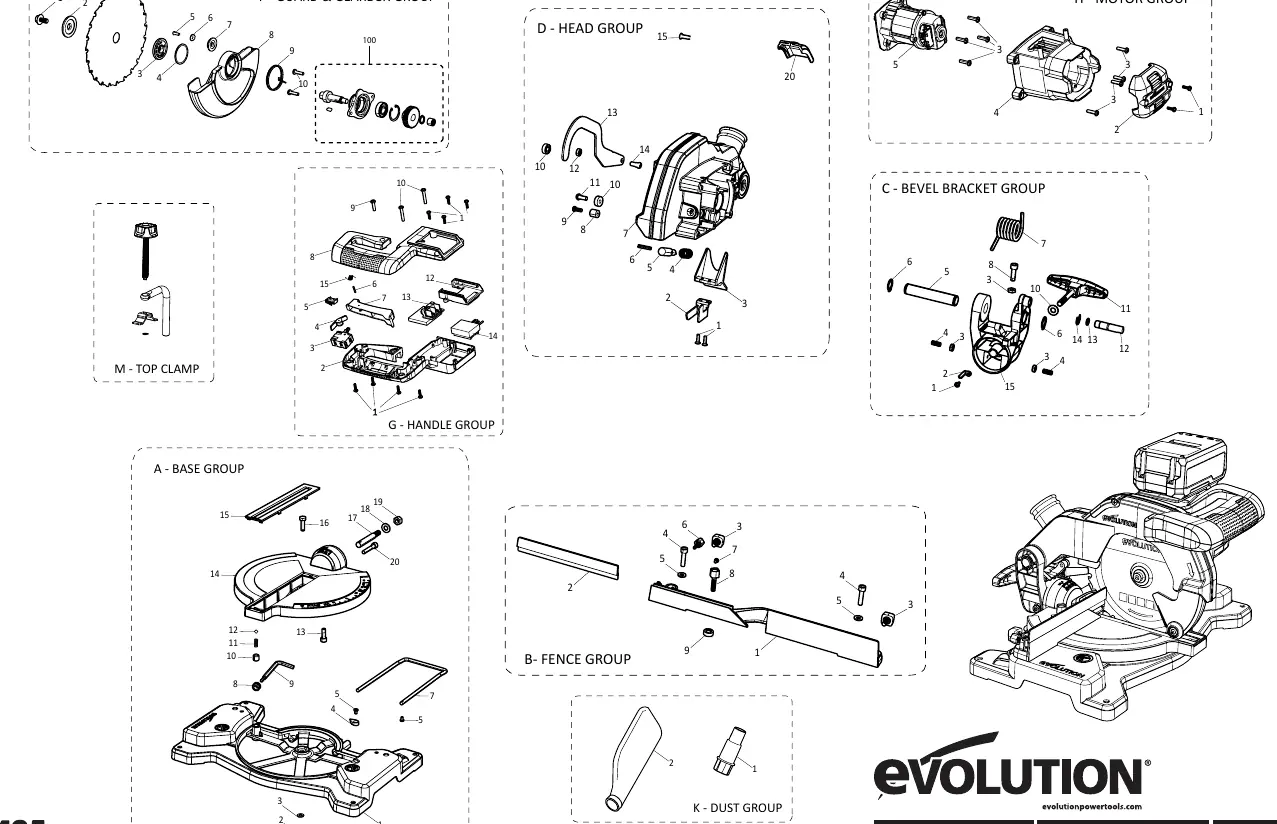
- A - Base Group: Includes the main table, mitre indicator, and support components.
- B - Fence Group: Contains the sliding fence and locking mechanisms.
- C - Bevel Bracket Group: Covers the pivot, bevel lock, and associated hardware.
- D - Head Group: Includes the blade housing, guard linkage, and dust chute.
- F - Guard & Gearbox Group: Details the blade guard, flanges, and gearbox assembly.
- G - Handle Group: Contains the trigger, switch, battery socket, and PCB components.
- H - Motor Group: Covers the motor housing and internal motor components.
- K - Dust Group: Includes the dust bag and connector.
- M - Top Clamp: The workpiece hold-down clamp assembly.
How to Use This Parts List
To identify a specific part:
- Locate the component in the exploded view diagram on page 1.
- Identify the corresponding reference number (e.g., A01, F02).
- Refer to the table on page 2 to find the matching Part Code and Quantity.
- Use the Part Code when ordering replacements or contacting support.
Manufacturer information
Evolution Power Tools
Practical help
Common problems
Damaged blade guard
Refer to the 'F - Guard & Gearbox Group' in the diagram to identify the specific guard part (F08) and spring (F09) for replacement.
Worn or missing fasteners
The parts list provides specific screw sizes (e.g., M4x6, M5x20) and part codes for all fasteners used in the assembly.
Motor or switch failure
Check the 'G - Handle Group' and 'H - Motor Group' to identify the switch (G03), motor PCB (G13), or motor housing (H04) for troubleshooting.
Before use
- Ensure all fasteners are tightened according to the assembly diagram.
- Verify that the blade guard moves freely and returns to the closed position.
- Check that the dust bag is securely attached to the dust hose connector.
- Confirm the battery is fully charged and properly seated in the battery socket.
Images and diagrams
- Exploded views show the assembly order of components.
- Each part is numbered to correspond with the table on page 2.
- Groups (A-K) categorize parts by their location on the saw.
Model compatibility
- Parts are specific to the R185CMS-Li model.
- Verify part codes against the specific version (V: 088-0004) before ordering.

Manual page author
Michael Turner
Technical manual editor
Reviews PDF manuals for structure, safety notes, and practical product details so readers can find the right information quickly.