General / Other Manuals
User Guide for Fanatec ClubSport Pedals V3 Brake Performance Kit
Quick guide for installing the Fanatec ClubSport Pedals V3 Brake Performance Kit. Includes assembly steps, elastomer spring hardness comparison, and maintenance tips.
Table of contents
Manual images
Jump to the sectionQuick guide from the manual
This document is a quick guide for the ClubSport Pedals V3 Brake Performance Kit. It is essential to read the full ClubSport Pedals V3 user manual available at www.fanatec.com/support to avoid damage and ensure optimal performance. This kit allows for customization of the brake pedal feel using various elastomer springs.
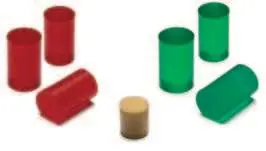
Package Content
- 2x Elastomer spring red Ø13 x 20 mm (A)
- 1x Elastomer spring red Ø12 x 20 mm (B)
- 2x Elastomer spring green Ø13 x 20 mm (C)
- 1x Elastomer spring green Ø12 x 20 mm (D)
- 1x Polyurethane spring (PU foam) Ø13,5 x 15 mm (E)
- 1x Lithium grease (F)
- 1x Installation tool (Fix-1) (G)
Note: Required tools are not included in the package.
Hardness Comparison
The kit allows for various combinations of elastomer springs to adjust the brake feel. The hardness ranges from soft to very hard depending on the combination of Ø13 and Ø12 springs (red and green).
Assembly and Installation
Follow these steps carefully to avoid damage to the vibration motor cable:

- Turn the brake preload screw to the backside end position (lowest preload).
- Insert the included installation tool (Fix-1) behind the brake assembly to retain a gap between the brake assembly and the pedal arm.
- Loosen the small screw (a) with a 2.5 mm Allen key and remove the thin bolt (b) from the brake pedal lever.
- Disconnect the loadcell cable from the 'Brake' port on the mainboard and remove it from the cable clips.
- Turn the brake assembly downwards out of the brake pedal lever.
- Remove the original Polyurethane springs and store them safely.
- Insert the new Polyurethane spring (E) into the preload screw.
- Select two elastomer springs (A-D) based on your preference and apply Lithium grease (F) to their surface.
- Insert the selected elastomer springs into the preload screw.
- Insert the brake pedal bolt into the preload screw.
- Turn the brake assembly back into the brake pedal lever using the installation tool, then reconnect the loadcell cable to the 'Brake' port.
- Insert the thin bolt (a) into the brake pedal lever through the black block at the brake bolt, then tighten the small screw (b) with a 2.5 mm Allen key.
- Adjust the preload screw so the scale is within the correct use range and there is no mechanical play in the brake pedal.
Important Usage Notes
Preload Screw: The preload screw is no longer used for full-range adjustment as before. Its use is now limited exclusively to eliminating mechanical play in the brake pedal.
Cable Safety: Always take care of the cables during assembly to avoid pinching or damage, which is not covered by the warranty.
Official resources from the manual
Manufacturer information
Fanatec
Practical help
Common problems
Vibration motor cable damage
Use the included installation tool (Fix-1) to maintain a gap between the brake assembly and pedal arm during installation to prevent pinching.
Mechanical play in brake pedal
Adjust the preload screw until the scale is in the correct range and the play is eliminated.
Before use
- Ensure you have a 2.5 mm Allen key (not included in the kit).
- Download and read the full ClubSport Pedals V3 user manual from www.fanatec.com/support.
- Ensure the workspace is clean.
- Apply the provided Lithium grease to the elastomer springs before installation.
Specs in practice
- Elastomer springs (A-D)
- Used to customize the brake pedal resistance and feel.
- Polyurethane spring (E)
- Provides the base resistance for the brake pedal.
- Lithium grease (F)
- Lubricant for the elastomer springs to ensure smooth operation.
Images and diagrams
- The hardness comparison table helps select the right combination of springs for desired brake stiffness.
- The assembly steps illustrate the correct sequence for removing the brake assembly and installing the new springs.
Model compatibility
- Designed specifically for ClubSport Pedals V3.

Manual page author
David Miller
Documentation analyst
Organizes user manual content into clear summaries, with attention to model details, product context, and everyday usability.