Lighting / Fixtures
Installation Manual for Feit Electric 1x4 LED Flat Panel Fixture FP1X4/840/WH
Quick installation guide for the Feit Electric 1x4 LED Flat Panel Fixture (FP1X4/840/WH). Includes safety warnings, required tools, and step-by-step mounting instructions.
Quick answers from the manual
Quick answer
- This manual provides installation instructions for the Feit Electric 1x4 LED Flat Panel Fixture. It covers safety precautions, required tools, and a 10-step mounting process. p. 1, 4, 5
Key actions
- Turn off power at the circuit breaker before installation. p. 2, 4
- Connect wires: black (line), white (neutral), green (ground). p. 4
Problems and fixes
Fixture not secure
Ensure mounting tabs are in a vertical position when installing on a vertical surface.
p. 4Show 2 more answers Show less
Technical specifications
| Parameter | Value | Meaning | Pages |
|---|---|---|---|
| Mounting Plate Dimensions | 25.6 in. x 9.8 in. x 0.47 in. | Physical size of the mounting bracket. | p. 3 |
Where to find it in the PDF
- Safety Information p. 2
- Installation p. 4, 5
Table of contents
Manual images
Click an image to enlargeQuick guide from the manual
This document provides installation instructions for the Feit Electric 1x4 LED Flat Panel Fixture. Before beginning, ensure you have the necessary tools and that the power is turned off at the circuit breaker. The installation involves mounting a plate to the junction box, securing it with toggle bolts, and connecting the electrical wiring.
Safety Information
- Turn off power: Always turn off the power supply at the fuse or circuit breaker box before installation.
- Grounding: Ground the fixture to prevent electric shock.
- Connections: Double-check all electrical connections to ensure they are tight and correct.
- Safety gear: Wear rubber-soled shoes and use a sturdy wooden ladder.
- Small parts: Keep small parts away from children and dispose of packing materials properly.
- Compliance: All electrical connections must comply with local and National Electrical Code (N.E.C.) standards. If unsure, consult a qualified electrician.
Tools and Hardware
Tools Required:
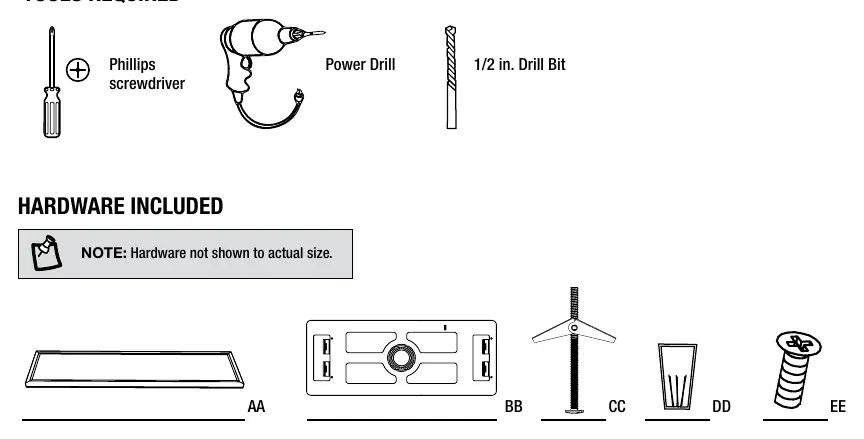
- Phillips screwdriver
- Power drill
- 1/2 in. drill bit
Hardware Included:
- 1x4 Fixture
- Mounting Plate (25.6 in. x 9.8 in. x 0.47 in.)
- 3/16 in. Bolts and Toggle Nuts
- Wire Nuts
- Machine Screws #8-32 x 1 in.
Installation
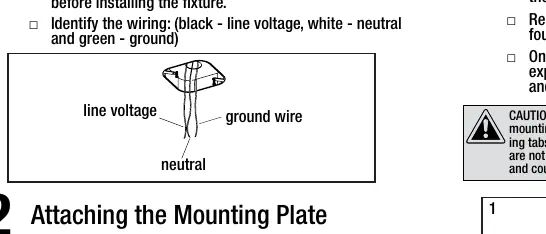
- Identifying the Wires: Identify the wiring: black (line voltage), white (neutral), and green (ground).
- Attaching the Mounting Plate: Attach the mounting plate (BB) to the junction box using the provided #8-32 x 1 in. screws (EE). Align the plate in the desired direction.
- Positioning the Toggle Bolts: Use the mounting plate as a guide to mark the position of the holes on the ceiling or wall.
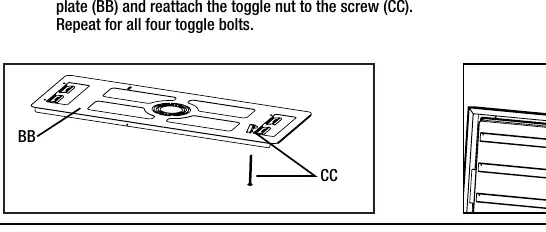
- Installing the Toggle Bolts: Remove the mounting plate. Drill four holes using a 1/2 in. drill bit. Insert the screw (CC) through the front of the mounting plate and reattach the toggle nut. Repeat for all four bolts.
- Re-attaching the Mounting Plate: Feed the junction box wires through the center hole of the mounting plate. Re-attach the plate by inserting the toggle nuts into the drilled holes. Pull the screw downward to engage and tighten.
- Connecting the Panel Light: Hook the support wire from the fixture onto the mounting bracket plate.
- Connecting Electrical Wires: Connect the three wires from the fixture to the junction box wires (black to line, white to neutral, green to ground). Ensure no excess wires are left outside the junction box to avoid pinching.
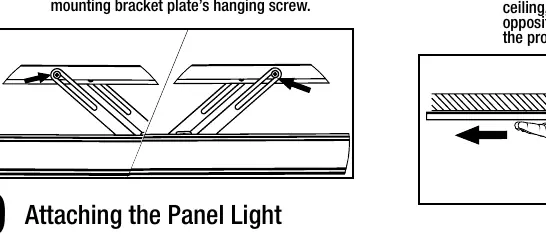
- Connecting the Swing Arms: Insert the swing arm’s keyhole slot into the mounting bracket plate’s hanging screw.
- Attaching the Panel Light: Feed the junction box and fixture wires through the center hole. Raise the fixture in the direction of the arrow on the swing arm.
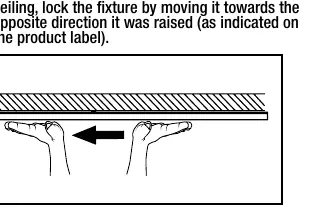
- Securing the Panel Light: Once the fixture is flush to the ceiling, lock it by moving it in the opposite direction it was raised.
Manufacturer information
Feit Electric Company, Inc.
Practical help
Common problems
Fixture not secure on vertical surface
Ensure mounting tabs are oriented in a vertical position.
Wires pinched during installation
Ensure no excess wires are left outside the junction box.
Before use
- Turn off power at the circuit breaker
- Verify all parts are present
- Ensure you have a Phillips screwdriver and power drill
- Check local electrical codes
Show more Show less
Specs in practice
- Mounting Plate Size
- 25.6 in. x 9.8 in. x 0.47 in.
Images and diagrams
- Steps 1-10 illustrate the mounting process, including wiring and securing the panel.
Model compatibility
- Designed for use in a circuit protected by a fuse or circuit breaker.

Manual page author
Michael Turner
Technical manual editor