Lighting / Fixtures
Installation and User Guide for Feit Electric 22-Inch Decorative 3-Light Chandelier CHD225CCTNLBK
Quick guide for installing and operating the Feit Electric 22-Inch Decorative 3-Light Chandelier (CHD225CCTNLBK). Includes assembly steps, wiring instructions, and color temperature settings.
Quick answers from the manual
Quick answer
- This guide covers the installation and operation of the Feit Electric 22-Inch Decorative 3-Light Chandelier (CHD225CCTNLBK), including wiring, assembly, and color temperature adjustment. p. 1, 4, 5, 6
Key actions
- Turn off power at the circuit breaker before starting. p. 2, 4
- Assemble stems and hollow bolts before attaching to the fixture. p. 4
- Connect wires using the provided Wago connector. p. 5
First start
- After installation, flip the wall switch ON to enter Mode 1. Use the switch to toggle between modes (bulb only, bulb + LED, up light only). p. 6
Show 2 more answers Show less
Technical specifications
| Parameter | Value | Meaning | Pages |
|---|---|---|---|
| Color Temperatures | 2700K, 3000K, 3500K, 4000K, 5000K | Adjustable white light settings. | p. 6 |
| Operating Temperature | 0°F - 120°F | Safe operating range. | p. 2 |
Where to find it in the PDF
- Installation p. 4, 5
- Operating Instructions p. 6
Table of contents
Manual images
Click an image to enlargeQuick Guide
This document provides instructions for the installation and operation of the Feit Electric 22-Inch Decorative 3-Light Chandelier. Key steps include assembling the stems, wiring the fixture to the junction box, and configuring the light modes using your wall switch.
Safety Information
Warning: Risk of shock. Turn off the main power at the circuit breaker before starting installation. Ensure all electrical connections are in accordance with local and National Electrical Code (N.E.C.) standards. If you are unfamiliar with electrical wiring, consult a certified electrician.
- Reliable operating temperature is 0°F to 120°F.
- Suitable for damp locations.
- Wear rubber-soled shoes and work on a sturdy ladder.
- Ensure all connections are tight and secure.
Pre-Assembly
Tools Required: Phillips screwdriver.
Hardware Included:
- Fixture (AA), Canopy (BB)
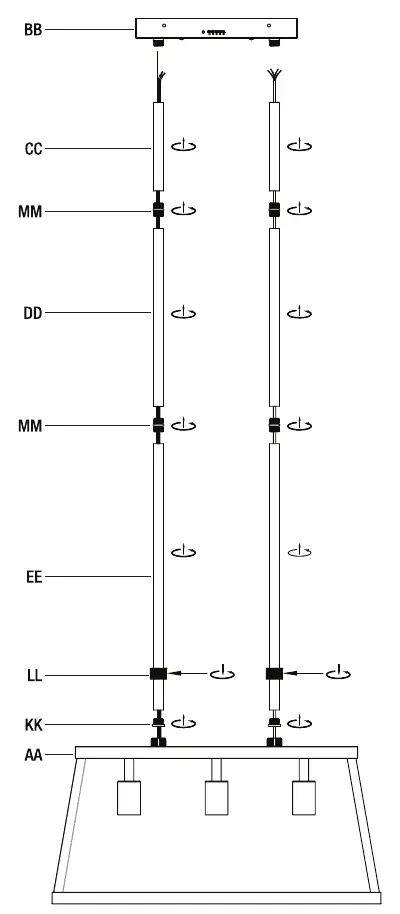
- Stems: 6-inch (CC), 12-inch (DD), 18-inch (EE)
- Mounting Plate with Safety Cable (FF)
- Wago Connector (GG), Wire Nut (HH)
- Mounting screws and adapters (II, JJ, KK, LL, MM)
Installation
1. Turning Off the Power: Turn the power OFF at the switch and fuse box or circuit breaker.
2. Removing the Mounting Plate: Unscrew the 4 mounting plate screws (II) using a Phillips screwdriver to remove the mounting plate (FF) from the canopy (BB).
3. Assembling the Fixture: Assemble the stems (CC, DD, EE) and hollow bolts (KK) to the fixture (AA). Ensure the thread adapters (LL) are used to secure the stems to the fixture and canopy.
4. Installing the Mounting Plate: Secure the mounting plate (FF) to the junction box using the junction box mounting screws (JJ).
5. Connecting the Wires: Connect the bare copper ground wire to the ground wire from the junction box. Use the Wago connector (GG) to connect the white fixture wire to the white junction box wire and the black fixture wire to the black junction box wire.
6. Final Assembly: Lift the canopy (BB) over the mounting plate (FF) and secure it with the 4 mounting plate screws (II). Screw the light bulbs into the fixture sockets clockwise.
Operating the Fixture
Selecting Modes: Use the wall switch to toggle between modes:
- Mode 1: Flip switch ON (light bulb only).
- Mode 2: Flip switch OFF and back ON in less than 5 seconds (light bulb + LED downlight).
- Mode 3: Flip switch OFF and back ON in less than 5 seconds (up light only).
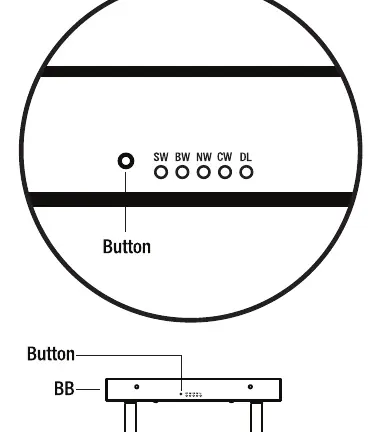
Changing Color Settings: While in Mode 2, push the selector button on the canopy (BB) to cycle through color temperatures: 2700K (Soft White), 3000K (Bright White), 3500K (Neutral White), 4000K (Cool White), and 5000K (Daylight).
Manufacturer information
Feit Electric Company, Inc.
Practical help
Common problems
Fixture does not turn on
Ensure the power is turned on at the circuit breaker and all wire connections are secure.
Color temperature does not change
Ensure you are in Mode 2 (bulb + LED downlight) and press the selector button on the canopy.
Light flickers
Check that all electrical connections are tight and the Wago connector is properly seated.
Before use
- Turn off power at the circuit breaker.
- Verify all parts (stems, canopy, mounting plate) are present.
- Ensure you have a Phillips screwdriver.
- Confirm the installation location is suitable for damp locations.
- Check that the operating temperature is between 0°F and 120°F.
Show more Show less
Specs in practice
- Color Temperatures
- Adjustable between 2700K (Soft White) to 5000K (Daylight).
- Operating Temperature
- Safe operating range is 0°F to 120°F.
Images and diagrams
- Wiring diagram shows connection of black (line), white (neutral), and bare copper (ground) wires using the Wago connector.
- Assembly diagram illustrates the sequence of stems (6-inch, 12-inch, 18-inch) and hollow bolts.

Manual page author
David Miller
Documentation analyst