Lighting / Fixtures
Installation Guide for Feit Electric 1X2 LED Skylight Flat Panel Fixture
Installation and operation guide for the Feit Electric 1X2 LED Skylight Flat Panel Fixture. Includes wiring instructions, mounting options (junction box or canless), and color temperature settings.
Quick answers from the manual
Quick answer
- This guide covers the installation and operation of the Feit Electric 1X2 LED Skylight Flat Panel Fixture. It supports both junction box and canless installation methods and features adjustable color temperatures (3000K-6500K). p. 1, 4, 6, 7
Key actions
- Select installation method: Junction Box (Option 1) or Canless (Option 2). p. 4, 6
- Adjust color temperature using the slide switch on the back of the fixture. p. 7
First start
- Turn on the wall switch to enter Mode 1 (Skylight). p. 7
Show 2 more answers Show less
Technical specifications
| Parameter | Value | Meaning | Pages |
|---|---|---|---|
| Voltage | 120VAC | Input voltage | p. 2 |
| Power | 40W | Power consumption | p. 2 |
| Operating Temperature | -13°F to 113°F | Safe operating range | p. 2 |
Where to find it in the PDF
- Safety Information p. 2
- Installation Instructions p. 4, 5, 6
- Operation and Color Settings p. 7
Table of contents
Important Information from the Manual
This document provides installation and operation instructions for the Feit Electric 1X2 LED Skylight Flat Panel Fixture (Model FP1X2/SKY/5CCT/WH). The fixture is designed for 120VAC, 60Hz operation and is suitable for damp locations. It features adjustable color temperatures and multiple installation methods.
Safety Information
- Always turn off the power supply at the fuse or circuit breaker box before installation.
- Ensure the fixture is grounded to avoid electric shock.
- Do not install in environments exceeding 45°C (113°F).
- If you are unfamiliar with electrical wiring, consult a certified electrician.
Pre-Assembly
Tools Required (Not Included):
- Phillips Screwdriver
- 1/2 in. Drill Bit
- Drywall Cutter
- Recessed Lighting Hole Saw (Recommended)
- Power Drill
Installation Options
The fixture supports two installation methods:
Option 1: Junction Box Installation
- Turn off power.
- Identify wires (Black-Hot, White-Neutral, Green-Ground).
- Remove the mounting plate from the fixture.
- Attach the mounting plate to the junction box using the provided screws.
- Mark and secure toggle bolts if necessary.
- Connect the fixture wires to the junction box wires.
- Attach the fixture to the mounting plate and secure it.
Option 2: Canless Installation
- Measure and cut the ceiling opening (4 in. hole and 5/8 in. hole).
- Remove the mounting plate from the fixture.
- Attach spring clips and the junction box to the back of the fixture.
- Connect the fixture wires to the supply wires inside the junction box.
- Insert the fixture into the ceiling opening until the clips snap into place.
Operating the Fixture
The fixture features different modes controlled by the wall switch:
- Mode 1 (Skylight): Turn the wall switch ON.
- Mode 2 (White Light): Turn the wall switch OFF and back ON in less than 3 seconds. The color temperature can be adjusted using the slide switch on the back of the fixture.
- Mode 3 (Blue Light): Turn the wall switch OFF and back ON in less than 3 seconds while in Mode 2.
Note: If the unit is turned off for more than 10 seconds, it will automatically revert to the default Mode 1 (Skylight).
Changing Color Settings
To change the white light color temperature, ensure the fixture is in Mode 2. Use the slide switch on the back of the fixture to select between:
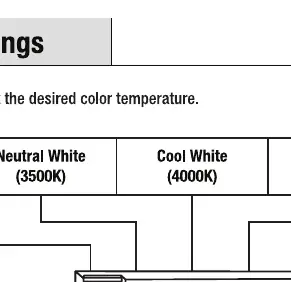
- 3000K (Bright White)
- 3500K (Neutral White)
- 4000K (Cool White)
- 5000K (Daylight)
- 6500K (Daylight Deluxe)
The color temperature is pre-set to 4000K.
Manufacturer information
Feit Electric Company, Inc.
Practical help
Common problems
Fixture does not turn on
Check the circuit breaker or fuse box to ensure power is ON. Verify that all wire connections are secure.
Incorrect color temperature
Ensure the fixture is in Mode 2, then adjust the slide switch on the back of the fixture to the desired setting.
Before use
- Turn off power at the circuit breaker
- Verify voltage is 120VAC
- Ensure mounting surface is suitable for the fixture
- Check that all hardware (screws, wire nuts, clips) is present
- Use a stud finder before cutting the ceiling
Show more Show less
Specs in practice
- Damp Location
- Suitable for areas with some moisture, but not direct water exposure.
Images and diagrams
- Wiring diagram: Connect Black to Hot, White to Neutral, and Green/Bare Copper to Ground.
- Color switch: Located on the back of the fixture, allows selection between 3000K, 3500K, 4000K, 5000K, and 6500K.
Model compatibility
- Suitable for mounting on ceiling or wall surface.
- Operating temperature range: -13°F to 113°F (-25°C to 45°C).

Manual page author
David Miller
Documentation analyst