Lighting / Work Lights
Sealey LED109 Series Rechargeable Portable Floodlight
Quick guide for the Sealey LED109 Series rechargeable portable floodlight. Includes charging instructions, operation, maintenance, and battery replacement steps.
Table of contents
Manual images
Click an image to enlargeQuick guide from the manual
This floodlight is a portable, rechargeable 10W SMD LED unit. Before first use, ensure the battery is fully charged. Always turn the floodlight 'Off' while charging to prevent damage to the charger plug. Do not use any charger other than the one supplied with the product.
Operation
The floodlight features an on/off rocker switch located on the main body. Select position 'O' to turn the unit off. The position of the main body can be adjusted by loosening the thumb screws on the side, moving the body to the desired angle, and retightening the screws.
Battery charging
Mains Charging:

- Ensure the floodlight is turned 'Off'.
- Plug the charger adaptor into the jack inlet on the floodlight body.
- Plug the charger into the mains supply. The charging indicator LED will illuminate RED while charging.
- Once fully charged, the indicator will turn GREEN.
- Allow approximately 6 hours for the initial charge and subsequent charges.
Vehicle Charging:
- Ensure the floodlight is turned 'Off'.
- Plug the vehicle charger into the jack inlet on the floodlight body.
- Insert the charger plug into the vehicle's 12V accessory socket.
- The charging indicator LED will illuminate RED while charging and GREEN when full.
- Allow approximately 4 hours for charging. Note: Charging from a vehicle socket will drain the vehicle's battery unless the engine is running.
Maintenance and battery replacement
The battery is a consumable item. To replace it:
- Ensure the floodlight is turned off and disconnected from the power supply.
- Remove the 8 retaining screws at the rear of the floodlight.
- Remove the cover, glass, and LED panel.
- Undo the 2 battery retaining screws and remove the battery retainer.
- Unplug the battery cable from the circuit board.
- Remove the old battery and install a genuine Sealey replacement by reversing the procedure. Take care not to pinch any wires.
Manufacturer information
Sealey Group
Practical help
Common problems
Floodlight will not charge or charger plug damaged
Ensure the floodlight is turned 'Off' while charging. Failure to do so can damage the charger plug.
Vehicle battery drain
Charging from a 12V vehicle socket will drain the vehicle's battery unless the engine is running.
Reduced battery capacity
Ensure the battery is properly charged before first use and conditioned. Do not leave the battery in a discharged state; recharge immediately if not in use.
Before use
- Ensure the floodlight is fully charged before first use.
- Inspect the charger plug, cable, and connector for wear or damage.
- Verify the voltage marked on the charger plug matches the floodlight.
- Ensure the floodlight is turned 'Off' before connecting to any power source.
- Check that the vehicle accessory socket is 12V.
Specs in practice
- Charging Time
- Approximately 5 hours (mains).
- Lumen Output
- High setting: 1000lm; Low setting: 400lm.
- Operating Time
- High setting: 3.5 hours; Low setting: 8 hours.
Images and diagrams
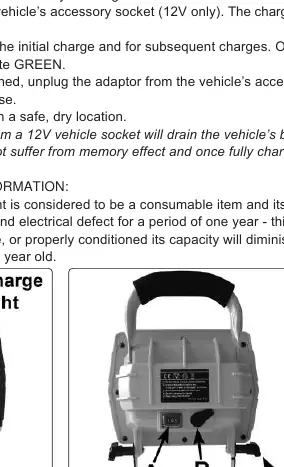
- Fig 1: Charging indicator LED location.
- Fig 2: Rear view showing rocker switch (A), jack inlet (B), and thumb screws (C).
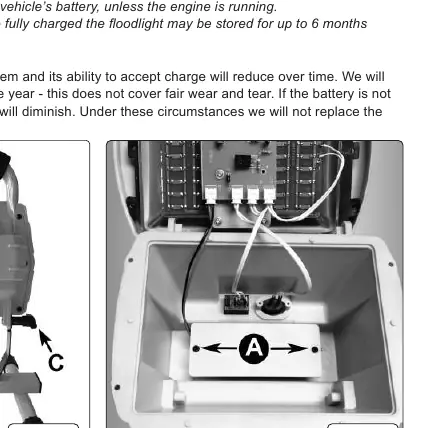
- Fig 3: Battery compartment showing battery retaining screws (A).
Model compatibility
- Use only the supplied mains or car charger.
- Vehicle charging requires a 12V accessory socket.
- Li-ion battery does not suffer from memory effect.

Manual page author
Emily Carter
User documentation editor
Prepares concise manual descriptions and highlights the most useful setup, operation, and maintenance information for readers.