Power / Energy Storage Systems
V-TAC VT-10-R LED Rechargeable Light
Quick guide for the V-TAC VT-10-R LED Rechargeable Light. Includes technical specifications, charging instructions, bracket adjustment, and safety guidelines for battery and charger usage.
Table of contents
Manual images
Click an image to enlargeQuick guide from the manual
The V-TAC VT-10-R is a portable LED rechargeable floodlight designed for general lighting purposes. It is suitable for 10-12 hours of daily operation. Please note that using the product for 24 hours a day will void the warranty. Always ensure the light is switched off and completely cool before cleaning.
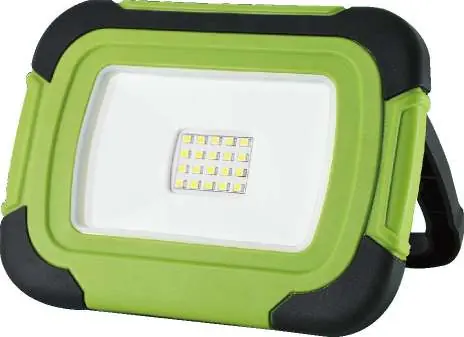
Technical Data
- Model: VT-10-R
- Battery: 3.7V, Li-Ion, 3600 mAh
- Power: 10W
- Lumens: 700/350 Lm
- Beam Angle: 100°
- IP Rating: IP44
- Function: 100%-50% brightness
- Dimensions: 175x125mm
- Life Span: 25,000 Hours
Major Components
The device consists of the following parts:
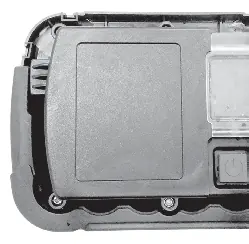
- Rechargeable Floodlight head
- LED lamp assembly
- Portable bracket
- Protective cover
- Micro socket
- LED indicator
- ON/OFF switch with mode function
Bracket Adjustment
The portable bracket is adjustable up to a maximum of 45°. Adjust the bracket to the desired position before use. Do not exceed the adjustable range, as this may damage the bracket.
Operation
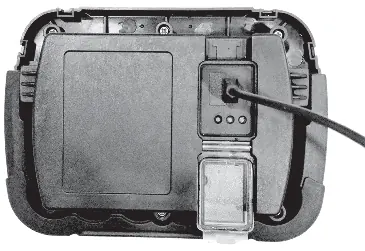
Charging
- Open the protective cover on the back of the unit.
- Push the micro plug into the micro socket.
- Plug the adapter into a suitable mains outlet. Do not use an extension cord.
- When the battery is charging, three LED indicators will illuminate in sequence (Red, Yellow, Green).
- Close the protective cover after charging to prevent water ingress.
Note: If the LED indicator shows only red, the battery is low and needs to be recharged.
Switching On/Off
Use the ON/OFF switch located on the back of the floodlight to operate the light and adjust the brightness modes.
Safety Instructions
- Batteries: Never attempt to open the battery. Do not store in temperatures exceeding 40°C. Charge only at ambient temperatures between 4°C and 40°C using the provided charger. Do not cause short circuits.
- Charger: Use only the provided charger. Do not charge non-rechargeable batteries. Do not expose the charger to water or attempt to open/probe it.
- General: This is not a toy. Do not attempt to replace the diode lights. If the protective glass is cracked or broken, it must be replaced before further use.
Practical help
Common problems
LED indicator shows red light
The battery is running low and needs to be recharged.
Water ingress
Ensure the protective cover is firmly closed after charging.
Bracket damage
Do not force the bracket beyond its 45° adjustment limit.
Before use
- Check that the protective glass is not cracked or broken.
- Ensure the charger provided with the tool is used.
- Verify the ambient temperature is between 4°C and 40°C for charging.
- Ensure the light is switched off and cool before cleaning.
Specs in practice
- 100%-50% Function
- The light supports two brightness levels.
Images and diagrams
- Fig 1 & 2: Identifies the floodlight head, LED assembly, bracket, protective cover, micro socket, LED indicator, and switch.
- Fig 4: Illustrates the correct method for connecting the charging cable to the micro socket.
Model compatibility
- Suitable for 10-12 hours daily operation.
- Usage for 24 hours a day voids the warranty.

Manual page author
David Miller
Documentation analyst
Organizes user manual content into clear summaries, with attention to model details, product context, and everyday usability.