Power / Batteries & Chargers
User Manual for Fieldmann FDEB 200451-E Electrical Orbital Sander
Quick guide for the Fieldmann FDEB 200451-E Electrical Orbital Sander. Includes assembly instructions, operation, safety warnings, technical specifications, and troubleshooting tips.
Quick answers from the manual
Quick answer
- The Fieldmann FDEB 200451-E is an electrical orbital sander with a 450W motor, variable speed control (6000-13000/min), and a 125mm sanding surface. It is designed for sanding wood, metal, and stone. p. 11, 12
Key actions
- Fitting sanding sheets p. 11
- Adjusting the handle p. 11
First start
- Connect to power, attach sanding paper, adjust handle, and press the trigger switch to start. p. 11
Problems and fixes
Product does not start
Check power connection and cord/plug integrity.
p. 13Maintenance and reset
- Disconnect from power before cleaning or maintenance. Regularly check moving parts and keep cutting tools sharp. p. 8
Technical specifications
| Parameter | Value | Meaning | Pages |
|---|---|---|---|
| Rated voltage | 230V | Operating voltage | p. 12 |
| Power input | 450W | Motor power | p. 12 |
Where to find it in the PDF
- General Safety Instructions p. 6, 7, 8, 9
- Assembly and Operation p. 11
- Technical Specifications p. 12
- Troubleshooting p. 13
Table of contents
Manual images
Click an image to enlargeQuick guide from the manual
The Fieldmann FDEB 200451-E is an electrical orbital sander designed for sanding wood, metal, stone, and painted surfaces. Before use, ensure you have read the safety instructions, checked the power supply, and attached the appropriate sanding paper. Always wear protective gear, including eye and ear protection and a breathing mask, when operating the tool.
General description
The sander features an ergonomic design with a soft grip handle. Key components include:
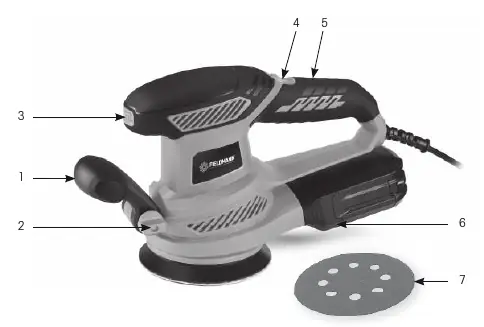
- Front handle: Adjustable for user comfort.
- Handle locking clamp: Secures the front handle position.
- Speed control dial: Allows adjustment of the sanding speed.
- ON/OFF trigger switch: Controls the operation of the machine.
- Dust bag: Collects sanding dust.
- Sanding pad: The base for attaching sanding sheets.
Assembly

Fitting sanding sheets
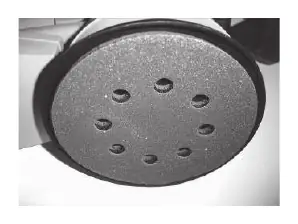
Select self-stick sanding paper of the required grain size. Place it on the sanding pad (7), ensuring the perforations in the paper align with those on the pad. The paper must stick firmly to the disc.
Dust extraction
It is recommended to connect the sander to a vacuum cleaner or dust extractor using the dust extraction port (6) to reduce airborne dust.
Handle adjustment
The front handle (1) can be adjusted. Slacken the handle locking clamp (2), pivot the handle to the desired position, and retighten the clamp before use.
Operation
To switch on the machine, press the switch trigger (4). To switch off, release the trigger. The speed can be adjusted using the speed control dial (3). Never use the machine for sanding magnesium workpieces.
Safety
Always disconnect the power tool from the electric grid before cleaning, maintenance, or changing accessories. Keep the work area clean and well-lit. Do not use the tool in environments with a risk of fire or explosion. If the tool emits abnormal noises or odors, stop working immediately.
Troubleshooting
If the product does not start, check the power supply and the power cord. If the sander does not reach full power, ensure the extension cord is suitable and the air vents are not blocked. For unsatisfactory results, replace dull or damaged sanding discs.
Technical specifications
The sander operates at 230V/50Hz with a power input of 450W. The no-load speed ranges from 6000 to 13000/min, and the sanding surface diameter is 125mm.
Disposal
Do not dispose of the tool in municipal waste. Use designated collection points for electric and electronic equipment recycling.
Manufacturer information
Fieldmann
Practical help
Common problems
Product does not start
Check if connected to power supply; check power cord or plug for defects.
Product does not reach full power
Use a proper extension cord; connect to a different power source; clean blocked air vents.
Unsatisfactory sanding result
Replace dull or damaged sanding disk; ensure the disk is suitable for the material.
Excessive vibration or noise
Replace dull or damaged disk; tighten any loose bolts or nuts.
Before use
- Read the instruction manual carefully.
- Ensure the power supply voltage matches the tool's specifications.
- Check that the sanding paper is firmly attached to the pad.
- Connect a dust extraction system if possible.
- Wear eye protection, ear protection, and a breathing mask.
- Ensure the switch is in the OFF position before plugging in.
Specs in practice
- No load speed
- 6000-13000/min
- Sanding surface diameter
- 125mm
Images and diagrams
- 1: Front handle
- 2: Handle locking clamp
- 3: Speed control dial
- 4: ON/OFF trigger switch
- 5: Soft grip handle
Model compatibility
- Do not use for sanding magnesium workpieces.
- Use only original or recommended spare parts.

Manual page author
David Miller
Documentation analyst
Organizes user manual content into clear summaries, with attention to model details, product context, and everyday usability.