Electronics / Networking
Finder 1Y.P2 Roller Shutter Kit Installation Manual
Installation guide for the Finder 1Y.P2 Roller Shutter Kit. Learn how to connect actuators, pair devices, and add additional units to your system without the Finder YOU app.
Quick answers from the manual
Quick answer
- This manual provides instructions for installing the Finder 1Y.P2 Roller Shutter Kit without using the Finder YOU app, including connecting actuators, pairing additional devices, and using range extenders. p. 1, 2
Key actions
- Connect Type 13.S2 actuators to motors. p. 1
- Connect Type 1Y.P2 interface to buttons. p. 1
First start
- Perform an opening and closing test after installation. p. 1
Problems and fixes
Range issues between input interface and actuator.
Use Type 1Y.E8 range extenders.
p. 1Where to find it in the PDF
- Installation Instructions p. 1
- Adding Additional Actuator p. 2
Quick guide from the manual
This document provides instructions for installing the Finder 1Y.P2 Roller Shutter Kit without using the Finder YOU app. Follow these steps for basic installation:
- Connect Actuators: Connect the Type 13.S2 actuators to the roller shutter motors to be automated.
- Connect Input Interface: Connect the Type 1Y.P2 input interface to the centralized buttons. Use P1 for opening and P2 for closing.
- Test: Perform an opening and closing test.
- Range Extension: If the Type 1Y.P2 input interfaces are too far apart, use the Type 1Y.E8 range extenders (supplied in the kit) between the input interface and the actuator.
Adding an additional actuator to the control system
If you need to add an additional actuator to a standard 5-part shutter kit, follow this procedure:
- Prepare Actuator: Press the P1 button of the roller shutter actuator Type 13.S2 5 times within 5 seconds. This requires firmware version 21 or later.
- Verify Setting Mode: The Type 13.S2 will indicate setting mode with the Blue LED always on, and CH1/CH2 ON for 1 second.
- Pair Input Interface: Press the button on the Type 1Y.P2 input interface 5 times within 5 seconds. This requires firmware version 7 or later.
- Completion: If acquisition is successful, the setting mode is exited (Blue LED off, CH1/CH2 ON for 1 second). The actuator will now respond to the input interface commands.
Manufacturer information
Finder S.p.A.
Practical help
Common problems
Input interfaces are too far apart for reliable communication.
Use the Type 1Y.E8 range extenders (supplied in the kit) between the Type 1Y.P2 input interface and the Type 13.S2 actuator.
Additional actuator not pairing.
Ensure the firmware version is correct (13.S2: Fw 21+; 1Y.P2: Fw 7+) and repeat the 5-click sequence within 5 seconds for both devices.
Before use
- Ensure you have the Type 13.S2 actuator and Type 1Y.P2 input interface.
- Verify that the centralized buttons are ready for connection.
- Check that the firmware versions meet the requirements for additional actuator pairing (13.S2: 21+, 1Y.P2: 7+).
Images and diagrams
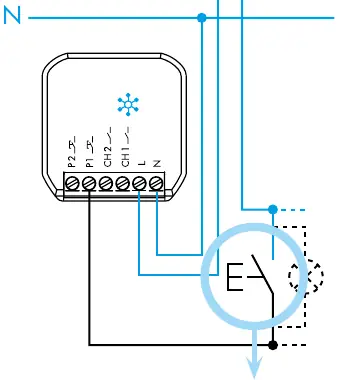
- The wiring diagram illustrates the connection of L (Line) and N (Neutral) to the actuator and input interface.
- The button sequence diagram shows the required 5-click action for pairing devices.
Model compatibility
- Compatible with the Finder YOU app for advanced system setup.
- Requires specific firmware versions for adding additional actuators to the system.

Manual page author
Michael Turner
Technical manual editor
Reviews PDF manuals for structure, safety notes, and practical product details so readers can find the right information quickly.