Home Appliances / Dehumidifiers
User Manual for Flama 1327FL 20L Digital Dehumidifier
Quick guide for the Flama 1327FL 20L Digital Dehumidifier. Includes setup, operating modes, maintenance, troubleshooting, and technical specifications.
Table of contents
Manual images
Click an image to enlargeQuick guide from the manual
This guide provides essential information for operating your Flama 1327FL 20L Digital Dehumidifier. Always ensure the unit is placed in an upright position for at least 12 hours after transport before turning it on. Maintain at least 50cm of free space around the unit for proper air circulation and do not install it in spaces smaller than 4m2.
Description of the device
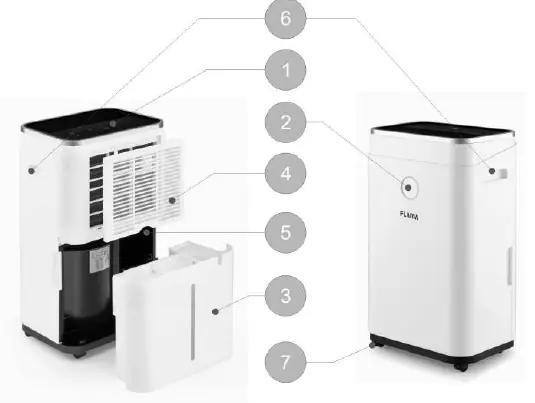
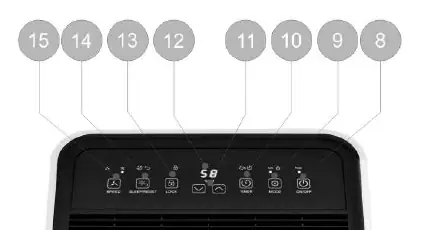
The dehumidifier consists of a control panel, water tank, air filter, and drainage options. The control panel features buttons for Standby (ON/OFF), Mode, Timer, Humidity/Time adjustment, Lock, Sleep/Filter Reset, and Fan control.
Operation
Turning the appliance on and off: Ensure the water tank is correctly positioned. Plug the unit into an earthed socket. Press the Standby button to start; the unit defaults to 60% humidity, automatic mode, and high fan speed.
Modes:
- Automatic Mode: Adjusts fan speed and humidity settings. The compressor starts/stops based on ambient humidity relative to the set humidity.
- Clothes Drying Mode: Optimizes fan speed and dehumidification capacity to accelerate drying. Humidity is fixed at 20%.
- Sleep Mode: Reduces fan speed to low. After 10 seconds of inactivity, all lights turn off except the sleep mode indicator.
Timer: Allows setting the operation time from 0-24 hours in 1-hour increments.
Child Lock: Press the Lock button for 3 seconds to disable all buttons. Press again to unlock.
Emptying the Water Tank
When the tank is full, the unit emits a sound and the full tank indicator lights up. Press Standby to turn off the unit, slide out the tank, empty it, clean it, and return it to the unit. If the light remains on, check that the tank and float are correctly positioned.
Continuous Drainage
For continuous operation, connect a drain hose to the drainage orifice. Ensure the hose is placed below the drainage orifice and is not bent or blocked.
Cleaning and Maintenance
Exterior: Clean with a dry cloth. If very dirty, use a neutral detergent and wipe with a damp cloth. Do not use a hose.
Air Filter: Clean every two weeks. Remove the filter from the rear lid, use a vacuum cleaner to remove dust, or wash with water and mild detergent if very dirty. Dry completely before reinstalling.
Troubleshooting
If the unit does not turn on, check the power connection, ensure the water tank is not full or incorrectly placed, and verify the ambient temperature is between 5°C and 35°C. If the unit is noisy, ensure it is stable and the filter is clean. Error codes like E2 indicate a sensor issue requiring technical assistance.
Technical Specifications
- Power Supply: 220V-240V~, 50Hz
- Dehumidification Capacity: 20L/day (at 30°C/80% RH)
- Tank Capacity: 6.5 L
- Operating Temperature: 5°C - 35°C
- Refrigerant: R290 (0.058 kg)
Manufacturer information
FLAMA, SA
Practical help
Common problems
Appliance does not turn on
Check power connection, ensure water tank is not full and is correctly placed, check if temperature is within 5-35°C range.
Poor performance
Clean the air filter, remove any obstructions from intake or outlet ducts.
Noise
Ensure the appliance is on a stable surface, clean the air filter.
Before use
- Let the unit rest for 12 hours after transport.
- Ensure the water tank is correctly positioned.
- Check that the power supply voltage matches the rating plate.
- Ensure at least 50cm of free space around the unit.
- Ensure all windows are closed for maximum efficiency.
Specs in practice
- Dehumidification capacity
- 20L/day (at 30°C/80% RH).
- Tank capacity
- 6.5 L.
- Operating temperature
- 5°C - 35°C.
Images and diagrams
- The control panel includes buttons for Speed, Sleep/Reset, Lock, Timer, Mode, and Standby.
- The water tank is located at the back/side and must be emptied when full.
Model compatibility
- Do not install in spaces smaller than 4m2.

Manual page author
Michael Turner
Technical manual editor
Reviews PDF manuals for structure, safety notes, and practical product details so readers can find the right information quickly.