Music / Guitar Effects
User Manual for Flamma FFO1 Dual Footswitch Stereo Looper Pedal
Quick guide for the Flamma FFO1 Dual Footswitch Stereo Looper Pedal. Learn how to record, manage loops, use USB data transfer, and adjust settings.
Table of contents
Manual images
Click an image to enlargeQuick guide from the manual
The Flamma FFO1 is a dual-footswitch stereo looper pedal designed for recording and managing audio loops. This guide provides essential information on device operation, loop management, and computer data transfer. Always use a 9V 200mA power adapter with center-negative polarity to avoid damage.
Device Overview
The pedal features a central screen for status information, a Select/Save knob, and a Volume/Delete knob. The LED strip provides real-time status and track length indication. The dual footswitches control recording, playback, and stop functions. Input and output jacks are located on the sides, while the USB-C port, power jack, and headphone output are on the top panel.
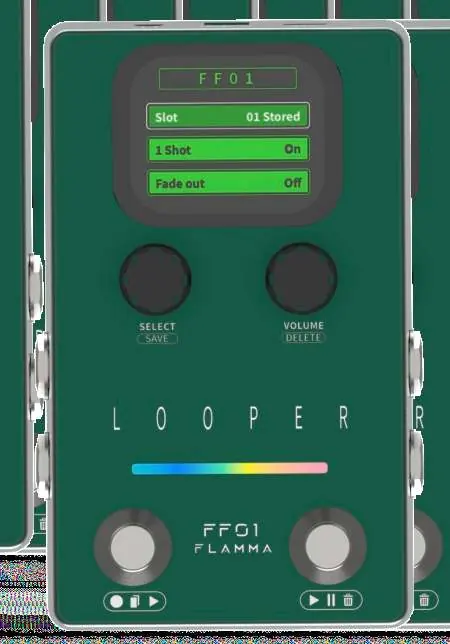

Looper Settings
Press the Select knob to cycle through parameters:
- Slot: Choose from 40 available storage slots.
- 1 Shot: Enable or disable One Shot playback (stops automatically after playing once).
- Fade Out: Enable or disable the fade-out function (1 to 5 seconds).
Looper Operations
Recording and Playback:

- Record: In an empty track state, press the left footswitch to start recording.
- Dub & Play: During recording, press the left footswitch to start overdubbing. Press the right footswitch to play without overdubbing.
- Stop: Press the right footswitch during playback to stop.
- Undo/Redo: Press and hold the right footswitch for 1 second during playback to undo the last layer. Repeat to redo.
- Delete: In playback or stop mode, press the right footswitch twice and hold for 1 second to clear the track.
Saving and Volume:
- Save: At the STOP status, press and hold the Select knob until the progress bar completes to save the track.
- Volume: Rotate the Volume knob to adjust playback volume (range: -∞ to 6dB).
Computer Data Management
Connect the FFO1 to a computer via the USB-C port. The device will appear as a removable disk. Open the WAVE folder to access subfolders W01 to W40, corresponding to the 40 storage slots.

- Import: Drag 44.1kHz/16bit WAV stereo files into an empty subfolder and rename the file to RECXX (e.g., REC01).
- Export: Copy audio files from the subfolders to your computer.
- Delete: Delete files directly within the subfolders to clear the slot.
Safety Precautions
- Use only the designated 9V 200mA power adapter.
- Do not place the device near water or in humid environments.
- Clean only with a dry cloth.
- Keep away from devices that generate magnetic fields to avoid interference.
Practical help
Common problems
Unexpected noise
It is recommended to use an isolated power supply for the device.
Cannot undo/redo
This function is unavailable if no new layers have been overdubbed after saving or importing.
Imported file not working
Ensure files are 44.1kHz/16bit WAV stereo and renamed to RECXX (e.g., REC01).
Before use
- Ensure power supply is 9V 200mA (center negative).
- Connect to a computer via USB for data management.
- Use L(MONO) jack for mono input/output.
- Check that the device is not placed near water or humid environments.
Specs in practice
- Max. Record Time
- 4 minutes per slot.
- Storage Slots
- 40 slots total.
Images and diagrams
- Top Panel: USB port, 9V power jack, and headphone output.
- Front Panel: Select/Save knob, Volume/Delete knob, LED status strip, and dual footswitches.
Model compatibility
- Supports 44.1kHz/16bit WAV stereo files for import.

Manual page author
Michael Turner
Technical manual editor
Reviews PDF manuals for structure, safety notes, and practical product details so readers can find the right information quickly.