Home Appliances / Refrigerators
User Manual for Furrion Arctic 12V Built-In Refrigerator
Comprehensive user guide for the Furrion Arctic 12V Built-In Refrigerator (8 and 10 cu. ft. models). Includes installation instructions, electrical wiring diagrams, temperature control settings, maintenance procedures, and troubleshooting...
Table of contents
Manual images
Click an image to enlargeQuick Guide from the Manual
This manual covers the installation, operation, and maintenance of the Furrion Arctic 12V Built-In Refrigerator. Before operating, ensure the unit has been standing upright for at least 4 hours to allow compressor oil to settle. The refrigerator is designed for 12V DC operation and requires a dedicated branch circuit with a minimum 15A fuse.
Installation
The refrigerator is designed for built-in installation with 0" clearance on the sides and top. A 1/4" clearance is required at the rear for wire entry. Ensure the cabinet is square and the base is level. If replacing an existing absorption refrigerator, ensure the power supply is isolated and grounded per RVIA standards.
Electrical Connection
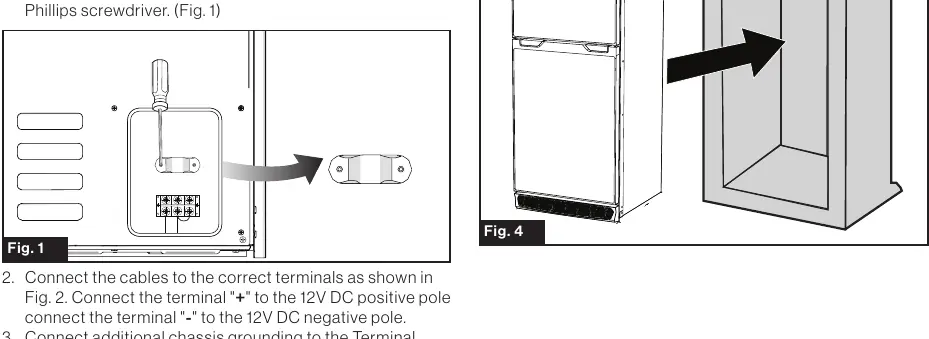
- Remove the strain relief and connector cover using a Phillips screwdriver.
- Connect the positive (+) and negative (-) 12V DC leads to the corresponding terminals.
- Connect additional chassis grounding to the terminal block labeled "GND" if desired.
- Secure the cable with the strain relief and replace the cover.
Operation
The temperature control knob is located inside the fresh food compartment. It allows you to adjust the temperature from cold to coldest or turn the system off. For initial startup or after loading large quantities of food, set the dial to "Max" for a few hours, then adjust to between "Mid" and "Max".
Off Grid Usage
When grid power is unavailable, use the "OFF GRID" setting to maximize battery life. During travel with a tow vehicle providing constant charging, use a normal temperature setting. Switch to "OFF GRID" once you arrive and are relying on battery reserves.
Maintenance
Cleaning
Clean the interior as needed with mild detergent. Keep the exterior clean using kitchen appliance wax or mild dish detergent. Avoid abrasive cleaners or bleach.
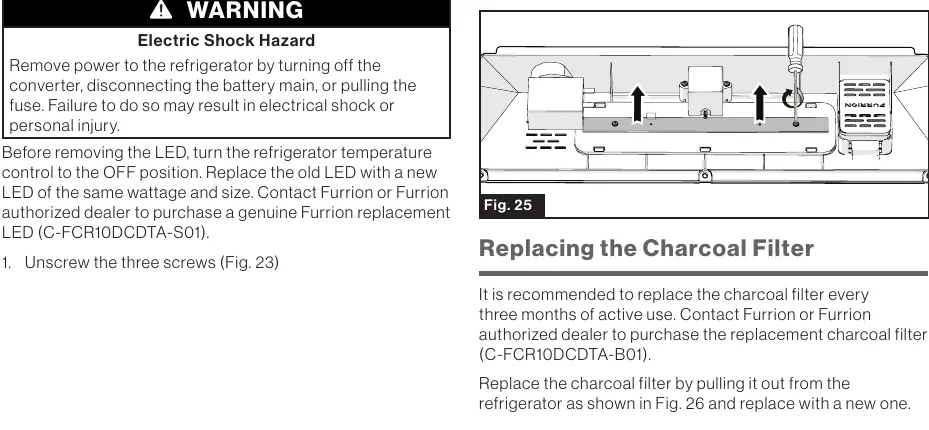
Replacing the Interior LED
- Turn the temperature control to OFF and disconnect power.
- Unscrew the three screws on the LED cover.
- Press the cover backwards to open it.
- Remove the clip and two screws to replace the LED.
- Reinstall the clip, screws, and cover.
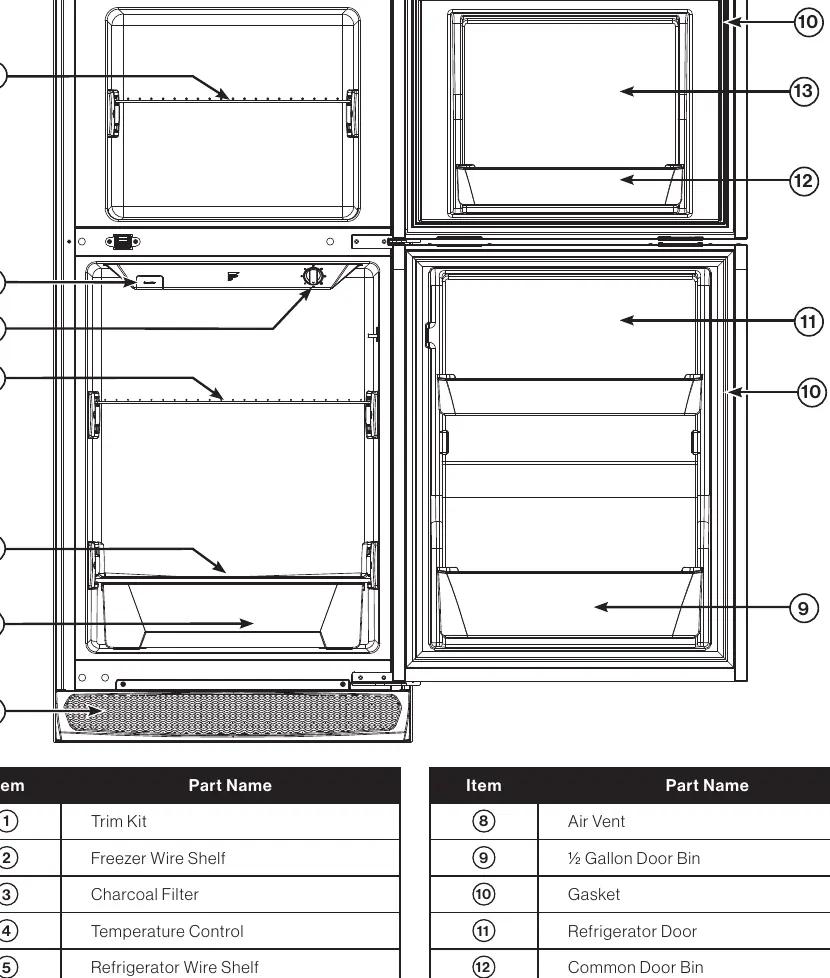
Replacing the Charcoal Filter
Replace the charcoal filter every three months of active use. Pull the old filter out and insert a new one.
Troubleshooting
If the refrigerator does not work, check if the circuit breaker has tripped or the fuse is blown. Ensure the temperature dial is not set to "OFF" and verify battery voltage is within the operating range (10.5V under load). If the unit is vibrating, ensure it is placed on a level surface.
Manufacturer information
Furrion
Practical help
Common problems
Refrigerator does not work
Check if the circuit breaker tripped or fuse is blown. Ensure the temperature dial is not set to OFF. Verify battery voltage is at least 10.5V under load.
Compressor turns on and off frequently
Check if the door is frequently opened, the temperature dial is set correctly, or the door gasket is damaged. Verify battery voltage is not dropping out of range.
Refrigerator compartments are too warm
Ensure the temperature dial is set correctly. Check if the door is left open or the gasket is damaged. If large amounts of warm food were added, wait for the unit to cool down.
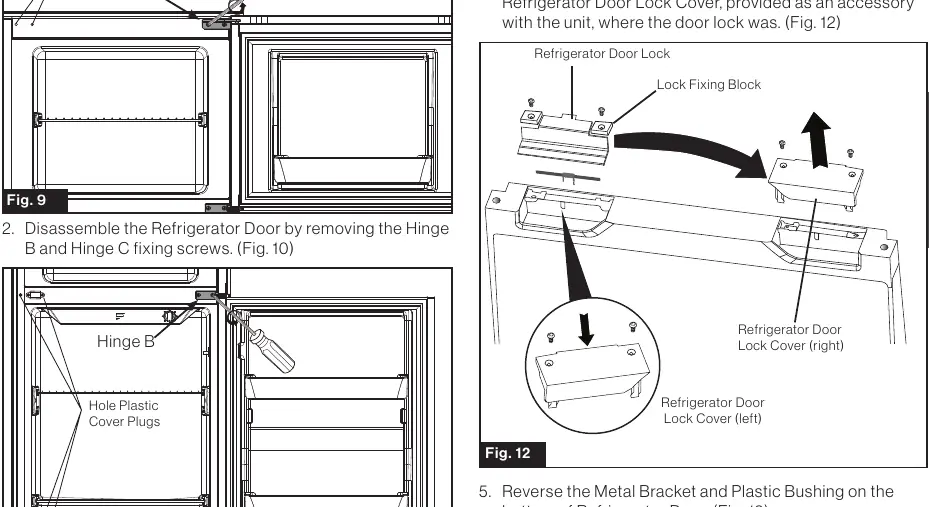
Door cannot be closed properly
Ensure the refrigerator is on a level surface. Check if the door was reversed incorrectly. Inspect the gasket for dirt or bending. Ensure shelves and bins are seated properly.
Before use
- Set the unit upright for at least 4 hours before running the compressor.
- Ensure the electrical installation follows local codes (RVIA/NEC).
- Verify the power source provides 10.5 - 17V DC.
- Ensure the circuit is dedicated and fused for 15A minimum.
- Check that the cabinet/enclosure is level and square.
- Perform a leak test if replacing a gas absorption refrigerator.
Specs in practice
- Rated Power Supply Voltage
- DC 12V. Do not connect to AC power.
- Rated Current
- 11A at start-up and maximum cooling setting.
- Operating Temperature Range
- 50°F to 126°F (10°C to 52°C) for optimal performance.
Images and diagrams
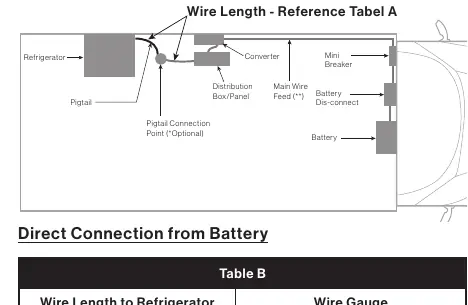
- Wiring diagram shows the connection points for DC 12V power, thermostat, cooling fan, and grounding.
- Table A and B provide wire gauge recommendations based on wire length to the refrigerator.
Model compatibility
- Compatible with 8 cu. ft. and 10 cu. ft. models.
- Requires 12V DC power source.
- Not compatible with AC power.

Manual page author
Emily Carter
User documentation editor
Prepares concise manual descriptions and highlights the most useful setup, operation, and maintenance information for readers.