HVAC / Air Conditioners
User Manual for Furrion 1465W Built-in Electric Fireplace
Comprehensive user manual for the Furrion 1465W Built-in Electric Fireplace. This guide provides detailed instructions for installation, operation, safety, maintenance, and troubleshooting for all models in the 1465W series.
Table of contents
Manual images
Click an image to enlargeQuick Guide
The Furrion 1465W Built-in Electric Fireplace is designed for residential and RV use. Before operating, ensure the marketing sticker and protective film are removed from the front glass. The unit features a proximity sensor for safety; if objects are detected within 6 inches, the unit will automatically shut off and a red LED will flash. To reset, remove the obstruction and cycle the power.
Installation
The fireplace supports two main installation types: Flush-mounted and Half Flush-mounted. Ensure the chosen location is not susceptible to moisture.
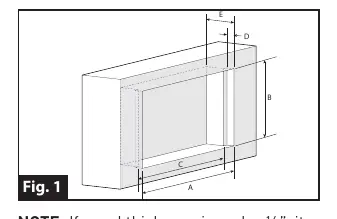
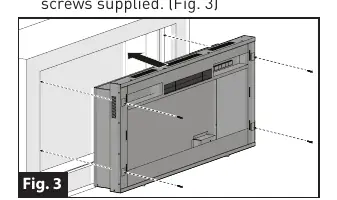
- Flush-mounted: Requires cutting an opening in the cabinet according to the dimensions provided in the manual (Fig. 1). Secure the unit with the 4 supplied mounting screws.
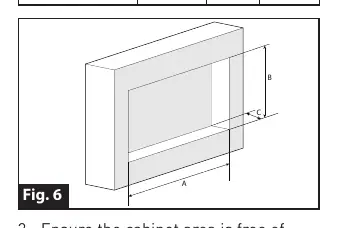
- Half Flush-mounted: Follows similar steps but uses different cutout dimensions (Fig. 6).
- RV Installation: It is recommended to connect the slide-out safety cut-off wires to the 12V DC activation system to prevent operation while traveling. Do not operate the fireplace when the slide-out is in the stowed position.
- General: Do not install directly on carpet or soft surfaces that restrict airflow. If installing in a carpeted area, place a solid, flat surface under the fireplace.
Operation
The fireplace can be controlled via the control panel or the included remote control.
- Power: Press the power button to turn the unit on or off. Holding the button for 5 seconds toggles between Celsius and Fahrenheit.
- Temperature: Use the remote to adjust heat input. Press the thermostat button on the control panel or remote to cycle through low heat, high heat, and off.
- Timer: Set the heating timer from 30 minutes to 5 hours.
- Brightness: Adjust interior brightness levels. Certain models allow control of flame color (Orange, Blue, Red) by pressing the brightness button.
Care and Maintenance
Always disconnect the power supply before performing maintenance. Clean the glass with a clean, dry cloth or a damp cloth for fingerprints; do not use abrasive cleaners. The metal surface can be cleaned with a damp cloth. The fan heater and flame blower motors are pre-lubricated and require no further lubrication, but periodic vacuuming of air intakes and exhausts is recommended.
Troubleshooting
If the display shows EE, the thermostat sensor is broken or disconnected. If it shows 88, the manual reset overheat protection has triggered; check for blocked air inlets. If the red LED is blinking, ensure no obstructions are within 6 inches of the vents.
Specifications
The unit operates on 120V AC (12A) and is designed to heat an area of approximately 500 sq. ft. It complies with UL 2021 and CSA 22.2 No.46 safety standards.
Manufacturer information
Furrion
Practical help
Common problems
Display shows EE
Thermostat sensor is broken or disconnected. Unplug, remove back panel, and check thermostat connection to the main board.
Display shows 88
Manual reset overheat protection triggered. Inspect air inlets and outlets for blockages.
Red LED blinking, blower motor does not start
Proximity switch cut off. Ensure no obstructions within 6 inches of air vents and press Power button to restart.
Remote control not working
Check batteries, ensure distance is less than 20 feet, and point directly at the control panel.
Fireplace turns off automatically
In RVs, the slide-out may have moved, activating the safety cut-off. Ensure the slide-out is fully extended.
Before use
- Remove marketing sticker from front glass.
- Remove protective film from the unit.
- Ensure installation location is not susceptible to moisture.
- Verify the unit is properly grounded.
- Ensure no obstructions within 6 inches of air vents.
Specs in practice
- Heating Area
- Designed to heat up to 500 sq. ft.
- Safety Standards
- Complies with UL 2021 and CSA 22.2 No.46.
Images and diagrams
- Fig 1: Cabinet cutout dimensions for flush-mount installation.
- Fig 6: Cabinet cutout dimensions for half flush-mount installation.
- Fig 10: Ventilation area warning; do not block.
Model compatibility
- RV installation requires connecting slide-out safety cut-off wires to the 12V DC system.
- Do not install directly on carpet; use a solid, flat surface underneath.

Manual page author
Michael Turner
Technical manual editor
Reviews PDF manuals for structure, safety notes, and practical product details so readers can find the right information quickly.