HVAC / Water Heaters
User Manual for Furrion 2-in-1 Range Oven
Comprehensive user guide for the Furrion 2-in-1 Range Oven. Includes installation instructions, gas and electrical connection steps, operating procedures for the cooktop and oven, maintenance tips, and troubleshooting.
Quick answers from the manual
Quick answer
- This manual provides instructions for the installation, safe operation, and maintenance of the Furrion 2-in-1 Range Oven. It covers gas and electrical connections, lighting procedures for the cooktop and oven, and troubleshooting common burner issues. p. 1, 17
Key actions
- Lighting the cooktop p. 10, 11
- Lighting the oven p. 12
First start
- Ensure gas supply is connected and leak-tested, and the unit is properly installed in the cabinet cutout. p. 7, 8, 10
Show 4 more answers Show less
Problems and fixes
Surface burners do not light
Check gas supply, clean burner ports, or ensure knob is fully turned to the flame position.
p. 17Maintenance and reset
- Cleaning and maintenance p. 14, 15, 16
Technical specifications
| Parameter | Value | Meaning | Pages |
|---|---|---|---|
| Power Input | 12V DC < 2 Amp | Electrical requirement | p. 17 |
Where to find it in the PDF
- Installation p. 7, 8, 9
- Operation p. 10, 11, 12
- Troubleshooting p. 17
Table of contents
Manual images
Click an image to enlargeQuick guide from the manual
This manual provides essential instructions for the safe installation, operation, and maintenance of the Furrion 2-in-1 Range Oven. Always read the safety warnings before use, especially regarding gas leaks. If you smell gas, immediately extinguish all flames, evacuate the vehicle, and shut off the gas supply.
Product Overview
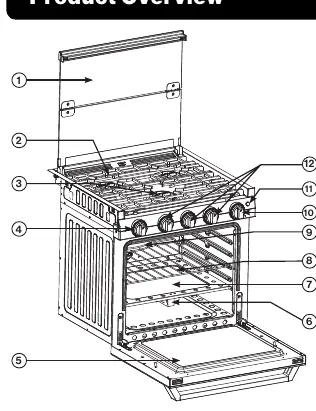
The range oven consists of a cooktop with burners, an oven, and control knobs. Key components include the glass cover, burner grates, ignition knob, oven door, and oven light.
Installation
Installation must be performed by a qualified installer in accordance with local codes and the instructions provided. Ensure the appliance is properly sealed from other air-moving devices to prevent negative or positive drafts that could affect burner performance.
- Cabinet Cutout: Ensure the cabinet is level and the bottom of the range is supported. Refer to the specific cutout dimensions provided in the manual for your 17" or 21" model.
- Gas Connection: Connect a propane supply line with a 3/8" Flare Female connection to the cooktop in the upper left rear corner. Tighten using two wrenches.
- Electrical Connection: Connect to 12V DC service only. Ensure correct polarity: Black is "+" and White is "-".
- Leak Check: Always perform a leak test using a gas leak detection liquid on all connections after installation.
Operation
Before lighting, ensure all control knobs are in the OFF position and the main gas tank valve is open.
Lighting the Cooktop
- Lift the cooktop glass cover to the full open position.
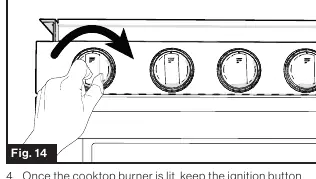
- Push and turn the burner control knob counterclockwise to the flame position.
- Keep the knob pushed in and turn the ignition knob clockwise repeatedly until the burner lights.
- Once lit, hold the ignition button for about 5 seconds until the flame is steady.
Lighting the Oven
- Open the oven door.
- Push and turn the oven control knob counterclockwise to the flame position.
- Keep the knob pushed in and turn the ignition knob clockwise repeatedly until the oven burner lights.
- Hold the ignition button for about 5 seconds until the flame is steady.
Cleaning and Maintenance
Ensure the appliance is cool before cleaning. Use warm soapy water for most surfaces. Do not use abrasive cleaners, steel wool, or acid-type cleaners on the cooktop or burner grates.
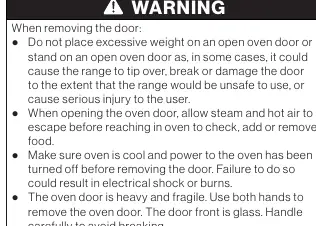
- Oven Door Removal: Open the door fully, flip the hinge levers toward you, close the door halfway, and pull it straight out of the hinge slots.
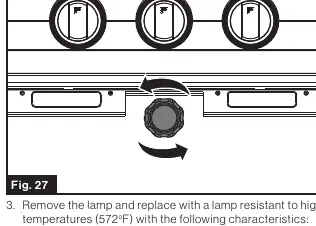
- Replacing Oven Light: Disconnect power, remove the glass cover, and replace the halogen lamp (12V, 15W, G9 type).
- Replacing Control Knob LED: Disconnect power, pull off the control knob, remove the screws holding the LED light, and replace the assembly.
Troubleshooting
If surface burners do not light, ensure the gas supply is open, burner ports are not clogged, and the knob is fully turned to the flame position. If the flame is orange, allow the burner to operate for a few minutes to clear dust; in coastal areas, this may be due to salt air.
Manufacturer information
Furrion
Practical help
Common problems
Surface burners do not light
Ensure gas supply valve is open, check for clogs in burner ports, or ensure the control knob is fully turned to the flame position.
Surface burner flame is orange
Allow the burner to operate for a few minutes to clear dust from the line. In coastal areas, this may be due to salt air.
Surface burner flame burns half way around
Dry the burner thoroughly if moisture is present, or clean clogged burner ports with a small-gauge wire.
Before use
- Ensure the main gas tank valve is open.
- Verify all control knobs are in the OFF position.
- Ensure the cooktop glass cover is fully open before lighting burners.
- Check that the area is clear of combustible materials.
- Ensure the appliance is cool before cleaning.
Show more Show less
Specs in practice
- Inlet Pressure
- 10" WC Min to 13.8" WC Max.
- Inner Volume
- 35L for 17" model, 51L for 21" model.
Images and diagrams
- Figure 12: Opening the cooktop glass cover.
- Figure 13-14: Lighting the cooktop burner.
- Figure 18-20: Lighting the oven burner.
- Figure 21-26: Oven door removal steps.
Model compatibility
- For use with LP gas only.
- For installation in recreational vehicles only (e.g., travel trailers, motor homes, tent campers).

Manual page author
David Miller
Documentation analyst