Power / Solar Panels
Installation Guide for Gallagher 20W/40W Solar Panel Kit
Comprehensive installation and setup guide for the Gallagher 20W/40W Solar Panel Kit. Includes step-by-step mounting instructions for steel and wooden posts, solar panel angle adjustment based on region, and wiring diagrams for connecting...
Quick answers from the manual
Quick answer
- This manual provides instructions for mounting the Gallagher 20W/40W Solar Panel Kit, adjusting its angle based on your region, and connecting it to an energizer and battery. p. 1, 2
Key actions
- Mounting on steel post p. 1
- Connecting to battery p. 2
Technical specifications
| Parameter | Value | Meaning | Pages |
|---|---|---|---|
| Solar Panel Angle | 45° - 55° | Optimal angle based on geographic region. | p. 2 |
Where to find it in the PDF
- Mounting Instructions (Steel) p. 1
- Mounting (Wooden), Angle Adjustment, Wiring p. 2
Table of contents
Manual images
Click an image to enlargeQuick guide from the manual
This document provides instructions for the installation and setup of the Gallagher 20W/40W Solar Panel Kit. Key tasks include mounting the panel on steel or wooden posts, adjusting the panel angle for optimal solar performance based on your region, and connecting the system to an energizer and battery. Ensure the panel is positioned to face North (Southern Hemisphere) or South (Northern Hemisphere) and is protected from animal access.
Kit contents
- 20W or 40W Solar Panel
- MPPT Solar Regulator
- Solar panel bracket
- Adapter bracket for B80/B180/B280
- 2 x spare fuses
- 4 x cable ties
- Mounting hardware (Coach screws, U-bolts, nuts, washers)
Mounting the Solar Panel
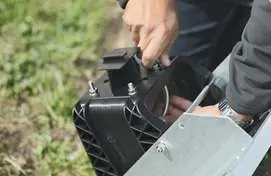
Steel posts
Suitable for steel posts up to 65mm in diameter or square steel posts up to 45mm.
- Securely drive the steel post into the ground using a post rammer.
- Fit the U-bolts to the bracket before securing the bracket to the post (do not fully tighten).
- Slot the bracket over the post and through the U-bolts.
- Slot your energizer on the back of the bracket.
- Align the bracket with the top of the post and tighten the U-bolts until secure.
Round wooden posts
Suitable for round wooden posts up to 135mm in diameter.
- Drive the post firmly into the ground.
- Slot the solar panel bracket and solar panel over the post.
- Secure tightly using 2 x coach screws.
- Slot your energizer on the back of the bracket.
Adjusting solar panel angle
To maximize solar performance, set the correct angle based on your region:

- Region 1: 45°
- Region 2: 50°
- Region 3: 55°
- Region 4: 55°
- Region 5: 55°
For equatorial regions, contact Gallagher group for recommended installations.
Connecting to the Energizer and Battery
The solar panel includes two lead sets exiting the back of the solar regulator:
- Energizer connection cable (1m): Plug connects directly into the Energizer.
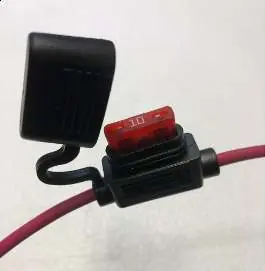
- Battery cable (3m): Connect the BLACK lead to the (-) Negative Battery Terminal and the RED lead (with the inline fuse holder) to the (+) Positive Battery Terminal.
- Insert Fuse: Open the inline fuse holder on the red lead, insert the supplied fuse, and close the cover.
Note: We recommend protecting your batteries from the environment by storing them in an insulated storage container. To protect your energizer from theft, we recommend using a padlock.
Multiple Panels and Battery Connections
If using multiple solar panels, connect the battery connection leads in parallel with the battery bank. Only one panel needs to be connected to the Energizer; leave the remaining Energizer cable coiled up and cable-tied to the back of the panel. Ensure positive and negative connections are made across the complete battery bank.
Practical help
Common problems
Solar panel not performing optimally
Ensure the panel is facing the correct direction (North in Southern Hemisphere, South in Northern Hemisphere) and the angle is set correctly for your region.
Energizer theft risk
Use a padlock to secure the energizer to the bracket.
Before use
- Verify post type and diameter (Steel up to 65mm/45mm square, Wooden up to 135mm).
- Ensure you have a post rammer for steel posts.
- Check that the fuse is inserted into the inline fuse holder on the red battery lead.
- Ensure battery connections are made in parallel for multiple battery setups.
Images and diagrams
- Figure 1 illustrates the parallel connection method for multiple solar panels and batteries, showing how to connect the battery bank correctly.
Model compatibility
- Compatible with B80, B180, and B280 energizers using the included adapter bracket.

Manual page author
Emily Carter
User documentation editor
Prepares concise manual descriptions and highlights the most useful setup, operation, and maintenance information for readers.