Home Appliances / Humidifiers & Diffusers
Installation and User Guide for Somfy Solar Panels
A comprehensive installation and user guide for Somfy 2.5W and 5.8W solar panels. Includes detailed mounting instructions for rivet and adhesive tape versions, wiring diagrams, maintenance tips, and troubleshooting for RS100 SOLAR io...
Quick answers from the manual
Quick answer
- Somfy solar panels are designed to charge 9.6V or 16.8V NiMH batteries for the RS100 SOLAR io roller shutter drive system. They must be installed outdoors by a professional. p. 2
Key actions
- Install the solar panel outdoors on the roller shutter housing. p. 3, 8, 13
- Connect the solar panel connector (C) to the drive connector (D). p. 4, 9, 14
First start
- Installation must be performed by a drive and home automation professional. p. 2, 7, 12
Problems and fixes
Roller shutter not operational
Check wiring and modify if necessary; check other components (motor, battery, control point).
p. 5, 10, 15Maintenance and reset
- Clean the surface regularly with clear water and a soft cloth. p. 4, 9, 14
Technical specifications
| Parameter | Value | Meaning | Pages |
|---|---|---|---|
| Max. power (W) | 2.5 / 5.8 | Maximum power output | p. 5, 10, 15 |
Where to find it in the PDF
- Installation (Rivets) p. 3
- Installation (Tape) p. 4
- Technical Data p. 5
Table of contents
Manual images
Click an image to enlargeQuick guide from the manual
This document provides installation and maintenance instructions for Somfy 2.5W and 5.8W solar panels (including 'TAPE' versions). These panels are designed to charge Somfy 9.6V or 16.8V NiMH batteries used in the RS100 SOLAR io roller shutter drive kit. Important: Installation must be performed by a drive and home automation professional.
Installation
The solar panel must be installed outdoors on the roller shutter housing to maximize sunlight exposure. Do not install behind glass or in shaded areas. All components of the RS100 SOLAR io kit must be installed on the same side of the roller shutter.
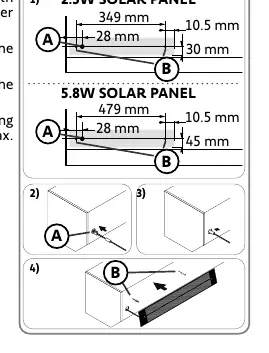
Securing with rivets
- Drill 1 hole (16 mm diameter, A) and 2 holes (5 mm diameter, B) on the front of the housing.
- Feed the solar panel wire through the 16 mm hole.
- Protect the wire from sharp edges using the provided protective foam.
- Mount the panel using aluminium pop rivets (4.8 mm diameter, max length 18.7 mm).
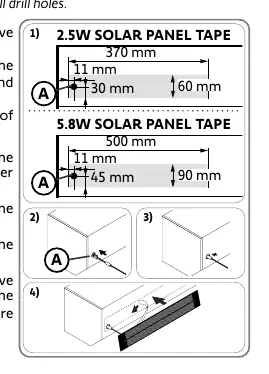
Securing with adhesive tape
Ensure the ambient temperature is between 20°C and 38°C during application. Clean the installation surface thoroughly with a degreasing agent before applying.
- Drill 1 hole (16 mm diameter, A) on the front of the housing.
- Feed the wire through the hole and protect it with foam.
- Remove the protective paper from the adhesive on the rear of the panel.
- Apply the panel to the housing with uniform pressure.
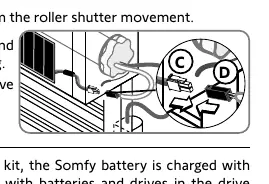
Wiring
Connect the solar panel connector (C) to the drive connector (D). It is recommended to place connectors behind the end piece and secure cables inside the roller shutter casing to prevent interference with shutter movement.
Maintenance
Keep the solar panel surface clean by washing regularly with clear water and a soft cloth. Ensure the photovoltaic cells are not obstructed by snow, leaves, or other debris. Never use abrasive materials or solvents that could scratch the panel.
Troubleshooting
If the roller shutter is not operational, check the wiring and ensure all components (motor, battery, control point) are functioning. If the battery requires frequent external charging, verify the panel's position for optimal sunlight, clean the panel, or check if the battery has reached the end of its service life.
Technical data
The panels are rated IP44 (photovoltaic cells IP67) and operate between -20°C and +70°C. The 2.5W model measures 370 x 60 x 6 mm (180g), while the 5.8W model measures 500 x 90 x 6 mm (360g).
Practical help
Common problems
Roller shutter not operational
Check wiring connections and ensure all system components (motor, battery, control point) are functional.
Battery requires frequent external charging
Ensure the panel is positioned to receive maximum natural light, clean the panel surface, or check if the battery has reached the end of its service life.
Before use
- Ensure installation is performed by a qualified professional.
- Verify the panel is installed on the same side as the roller shutter drive.
- Clean the installation surface with a degreasing agent (for TAPE versions).
- Ensure the panel is not installed behind glass or in the shade.
- Deburr all drilled holes to prevent cable damage.
Specs in practice
- Operating temperature
- Safe operating range is -20°C to +70°C.
Images and diagrams
- Drilling pattern: 16mm hole for wire (A), 5mm holes for rivets (B).
- Wiring: Connect panel connector (C) to drive connector (D).
Model compatibility
- Compatible with RS100 SOLAR io drive kits.
- Charges 9.6V and 16.8V NiMH battery sticks or naked batteries.

Manual page author
David Miller
Documentation analyst
Organizes user manual content into clear summaries, with attention to model details, product context, and everyday usability.