Plumbing / Toilets Urinals
Installation Manual for Geberit 154.336.FW.1 Ready-To-Fit Set
Quick installation guide for the Geberit 154.336.FW.1 Ready-To-Fit Set. Learn how to properly install, adjust, and secure your in-wall drain cover with step-by-step instructions.
Table of contents
Manual images
Click an image to enlargeQuick Installation Guide
This document provides the installation procedure for the Geberit 154.336.FW.1 Ready-To-Fit Set. Ensure you have the necessary tools, including a 3mm Allen key and a PH2 screwdriver, before beginning the installation.
Installation Steps
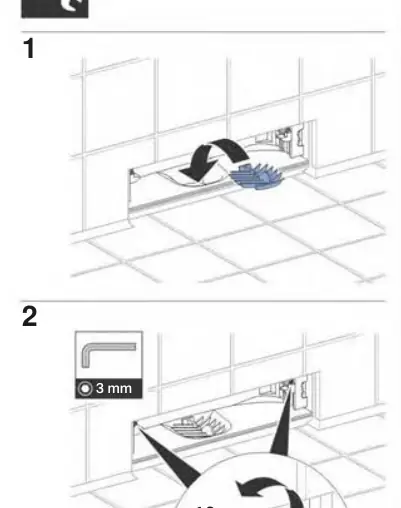
- Preparation: Remove the protective cover from the in-wall drain unit.
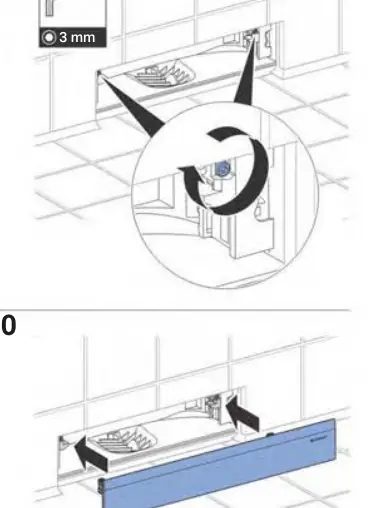
- Depth Adjustment: Use a 3mm Allen key to adjust the depth mechanism. Rotate as necessary to achieve the correct fit.
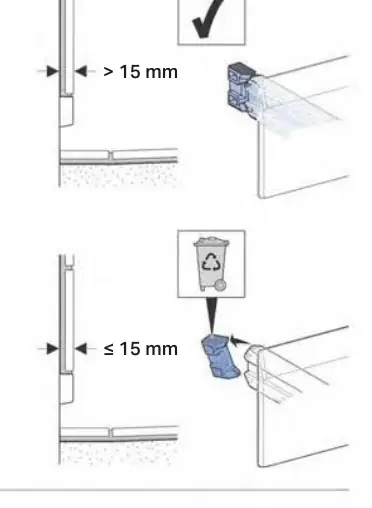
- Wall Thickness Check: Verify your wall thickness. If the distance is greater than 15mm, follow the specific installation path indicated. If it is 15mm or less, follow the alternative path.
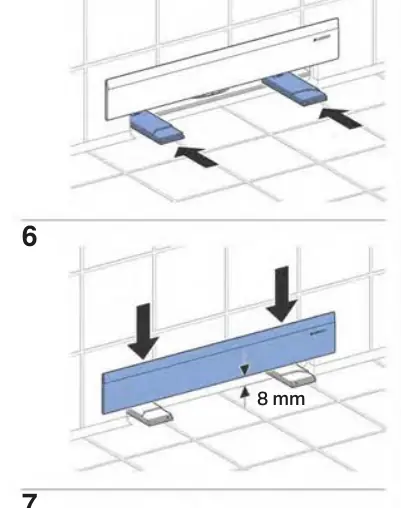
- Positioning: Place the cover into position. Ensure it is aligned correctly with the wall surface.
- Final Installation: Secure the cover into the unit.
Fine Adjustment
If the cover does not sit flush against the wall, perform a fine adjustment:
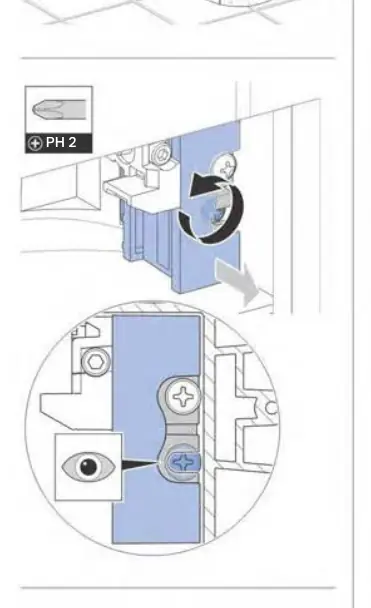
- Use a PH2 screwdriver to adjust the mounting screws.
- Rotate the screw to move the cover inward or outward until it sits perfectly flush against the wall surface.
- Verify the fit visually to ensure there are no gaps.
Contact Information
Geberit International AG, Schachenstrasse 77, CH-8645 Jona. For further support, contact [email protected] or visit www.geberit.com.
Official resources from the manual
Manufacturer information
Geberit Group
Practical help
Common problems
Cover does not sit flush against the wall
Use a PH2 screwdriver to perform fine adjustments on the mounting screws until the cover is flush.
Difficulty with depth adjustment
Ensure you are using a 3mm Allen key to rotate the adjustment mechanism.
Before use
- Verify wall thickness (check if >15mm or <=15mm)
- Ensure 3mm Allen key is available
- Ensure PH2 screwdriver is available
- Remove protective cover from the drain unit
Images and diagrams
- Steps 1-2: Initial preparation and depth adjustment using a 3mm Allen key.
- Step 3: Wall thickness verification (>15mm vs <=15mm).
- Steps 5-11: Positioning and final installation of the cover.
- Page 4: Fine-tuning the fit using a PH2 screwdriver.
Model compatibility
- Designed for specific wall thickness requirements; verify if your installation is >15mm or <=15mm.

Manual page author
Emily Carter
User documentation editor
Prepares concise manual descriptions and highlights the most useful setup, operation, and maintenance information for readers.