Electronics / Video Transmission
User Guide for Gofanco 18G HDMI 2.0 CAT Extender with Cascade - 70m
A comprehensive user guide for the Gofanco 18G HDMI 2.0 CAT Extender with Cascade. This manual covers installation, wiring diagrams, IR application, troubleshooting, and technical specifications for the HD20Ext-Cas and HD20Ext-RX system.
Quick answers from the manual
Quick answer
- The Gofanco 18G HDMI 2.0 CAT Extender extends 4K HDR HDMI signals up to 70 meters over a single CAT6 cable, supporting cascading up to 10 receivers. p. 3
Key actions
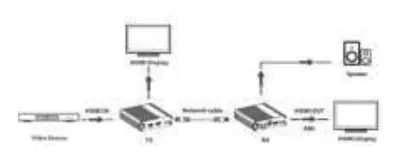
- Connect HDMI source to TX and display to RX using CAT6 cable. p. 8
First start
- Power off devices, connect cables, then power on. p. 8, 9
Problems and fixes
No video output
Check power, verify cables, try direct connection, press reset on both units.
p. 11Maintenance and reset
- Press the reset button on both TX and RX units. p. 11
Technical specifications
| Parameter | Value | Meaning | Pages |
|---|---|---|---|
| Transmission Distance | 70m (230ft) | Maximum range over CAT6 cable. | p. 12 |
| Resolution | 4K@60Hz | Maximum supported resolution. | p. 12 |
Where to find it in the PDF
- Transmitter Layout p. 5
- Receiver Layout p. 6
- Installation p. 8
- Specifications p. 12
Table of contents
Manual images
Click an image to enlargeQuick Guide
The Gofanco 18G HDMI 2.0 CAT Extender with Cascade is designed to extend UHD 4K HDR HDMI signals up to 70 meters (230ft) over a single CAT6 cable. It supports HDMI 2.0, HDCP 2.2, and can cascade up to 10 receivers (RX). The system includes bi-directional IR control and HDMI loop-out on the transmitter (TX).
Package Contents
- 1x 18G HDMI 2.0 CAT Extender with Cascade - 70m (1 Transmitter & 1 Receiver)
- 1x IR Blaster cable
- 1x IR Receiver cable
- 2x Power adapter (5VDC/2A)
- Surface mount accessories
- User's guide
Installation Requirements

- HDMI source device (e.g., computer, DVD player, gaming console)
- HDMI display device (e.g., HDTV, monitor, projector)
- UTP/STP CAT6 cable following IEEE-T568B wiring standard
- Additional RX units (part# HD20Ext-RX) if cascading is required
Product Layout
Transmitter (TX): Features a Reset button, RJ45 Out (to Receiver), Power/Signal LED, Power Jack, HDMI Out (local monitoring), HDMI In (source), IR In, and IR Out.


Receiver (RX): Features a Reset button, Audio Switch (S/PDIF or ARC), RJ45 In (from Transmitter), Power/Signal LED, Power Jack, RJ45 Out (for cascading), Optical Out, HDMI Out, IR In, and IR Out.
Hardware Installation
- Power off all devices.
- Connect the HDMI source to the Transmitter's HDMI In port.
- Optionally, connect a local display to the Transmitter's HDMI Out port.
- Connect the IR cables to the IR ports if remote control is needed.
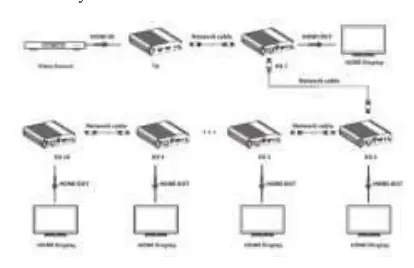
- Connect a CAT6 cable between the Transmitter's RJ45 Out and the Receiver's RJ45 In. For cascading, connect the RJ45 Out of the former RX to the RJ45 In of the next RX.
- Connect the HDMI display to the Receiver's HDMI Out port.
- Connect the power adapters to the TX and RX units and plug them into a power source.
- Power on all connected devices.
IR Application
Control HDMI source from RX location: Connect the IR Blaster cable to the TX's IR Out port (facing the source's IR window) and the IR Receiver cable to the RX's IR In port.
Control display device from TX location: Connect the IR Blaster cable to the RX's IR Out port (facing the display's IR window) and the IR Receiver cable to the TX's IR In port.
Troubleshooting
If there is no video output, ensure the source is powered on, check all HDMI and CAT cable connections, try using different cables, and press the reset button on both TX and RX units. If video quality is poor, press the reset button on both units and verify cable integrity.
Specifications
The system supports resolutions up to 4K@60Hz YUV 4:4:4, 18Gbps bandwidth, and Dolby Digital 5.1Ch audio. Operating temperature is -20 to 60 C. Power consumption is 4W for TX and less than 4W for RX.
Practical help
Common problems
No video output
Check if the source is powered on, verify HDMI and CAT cable connections, try different cables, and press the reset button on both TX and RX units.
Poor video quality
Press the reset button on both TX and RX units and ensure all cables are securely connected.
Before use
- Ensure HDMI source device is powered on
- Verify HDMI display device is ready
- Use a CAT6 cable wired to IEEE-T568B standard
- Use the included 5VDC/2A power adapters
- Ensure environment is safe and well-ventilated
Specs in practice
- Transmission Distance
- Up to 70 meters (230ft) over a single CAT6 cable.
Images and diagrams
- 1-to-1 Connection: Direct link between TX and RX units.
- 1-to-Many Connection: Cascading multiple RX units using RJ45 Out ports.
Model compatibility
- Requires CAT6/CAT6A/CAT7 cable.
- HDMI 2.0 and HDCP 2.2 compliant.
- Supports cascading up to 10 receivers.

Manual page author
Michael Turner
Technical manual editor
Reviews PDF manuals for structure, safety notes, and practical product details so readers can find the right information quickly.