Electronics / Video Transmission
User Guide for Gofanco 1x4 1080p HDMI Wireless Extender
Quick guide for the Gofanco 1x4 1080p HDMI Wireless Extender. Learn how to install, pair receivers, troubleshoot signal issues, and optimize wireless transmission range.
Quick answers from the manual
Quick answer
- The Gofanco 1x4 1080p HDMI Wireless Extender transmits HDMI signals wirelessly up to 200m. It supports 1080p@60Hz and up to 4 receivers. p. 3
Key actions
- Pairing the TX and RX p. 6
First start
- Installation steps p. 7
Problems and fixes
Display is not clear or stable
Adjust position, check cable lengths (under 2m), ensure line-of-sight, remove obstacles.
p. 9Maintenance and reset
- Reset to factory settings p. 5, 6
Technical specifications
| Parameter | Value | Meaning | Pages |
|---|---|---|---|
| Max Resolution | 1920x1080p @ 60Hz | Maximum supported resolution | p. 10 |
| Max Distance | 200m | Maximum wireless transmission distance | p. 10 |
Where to find it in the PDF
- Product Layout (TX) p. 5
- Product Layout (RX) p. 6
Table of contents
Manual images
Click an image to enlargeQuick Guide
The Gofanco 1x4 1080p HDMI Wireless Extender allows for wireless transmission of HDMI signals from a source device to a display device. It supports a maximum range of 200 meters (line-of-sight) and resolutions up to 1080p @ 60Hz. The system supports up to four receivers (RX), though range decreases with each added receiver.
Safety Notices
- Do not expose the unit to rain, heavy moisture, or liquid.
- Keep the product in a well-ventilated location to prevent overheating.
- Use only the included DC12V power adapters.
- Shut off power before installation.
- Do not plug/unplug HDMI or IR cables while the device is in use.
Package Contents
- 1x4 1080p HDMI Wireless Extender (1 TX & 1 RX)
- IR Emitter cable
- IR Receiver cable
- Antennas (4pcs)
- Power adapters (2pcs)
- User's guide
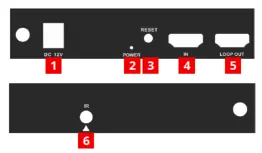
Product Layout
Transmitter (TX): Features a Power Jack, Power LED, Reset Button, HDMI In, HDMI Loopout, and IR Out port.
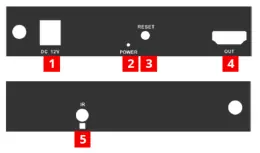
Receiver (RX): Features a Power Jack, Power LED, Reset Button, HDMI Out, and IR In port.
Installation
- Power off all devices.
- Install the included antennas to the TX and RX units.
- Connect the HDMI source device to the Transmitter's HDMI In port.
- Optional: Connect an HDMI display to the Transmitter's HDMI Loopout port for local monitoring.
- Optional: Connect the IR Emitter cable to the Transmitter's IR Out port and position it towards the source device's IR window.
- Connect the HDMI display to the Receiver's HDMI Out port.
- Optional: Connect the IR Receiver cable to the Receiver's IR In port.
- Connect the power adapters to the TX and RX units and plug them into power outlets.
- Power on the source device and display.
Pairing the TX and RX
The units are paired at the factory. If you use the Reset function or add new receivers, re-pairing is required:
- Power on the TX and RX and wait 30 seconds.
- Connect an HDMI cable between the TX's HDMI In port and RX's HDMI Out port and wait 10 seconds.
- Disconnect the HDMI cable.
- Power cycle the TX and RX to complete the pairing.
Application Diagrams
The system supports one-to-one and one-to-many connections. Note that wireless transmission range is reduced with each added receiver:
- 1 TX to 1 RX: up to 200m
- 1 TX to 2 RXs: up to 120m
- 1 TX to 3 RXs: up to 60m
- 1 TX to 4 RXs: up to 30m
Troubleshooting
If the display is not clear or stable, ensure the units are within the required signal range, check that HDMI cables are under 2m, ensure line-of-sight, and remove obstacles. If IR control is not working, verify cable connections and ensure the IR eye is properly aligned with the source device's IR window.
Specifications
- Supported Protocol: HDMI 1.3, HDCP 1.3
- Max Resolution: 1920x1080p @ 60Hz
- Wireless Frequency: 5GHz
- Max Distance: 200m (line-of-sight)
- Latency: Less than 200ms
Practical help
Common problems
Display is not clear or stable
Adjust the position of units to ensure line-of-sight, check that HDMI cables are under 2m, remove obstacles, and decrease distance between units.
IR control is not working
Check that IR cables are connected properly, ensure the IR eye is pointed at the source device's IR window, and verify the remote operates within 20KHz-60KHz.
Before use
- Power off all devices before installation.
- Ensure you have HDMI cables (not included).
- Install antennas on both TX and RX units.
- Verify the environment is clear of obstacles for optimal range.
- Use only the included DC12V power adapters.
Specs in practice
- Latency < 200ms
- Not recommended for real-time applications like gaming.
Images and diagrams
- Transmitter (TX) connects to the HDMI source.
- Receiver (RX) connects to the HDMI display.
- IR cables allow remote control of the source device from the display location.
Model compatibility
- Supports up to 4 receivers (RX).
- Additional receivers (part# HDwireless1x4-RX) are sold separately.
- Wireless range decreases with each added receiver.

Manual page author
Emily Carter
User documentation editor
Prepares concise manual descriptions and highlights the most useful setup, operation, and maintenance information for readers.