Electronics / Video Transmission
User Manual for Gofanco Full HD HDMI Over IP Extender 150m
Quick setup guide and user manual for the Gofanco Full HD HDMI Over IP Extender (150m). Learn how to install, connect, and troubleshoot your video transmission system.
Table of contents
Manual images
Click an image to enlargeQuick guide from the manual
The Gofanco Full HD HDMI Over IP Extender (150m) allows you to extend 1080p HDMI signals over a single CAT5e/6/7 cable up to 150 meters. It supports both direct 1-to-1 connections and 1-to-many configurations over a Gigabit Ethernet network. The system includes IR extension capabilities to control media players from remote locations.
Package Contents
- Full HD HDMI Over IP Extender (TX & RX units)
- IR Blaster and IR Receiver cables
- Power adapters
- User Manual
Product Layout
Transmitter (TX) Layout:
- DC/5V: Power input.
- Power LED: Indicates power status.
- HDMI IN: Connects to the HDMI source.
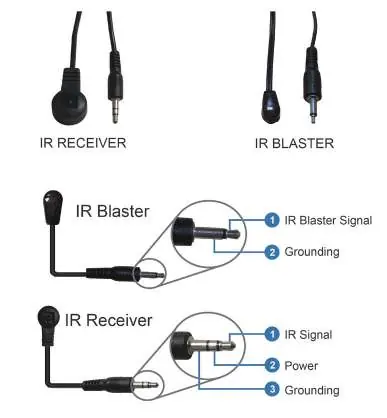
- IR-TX: Connects to the IR Blaster cable.
- Audio: Stereo audio output.
- CAT5e/6: RJ45 port for network cable connection to the Receiver.
- Reset: Press for 5 seconds to reset the video signal.
Receiver (RX) Layout:
- IR-RX: Connects to the IR Receiver cable.
- Audio: Stereo audio output.
- CAT5e/6: RJ45 port for network cable connection to the Transmitter.
- DC/5V: Power input.
- Power LED: Indicates power status.
- HDMI OUT: Connects to the HDMI display.
Hardware Installation
- Power off all devices, including the HDMI source and display.
- Connect the HDMI source to the Transmitter's HDMI IN port using an HDMI cable.
- Optional: Connect the IR Blaster cable to the Transmitter's IR-TX port and position the eye towards the source device's IR sensor.
- Connect a CAT5e/6 cable between the Transmitter's CAT5e/6 output and the Receiver's CAT5e/6 input.
- Connect the HDMI display to the Receiver's HDMI OUT port using an HDMI cable.
- Optional: Connect the IR Receiver cable to the Receiver's IR-RX port.
- Connect the included power adapters to both the Transmitter and Receiver, then plug them into a power source.
- Power on all connected devices.
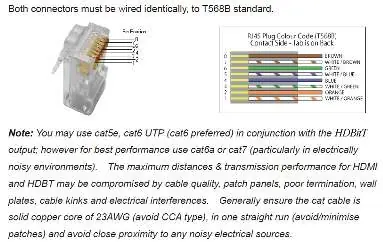
CAT Cable Wiring
For optimal performance and compatibility, both ends of the CAT5e/6 cable must be wired identically using the T568B wiring standard. It is recommended to use solid copper core CAT6 cable (23AWG) for best results, avoiding CCA types and minimizing patches.
Application Diagrams
1-to-1 Connection: Direct connection between the Transmitter and Receiver or through a Gigabit LAN via a dedicated switch.
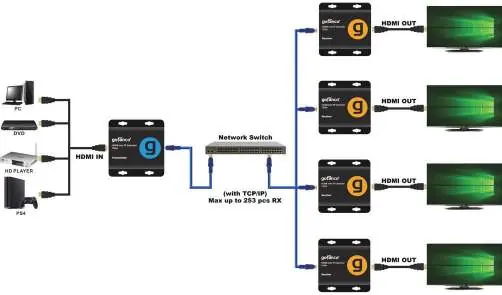
1-to-Many Connection: Requires a dedicated Gigabit switch. If using an existing network, create a VLAN to segregate the Transmitter and Receivers from other network traffic. A smart switch is required for many-to-many setups.
IR Application
To control an HDMI source device from the remote location, connect the IR Blaster cable to the Transmitter's IR-TX port and the IR Receiver cable to the Receiver's IR-RX port. Ensure the IR Blaster eye is facing the source device's IR sensor.
Troubleshooting
- Display shows 'Please check the TX and RX connection': Verify power adapters are connected and powered on. Ensure the network cable is firmly connected between units.
- Display shows 'X' on Transmitter: Ensure the HDMI source is connected and powered on. Try using a different HDMI cable.
- Display shows 'X' between Transmitter & Receiver: Check that the network cable is securely connected.
- General issues: Ensure HDMI cables are under 5m and network cables are under 150m. Press the reset button on the Transmitter for 5 seconds.
Specifications
- HDMI Signal: HDMI 1.3 and HDCP 1.2 compatible.
- Resolution: Up to 1080p@60Hz.
- Transmission Distance: Up to 150m (492ft) at 1080p@60Hz.
- Operating Temperature: 5° to 131° F (-15° to 55° C).
- Power Consumption: 4W per unit (TX/RX).
Practical help
Common problems
Display shows 'Please check the TX and RX connection'
Ensure power adapters are connected and powered on; verify the network cable is firmly connected between the TX and RX units.
Display shows 'X' on Transmitter
Ensure the HDMI source device is connected and powered on; try using a different HDMI cable.
Display shows 'X' between Transmitter & Receiver
Check that the network cable is tightly connected.
Extender not working properly
Verify HDMI cable length is under 5m and network cable is under 150m; press the reset button on the Transmitter for 5 seconds.
Before use
- Power off all devices before installation.
- Ensure you have a Gigabit Ethernet switch for 1-to-many setups.
- Use T568B wiring standard for CAT5e/6 cables.
- Verify HDMI cables are under 5m.
- Ensure power adapters are connected to a reliable power source.
Specs in practice
- Transmission Distance
- Up to 150m (492ft) at 1080p@60Hz.
- Operating Temperature
- 5° to 131° F (-15° to 55° C).
- Power Consumption
- 4W for both TX and RX units.
Images and diagrams
- 1-to-1 Connection: Direct connection between Transmitter and Receiver or via a Gigabit switch.
- 1-to-Many Connection: Requires a dedicated Gigabit switch; use VLANs to segregate traffic.
- IR Pin Definition: Shows wiring for IR Blaster and IR Receiver cables.
Model compatibility
- Compatible with CAT5e/6/7 cables (CAT6 preferred).
- Supports HDMI 1.3 and HDCP 1.2.

Manual page author
David Miller
Documentation analyst
Organizes user manual content into clear summaries, with attention to model details, product context, and everyday usability.