Electronics / Video Transmission
User Manual for Zenty 1080P Wireless Extender
Quick guide for the Zenty 1080P Wireless Extender. Learn how to connect, pair transmitters, use hardware and software casting, and troubleshoot your device.
Table of contents
Manual images
Click an image to enlargeQuick Guide
The Zenty 1080P wireless extended system allows you to transmit audiovisual signals wirelessly from HDMI source devices (such as laptops, gaming consoles, and set-top boxes) to a display. It supports plug-and-play functionality without the need for drivers or additional software. The system supports 1080p resolution and can be used with both Zenty transmitters and native screen casting protocols like Airplay, Samsung Smart View, and Miracast.
Connection Diagram
The receiver unit features the following ports and controls:
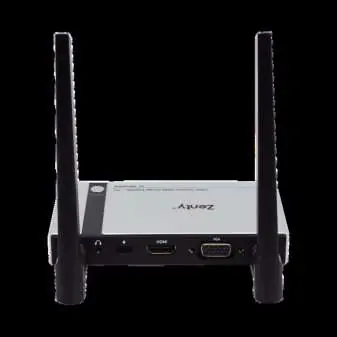
- On/Off Switch: Power control for the receiver.
- 3.5mm Jack: Audio output.
- USB-C Power Supply: Power input (5V 2A).
- HDMI Out: Video output to the display.
- VGA Out: Alternative video output to the display.
- Pair/Reset Pinhole: Located on the underside of the receiver.
Hardware Casting
To use the hardware transmitter:
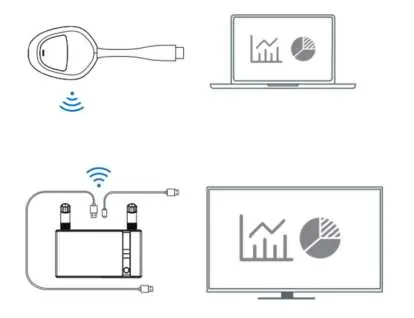
- Connect the receiver's HDMI or VGA port to your display device.
- Connect the receiver to a 5V 2A power adapter via the USB-C port and turn it on.
- Set the display input source to the corresponding port until the boot screen appears.
- Connect the transmitter to your HDMI source device.
- Wait 10 seconds after the indicator light flashes quickly for casting to complete.
Note: If the HDMI source device does not provide sufficient power, connect the transmitter to an external USB-C power adapter.
Pairing Instructions
To pair a transmitter with the receiver:
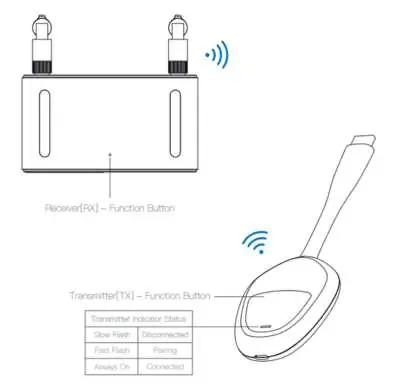
- Press and hold the receiver function button for 3 seconds until the prompt appears on the screen.
- Press and hold the transmitter function button for 3 seconds. The indicator will flash to signify pairing has begun.
- When the indicator light becomes solid, pairing is successful.
One receiver can pair with up to 8 transmitters.
Function Settings
You can configure the receiver via its web interface:
- Search for the receiver in your device's Wireless Network Settings (SSID: RX-XXXX).
- Use the default password: 12345678.
- Open a web browser and enter 192.168.203.1.
- The web GUI allows you to manage network settings, resolution, firmware upgrades, and device restarts.
Software Casting
When using the receiver without a transmitter, you can use native casting protocols:
- Apple iOS: Open Control Center, tap Airplay, and select the "RX-XXXX" device.
- Android: Use the screen casting function on your device (e.g., Smart View on Samsung, Wireless Display on Lenovo) and connect to the "RX-XXXX" device.
Troubleshooting
- Factory Reset: If the product fails, press and hold the receiver function button for 10 seconds until the display goes dark and the unit restarts.
- Privacy Mode: Tap the transmitter function button to disconnect or reconnect.
- HD Interface: If your source device does not have an HD interface, use an appropriate converter.
Maintenance
Clean the unit with a soft, dry cloth. Do not use alcohol, paint thinner, or benzine.
Practical help
Common problems
Device fails to work or behaves unexpectedly
Press and hold the receiver function button for 10 seconds to restore factory settings.
Transmitter not connecting
Ensure the transmitter is paired. Press and hold the transmitter function button for 3 seconds to enter pairing mode.
Insufficient power from source device
If the HDMI source device cannot power the transmitter, connect the transmitter to a USB-C power adapter.
Before use
- Ensure the receiver is connected to a display via HDMI or VGA.
- Connect the receiver to a 5V 2A power adapter.
- Set the display input source to the correct HDMI/VGA port.
- Ensure the transmitter is connected to the HDMI source device.
Images and diagrams
- Receiver ports include 3.5mm jack, USB-C power, HDMI out, and VGA out.
- Transmitters feature a function button and indicator light.
Model compatibility
- Supports Apple Airplay, Samsung Smart View, Windows Screen Mirror, and Miracast.
- One receiver can pair with up to 8 transmitters.

Manual page author
Michael Turner
Technical manual editor
Reviews PDF manuals for structure, safety notes, and practical product details so readers can find the right information quickly.