Lighting / Fixtures
Installation Guide for Golden Lighting 0890-3P 3-Light Pendant
Quick installation guide for the Golden Lighting 0890-3P 3-Light Taper Candle Pendant. Includes wiring diagrams, assembly steps, and placement recommendations.
Table of contents
Manual images
Click an image to enlargeQuick guide from the manual
This document provides installation instructions for the Golden Lighting 0890-3P pendant light. Key placement recommendations include:
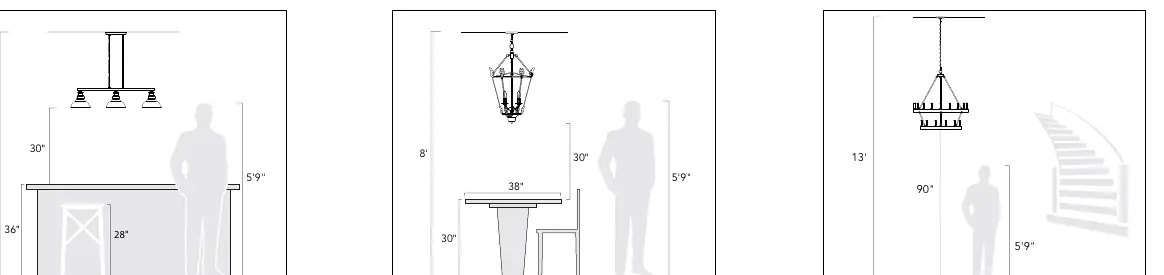
- Kitchen Island: Center the fixture over the island. Hang at least 30 inches above the countertop.
- Dining Room Table: Hang at least 30 inches above the table. Use a fixture that is 12 inches narrower than the table width.
- Open Areas: The bottom of the fixture should hang at least 7.5 feet from the floor.
Preparation for installation
Before starting, ensure the power is shut off at the circuit breaker. Remove the old fixture and mounting strap. Ensure you have all parts from the yellow bag. Installation should be performed by an accredited professional.
Assembly instructions
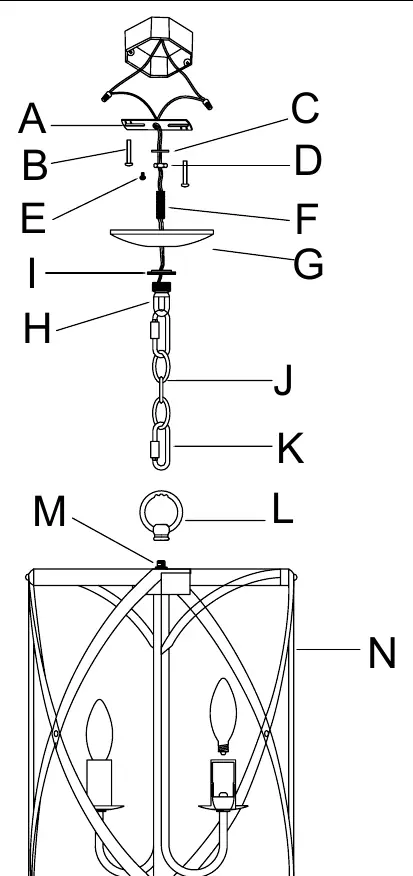
- Mounting Strap: Attach the mounting strap (A) to the junction box using screws (B). Adjust the nipple (F) and canopy loop (H) to the desired height.
- Fixture Assembly: Connect the top loop (L) to the post (M) of the fixture body (N). Pull wires through the loop until taut.
- Chain Adjustment: Determine the correct number of chain links needed. Use pliers to open and remove excess chain. Attach chain connectors (K) to the chain (J) and connect to the top loop (L) and canopy loop (H).
- Wiring: Feed the fixture wires up through the chain.
Connecting the wires
Refer to the wiring diagram to connect the fixture wires to the house supply wires:
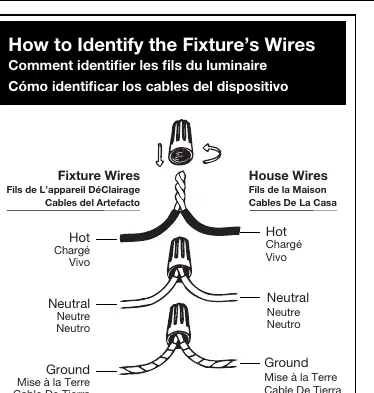
- Hot: Smooth, black, or transparent with black inner thread.
- Neutral: Ribbed, white, or transparent with white inner thread.
- Ground: Copper, bare metal, green, or transparent with green inner thread.
Twist wire pairs together and secure with a wire connector. If no house ground wire exists, wrap the fixture ground wire around the ground screw (E) on the mounting bracket.
Finishing the installation
Push the canopy (G) up to the ceiling and secure it by threading the canopy loop collar (I) onto the canopy loop (H). Install the specified light bulbs (not provided), ensuring you do not exceed the maximum wattage. Turn on the power to test the fixture.
Manufacturer information
Golden Lighting
Practical help
Common problems
Fixture not hanging at the correct height
Adjust the height of the nipple (F) and canopy loop (H) on the mounting strap before final installation.
Difficulty identifying wires
Use the texture guide: Hot is smooth/black, Neutral is ribbed/white, Ground is copper/green/bare metal.
Before use
- Shut off power at the circuit breaker.
- Verify all parts (A-N) are present in the yellow bag.
- Ensure an accredited professional is performing the installation.
- Check that the chosen location allows for proper clearance (e.g., 30 inches above tables/counters).
- Confirm you have the correct light bulbs (do not exceed maximum wattage).
Specs in practice
- Neutral Wire
- Ribbed, white, or transparent with white inner thread.
Images and diagrams
- The parts diagram (A-N) identifies the mounting strap, canopy, chain, and fixture body components.
- The wiring diagram illustrates the correct connection of fixture wires to house supply wires.
Model compatibility
- Use only specified bulbs.
- Do not exceed the maximum recommended wattage.

Manual page author
David Miller
Documentation analyst
Organizes user manual content into clear summaries, with attention to model details, product context, and everyday usability.