Lighting / Fixtures
Assembly Instructions for Golden Lighting 0865-A1W Wall Sconce
Quick guide for the Golden Lighting 0865-A1W wall sconce. Includes installation steps for both plug-in and hardwired configurations, wiring identification, and safety guidelines.
Table of contents
Manual images
Click an image to enlargeQuick guide from the manual
The Golden Lighting 0865-A1W wall sconce offers two distinct installation methods: a plug-in installation for wall mounting or a hardwired installation for connection to an existing junction box. Please review the specific diagram corresponding to your chosen installation method before beginning.
Safety Information
- All installation work should be performed by an accredited professional.
- Always shut off the power supply at the fuse or circuit breaker before starting any work.
- Use only the specified bulbs and do not exceed the maximum wattage.
Installation Method 1: Plug-in
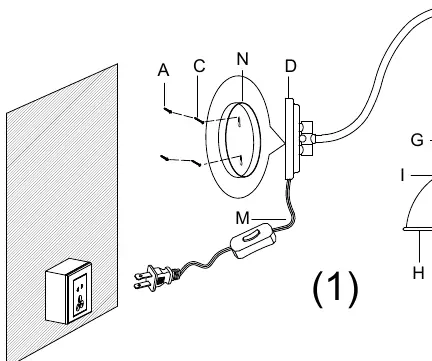
- Ensure the backplate (D) is horizontal and perpendicular to the wall.
- Measure the keyhole distance on the backplate and mark the wall.
- Drill holes and insert plastic screw anchors (A) until flush with the wall.
- Insert mounting screws (C) into the anchors, leaving 2-3mm of threads exposed.
- Hang the mounting plate (N) behind the backplate (D) onto the screws.
- Slide the shade (H) over the socket (G) and secure with the socket ring (I).
- Install the bulb and plug the cord into the nearest outlet.
- Use the switch on the cord (L) to operate the light.
Installation Method 2: Hardwired
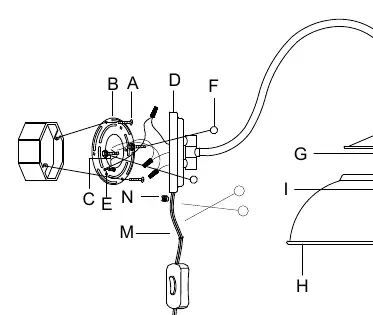
- Remove the mounting plate (N) from the backplate (D) and install it onto the mounting strap (B).
- Secure the mounting strap (B) to the junction box using mounting screws (A).
- Trim the plug from the cord (M), leaving 8-10 inches of wire.
- Pull the cord through the hole in the bottom of the backplate (D) and plug the hole with the stopper (N).
- Connect the fixture wires to the house supply wires (Hot to Hot, Neutral to Neutral, Ground to Ground) using wire connectors.
- Secure the backplate (D) to the mounting strap (B) using decorative nuts (F).
- Slide the shade (H) over the socket (G) and secure with the socket ring (I).
- Install the bulb and restore power.
Wiring Identification
Properly identify your wires before making connections:

- Hot Wire: Smooth, black, or transparent with black inner thread.
- Neutral Wire: Ribbed, white, or transparent with white inner thread.
- Ground Wire: Copper, bare metal, green, or transparent with green inner thread.
General Lighting Tips
For the best lighting effect, consider layering your lighting to combine task and ambient light. Using dimmers allows you to control the light output level. For more advice, visit www.GoldenLighting.com.
Official resources from the manual
Manufacturer information
Golden Lighting
Practical help
Common problems
Fixture does not turn on
Ensure the bulb is installed correctly, the switch on the cord is in the 'on' position, and the power supply at the circuit breaker is active.
Wiring confusion during hardwire installation
Follow the wire identification guide: Hot (smooth/black), Neutral (ribbed/white), and Ground (copper/green/bare). Ensure all wire twists are in the same direction.
Before use
- Shut off power at the circuit breaker.
- Verify the wall surface is suitable for mounting.
- Ensure you have an accredited professional for installation.
- Check that you have all parts from the yellow bag.
- Determine if you are using the plug-in or hardwired installation method.
Specs in practice
- Neutral Wire
- Completes the circuit; identified by ribbed texture, white color, or transparent wire with white inner thread.
Images and diagrams
- Diagram 1: Illustrates the plug-in installation process using the cord and wall anchors.
- Diagram 2: Illustrates the hardwired installation process connecting directly to a junction box.
Model compatibility
- Requires professional installation.
- Compatible with dimmers for adjustable light output.
- Do not exceed the maximum wattage specified for the bulb.

Manual page author
Emily Carter
User documentation editor
Prepares concise manual descriptions and highlights the most useful setup, operation, and maintenance information for readers.